
A few months ago, if you had told me I’d be obsessing over brown manicures, I would have laughed. I was a loyal light pink girl—neutral, timeless, and safe. But then, while flipping through Marie Claire, I spotted Hailey Bieber’s glossy brown nails from the Cinnamon Roll Peptide Lip Treatment launch. Something about that deep chocolate shade, rich with warm hues and a high-shine finish, felt fashion-forward yet natural. That’s when I knew—I had to try it.
I walked into my favourite salon, ready for a change. My nail artist, inspired by Instagram’s nail trends, suggested a rich, pigment-rich shade—Orly’s Don’t Be Suspicious. As she applied the first coat, I was mesmerized.
It was cosy vibes in a bottle, a curated trend blending elegance with bold expression. The salon-favorite shade made my nails look effortlessly chic, polished, and stylish.
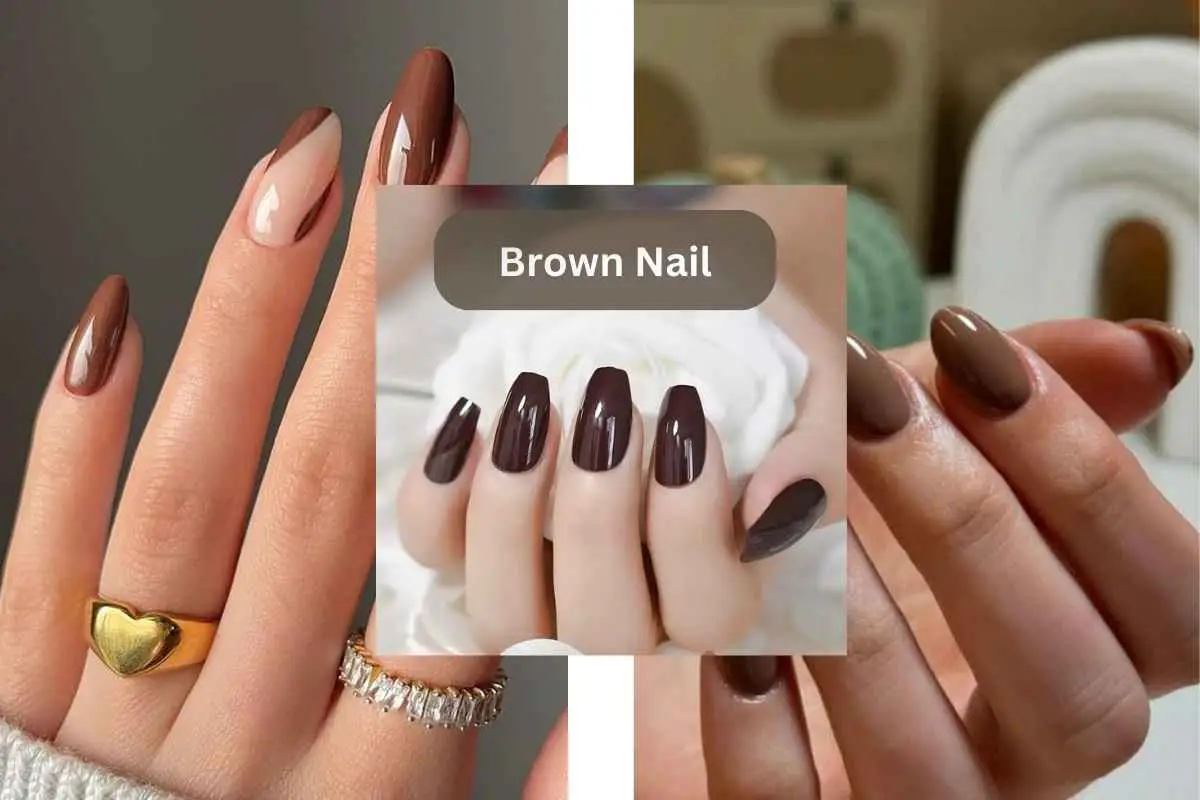
Brown Nails Are Everywhere
I’m not alone in this obsession. Jennifer Aniston, Selena Gomez, and Blake Lively have all been seen sporting earthy tones, while Sabrina Carpenter’s Espresso lyrics made mocha hues even more iconic. With Pantone naming Mocha Mousse the signature shade of 2025, the brown manicure is no longer just a seasonal trend—it’s a timeless staple.
Even celebrity nail artists Mazz Hanna and Hang Nguyen rave about brown nails, calling them the ultimate neutral. Whether you love glossy effects, tortoiseshell tips, or a chrome finish, there’s a shade for every skin tone. And if you’re into muted tones, a matte brown manicure can add an elegant, autumn-inspired touch to your look.
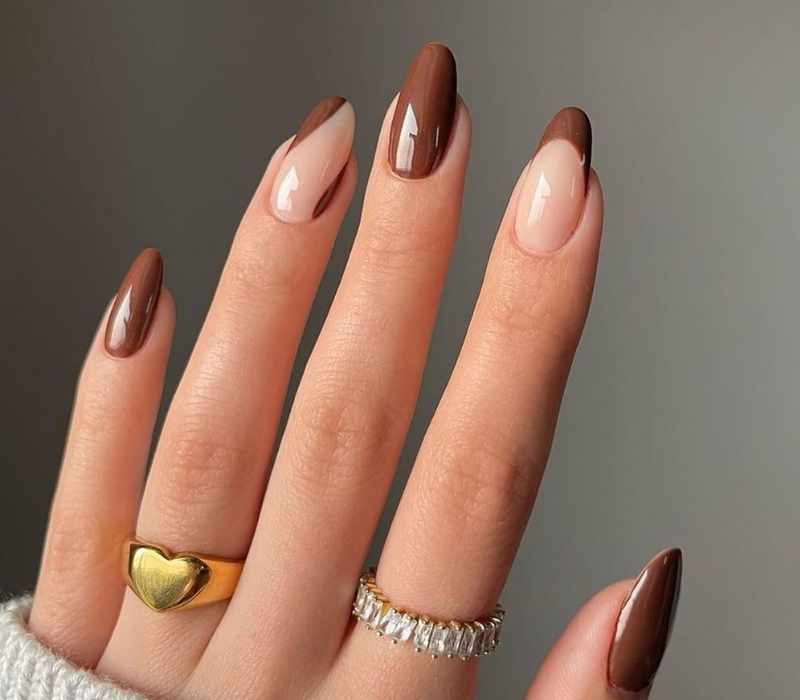
Glossy Almond Perfection
A sleek, simple look never goes out of style, and almond-shaped nails are proof. With a glossy finish, these nails bring the richness of chocolate and brown tones into a perfect autumn aesthetic.
Paired with a cosy sweater, yellow gold jewellery, and the warm spirit of fall, this manicure is pure nirvana for seasonal beauty lovers.
How to Achieve This Look
1️⃣ Prep and Prime
Start with clean nails. File, shape, and apply a base coat to protect your natural nails.
2️⃣ Pick Your Brown
Choose your favorite finish—mocha, espresso, or even a muted chocolate brown. Apply two thin coats for full coverage.
3️⃣ Finish It Off
Seal the color with either a glossy top coat for shine or a matte top coat for a more subtle, soft-touch effect.
Pro tip: Use a tinted brown base if you’re going for designs like tortoiseshell—it’ll save layers and drying time.

Bittersweet Dark Elegance
For those who love depth and intensity, a long, coffin-shaped style in dark tones brings a bittersweet yet rich appeal. The extra-long coffin tips elevate the look, making it a bold statement. Whether it’s a variation of deep browns or cooler undertones, this style is all about refined drama.
Timeless Chocolate Shades
Luxury meets longevity with Les Mains Hermès Nail Enamel in the shade 95 Brun Bistre. If you prefer a longer-lasting finish, Gelcare UV Gel Nail Polish in Espresso is an ideal match. These cooler tones offer sophistication with a high-end appeal.
How to Achieve This Look
1️⃣ Pick Your Shade
Go for a high-quality polish like Les Mains Hermès 95 Brun Bistre for a luxurious touch, or Gelcare UV Gel in Espresso for a long-lasting, gel-like finish.
2️⃣ Prep Like a Pro
Start with clean, filed nails and apply a nourishing base coat. This helps the color adhere better and keeps your nails healthy.
3️⃣ Polish & Perfect
Apply two thin coats of your chosen chocolate shade. Let each layer dry fully before adding the next for a smooth, even finish.
4️⃣ Seal the Deal
Use a glossy or matte top coat depending on your vibe—gloss for shine, matte for a soft, velvety effect.
Pro tip: Chocolate tones pair beautifully with gold jewelry—wearing a few rings can enhance the richness of the manicure instantly.
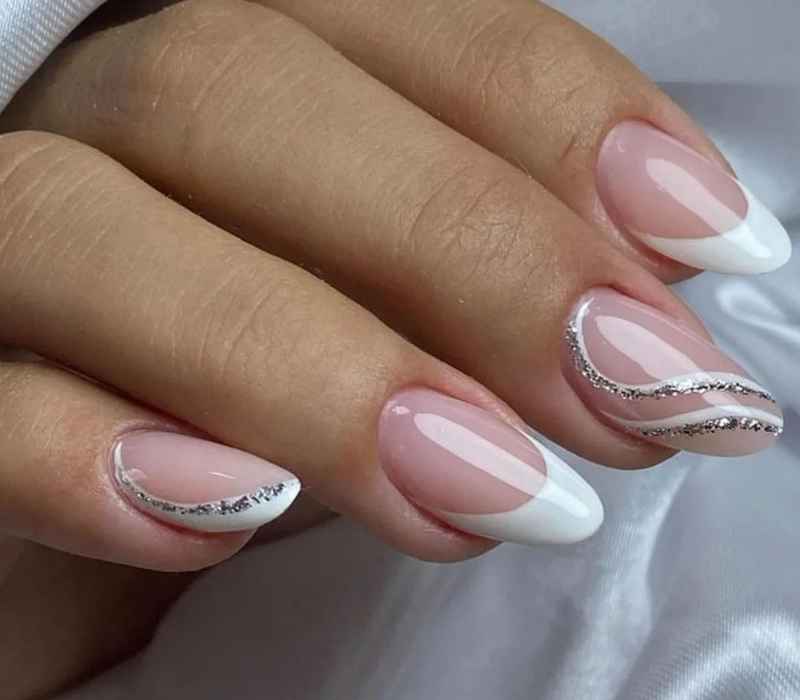
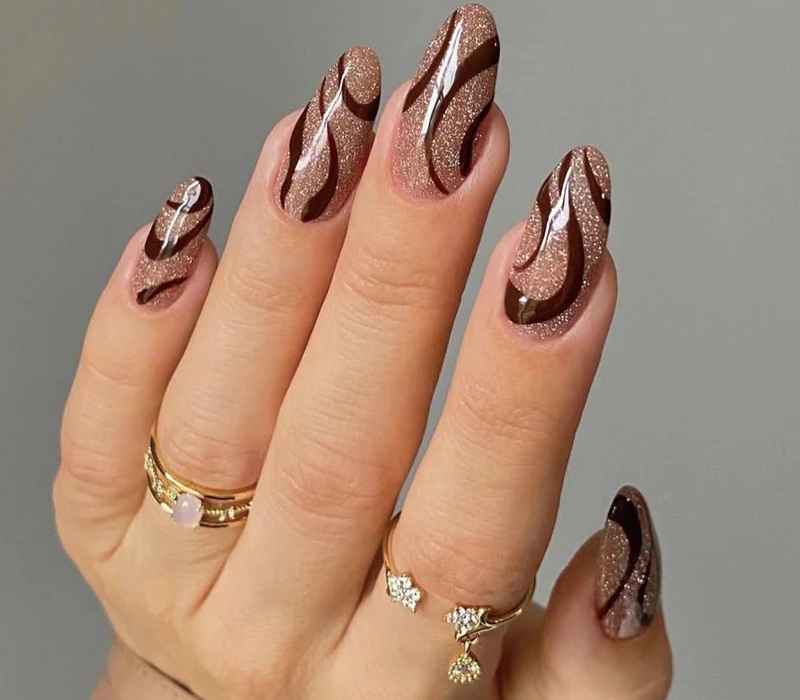
Tortoiseshell Swirl Magic
The beauty of warm, glowing tones comes alive with a tortoiseshell and swirl design. Crafted by expert manicurist Dayanna I. Sapiens, this nail design combines white and brown elements for a stunning contrast.
How to Achieve This Look
1️⃣ Start with a Neutral Base
Apply a nude or soft beige polish to set the stage for the design.
2️⃣ Create the Tortoiseshell Effect
Use a mix of amber, dark brown, and honey polishes. Dab the colors in small patches, blending them slightly with a nail brush or sponge for that marbled effect.
3️⃣ Add the White Swirls
Once the base is dry, use a thin nail art brush to swirl white gel polish over a few nails for contrast and movement.
4️⃣ Top it Off
Seal with a glossy top coat to enhance depth and shine.
Pro tip: For more control with the swirl lines, use a detail nail art pen or dotting tool instead of a brush—especially if you’re a beginner.
Deep & Sensual Clove Tones
For a bold yet sophisticated appeal, clove offers a deep, subtle glow. Its purple and burgundy undertones, combined with a soft shimmer, create an eye-catching, sensual finish.
A truly year-round shade, it blends beautifully with seasonal fashion, making it a favourite for those who embrace colour to their heart’s content.
How to Achieve This Look
1️⃣ Prep Your Nails
Clean, file, and buff your nails to create a smooth base. Apply a nourishing base coat to prevent staining.
2️⃣ Apply Clove Polish
Choose a clove-inspired polish—look for shades with purple, wine, or burgundy tones and a slight shimmer. Apply 2 thin coats for an even, rich finish.
3️⃣ Seal the Color
Lock in the look with a glossy or satin top coat to enhance the shimmer and extend wear.
Pro tip: Use a fine glitter top coat on just one or two nails for a subtle accent that adds depth without overpowering the look.
Metallic Brown Milk Chocolate Nails
Long, square-shaped nails are perfect for a metallic look, and this brown milk chocolate shade brings a sparkly, bold effect. You can try a DIY approach at home using Emily Heather Nail Artist Polish in the Liquid Assets shade.
To make the colour truly show its glory, it’s best to apply it on longer nails. If Liquid Assets is sold out, you can select an alternative like Cirque Colors Lyra, which is also on sale.
How to Achieve This Look
1️⃣ Prep & Shape
Start by filing nails into a square shape and buff the surface smooth. Apply a protective base coat to prevent staining.
2️⃣ Choose the Right Shade
Use a metallic polish like Emily Heather Nail Artist Polish in Liquid Assets. If it’s unavailable, Cirque Colors Lyra is a great backup with similar shimmer.
3️⃣ Polish It Up
Apply two thin coats for full coverage, allowing each to dry before applying the next. Follow with a high-gloss top coat for that mirror-like finish.
Pro tip: Metallic shades can highlight flaws—make sure your nail surface is smooth and use a ridge-filling base coat for best results.
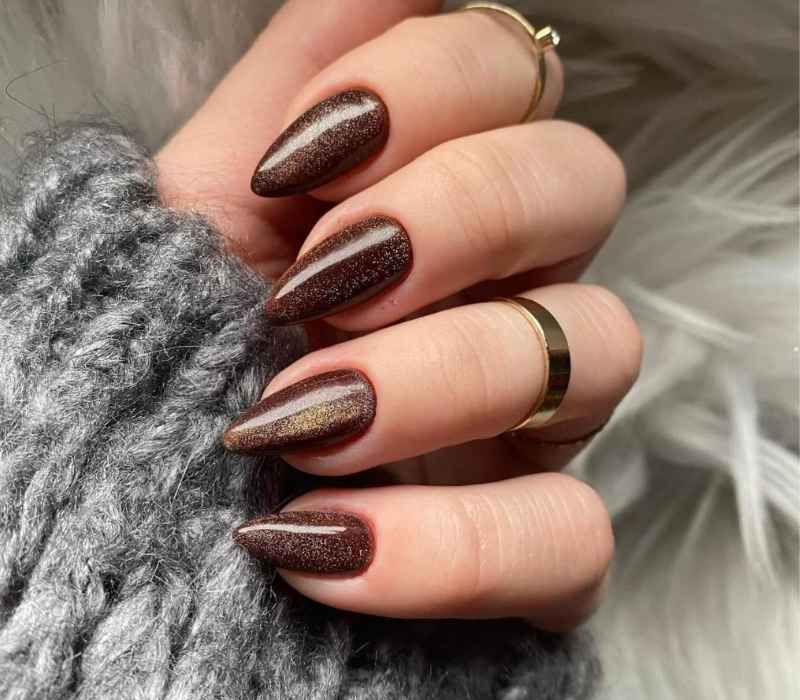
Amber Velvet Nails
Nothing says elegance like sparkle paired with an amber, velvet touch. This stunning design features a glitter effect on long, almond-shaped nails. Sapiens created this look using Gelcare UV Gel Nail Polish in shades like Gold Velvet, Argan Oil, and Jelly Brown—one of Hanna’s faves.
The jelly texture allows for creative experimentation, making it a great choice for chocolate tones, tortoiseshell effects, or even a translucent finish.
How to Achieve This Look
1️⃣ Shape & Prep
File nails into a soft almond shape. Clean and buff the surface, then apply a gel base coat.
2️⃣ Layer the Color
Use Gelcare UV Gel Nail Polish in shades like Gold Velvet, Argan Oil, and Jelly Brown. Start with the jelly brown as a base, then layer Argan Oil and finish with Gold Velvet for dimension and shimmer.
3️⃣ Seal & Shine
Cure between layers and finish with a glossy top coat to lock in the velvet-like effect and glitter.
Pro tip: For a more translucent or tortoiseshell effect, apply thin jelly layers and blend softly with a sponge or brush.
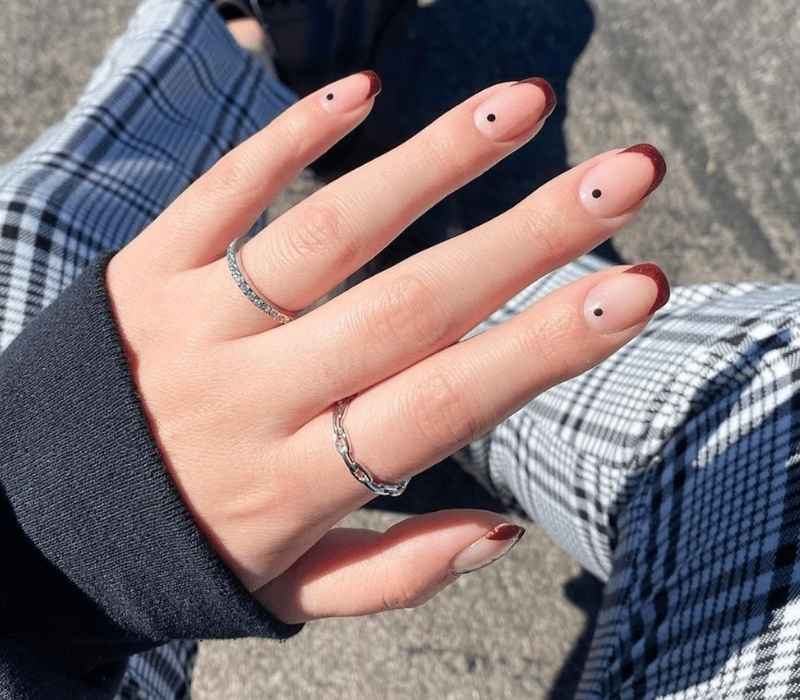
Dot Accents
For a chic and minimalist style, go for a brown and nude combination with dot accents. This look is all about subtle, trendy details, perfect for the clean girl aesthetic that is thriving this season. Whether it’s on your FYP or in real life, this nail style is having its moment.
How to Achieve This Look
1️⃣ Start with a Clean Base
Shape your nails and apply a neutral nude polish. Let it fully dry or cure if using gel.
2️⃣ Add Dot Details
Using a dotting tool or bobby pin, apply small brown dots—either centered near the cuticle, at the tips, or scattered creatively.
3️⃣ Finish & Seal
Apply a clear top coat to lock in the design and add a glossy shine.
Pro tip: Stick to a maximum of two accent dots per nail for a clean, balanced look that still makes a statement.
Glitter Accent
Sometimes, a simple brown mani needs a glittery accent to stand out. Whether you love stylish nail looks, this design is a must-try.
A single accent nail adds a festive touch, making it ideal for the holiday kickoff. If you love sparkles, this one deserves a spot in your collection!
How to Achieve This Look
1️⃣ Prep Your Nails
File, buff, and clean your nails before applying a base coat for smooth, lasting results.
2️⃣ Apply Brown Polish
Paint all nails in your favorite brown shade, leaving one nail (usually the ring finger) for the glitter accent.
3️⃣ Add Glitter Accent
On your chosen nail, apply a glitter polish. Choose gold, rose gold, or bronze for a warm contrast.
4️⃣ Seal the Look
Finish with a glossy top coat on all nails to add shine and durability.
Pro tip: Use a sponge to dab on glitter for a more concentrated, dazzling effect.
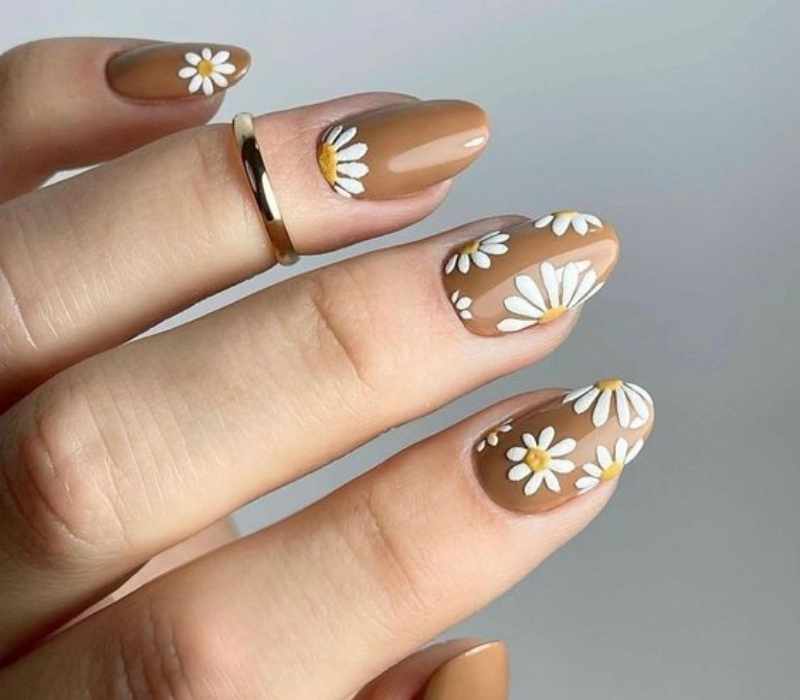
Short Brown Daisy Nails
A simple and stylish way to try DIY nail art is with a short brown daisy mani. To recreate this look, choose five shades of brown and white as a base. Use a dotting tool to create little dots, forming a centre for the daisy. This design is fun and effortless, giving your nails a cute and trendy vibe.
How to Achieve This Look
1️⃣ Start with Clean Nails
Shape and buff your nails, then apply a base coat for smooth coverage.
2️⃣ Choose Your Palette
Pick five complementary brown tones and a white polish for the daisy petals.
3️⃣ Apply the Base Color
Paint your nails with one of the lighter brown shades as your base.
4️⃣ Create the Daisy
Use a dotting tool or a bobby pin. Dot a white circle around a darker brown center dot to form petals.
5️⃣ Top It Off
Seal your design with a clear, glossy top coat for shine and protection.
Pro tip: If you’re short on tools, a toothpick or the end of a bobby pin works great for dotting flower petals.
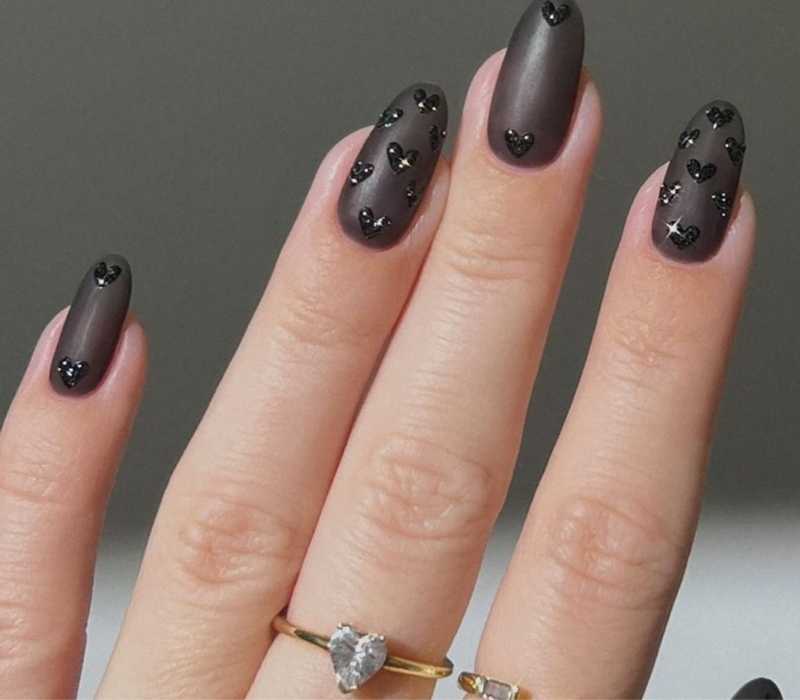
Mix-n-Match Brown Sparkle Nails
If you love bold looks, mix-and-match brown sparkle nails are the way to go. Featuring French tips, hearts, and glitter, this design proves how stunning brown nails can be. Using shades like Coco Bean, Jenny Wren, and Black Betty from Magpie Beauty USA, you can create an intricate look. For best results, visit a salon to have a professional recreate this dazzling style.
How to Achieve This Look
1️⃣ Prep Your Nails
Start with clean, shaped nails and apply a clear base coat to protect them.
2️⃣ Pick Your Shades
Choose warm brown tones like Coco Bean, Jenny Wren, and Black Betty (or similar shades). These will help create depth and contrast.
3️⃣ Mix the Styles
Alternate each nail:
- Add a glittery French tip on one,
- A full glitter nail,
- A small heart accent,
- And a classic glossy brown.
4️⃣ Seal the Look
Use a high-shine top coat to enhance the sparkle and keep the design intact.
Pro tip: To get clean lines and precise hearts, consider using nail art stickers or ask a professional nail tech to bring your vision to life.
Multi-color Brown Floral Mani
A gorgeous DIY floral daisy nail look is easier to achieve than you think. Created by Sapiens with Le Manoir nail polish, this design uses shades like Archive Beige, Cabernet, and Dusty Rose. Applying three coats ensures opacity, making the nail art stand out beautifully. This chic look is perfect for a fresh and floral manicure.
How to Achieve This Look
1️⃣ Start Fresh
File and buff your nails, then apply a clear base coat to protect your natural nail.
2️⃣ Apply Your Shades
Use colors like Archive Beige, Cabernet, and Dusty Rose. Apply three thin coats for a smooth and opaque base.
3️⃣ Create the Floral Art
Using a dotting tool or thin brush, make tiny daisy shapes. Mix up the colors on each nail to keep the look playful and unique.
4️⃣ Lock It In
Finish with a glossy top coat to keep your floral art looking fresh and long-lasting.
Pro tip: Use a toothpick if you don’t have a dotting tool—it’s perfect for small daisy details at home.
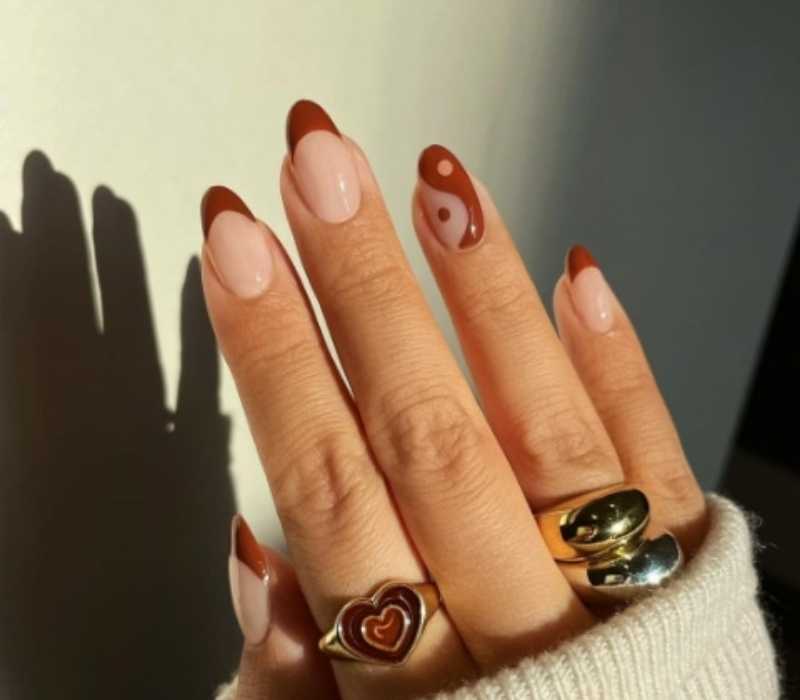
Short Brown Floral Yin-Yang Nails
For a unique twist, short brown floral yin-yang nails artistically combine two tones. The manicure features delicate accents that add an element of design and interest. This style is great for shorter nails, making it an ideal choice for those who love a clean yet creative look.
How to Achieve This Look
1️⃣ Prep Your Nails
Trim, shape, and buff your nails. Apply a clear base coat to help the polish last longer.
2️⃣ Create the Yin-Yang Base
Choose two complementary brown tones—one light, one deeper. Use a thin brush to paint the yin-yang design, dividing each nail into two curves.
3️⃣ Add Florals
With a dotting tool or thin brush, paint tiny white or beige flowers on one side of the yin-yang for a soft, detailed finish.
4️⃣ Seal the Design
Apply a glossy top coat to enhance shine and protect the artwork.
Pro tip: Use a gel liner or nail art pen for more control when painting the yin-yang curve.
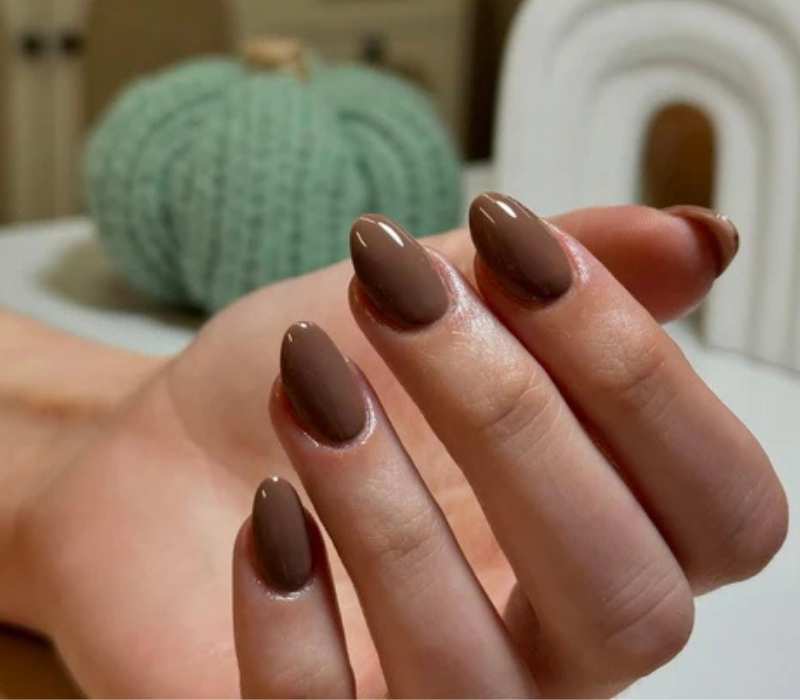
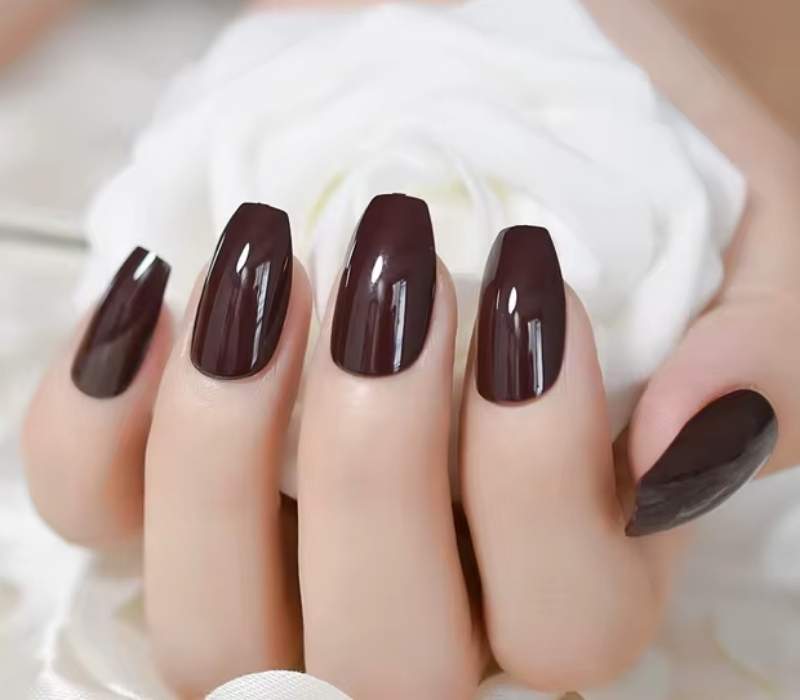
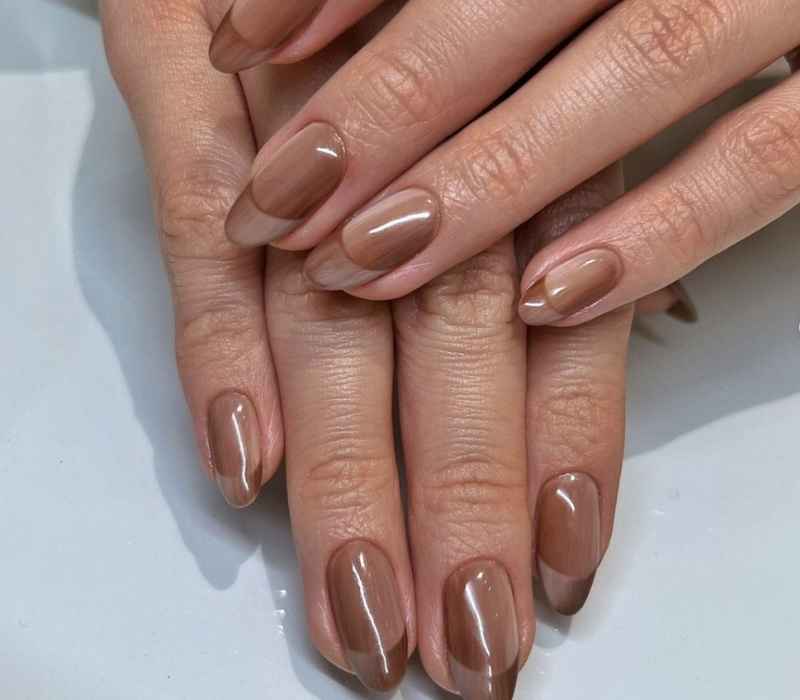
Dark Brown Nail
A solid dark brown nail look is the definition of fall-winter luxury. The rich tone exudes old-money elegance, making it a top choice for those who love a moody, understated aesthetic. It’s a classic style that’s currently trending and pairs perfectly with cosy, sophisticated outfits.
How to Achieve This Look
1️⃣ Start with Nail Prep
Clean, file, and buff your nails for a smooth surface. Apply a nourishing base coat to prevent staining.
2️⃣ Apply Your Dark Brown Polish
Choose a rich, creamy dark brown shade. Apply two even coats for full coverage, letting each layer dry in between.
3️⃣ Top It Off
Finish with a glossy or matte top coat, depending on your style. Gloss gives a polished, luxe finish, while matte adds depth and modern flair.
Pro tip: For extra drama, try pairing this shade with almond or square-shaped nails—it elevates the elegance instantly.
Read Also: 18 Pink Fall Nail Ideas That Are Too Pretty To Miss
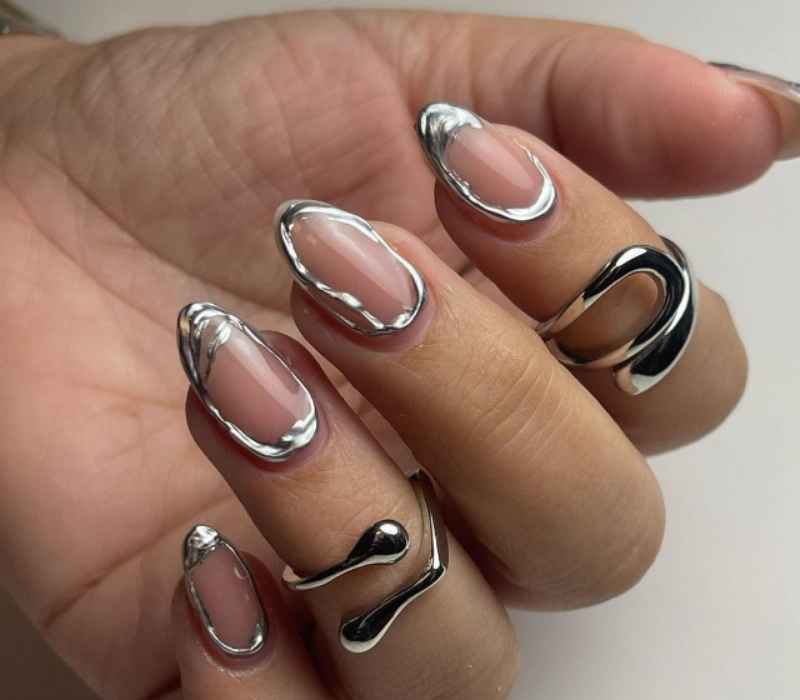
Metallic Swirls
For a classic seasonal twist, brown Frenchies with chrome swirls are the perfect pick. The fall tones add warmth, while the chrome finish gives them a shine. This design is great for when darker tones dominate, but you still want an eye-catching manicure.
How to Achieve This Look
1️⃣ Prep Your Nails
Start with clean, shaped nails and apply a base coat to protect your natural nails.
2️⃣ Create Brown French Tips
Use a rich brown polish to paint the tips of your nails. Keep the lines clean and neat for that classic French manicure look.
3️⃣ Add Chrome Swirls
With a thin nail art brush or nail art pen, paint metallic chrome swirls over the brown tips or on the nail base for a stylish contrast.
4️⃣ Seal the Design
Finish with a glossy top coat to lock in the shine and add extra durability.
Pro tip: Use a chrome powder on top of a sticky base coat for extra mirror-like shine that lasts longer.
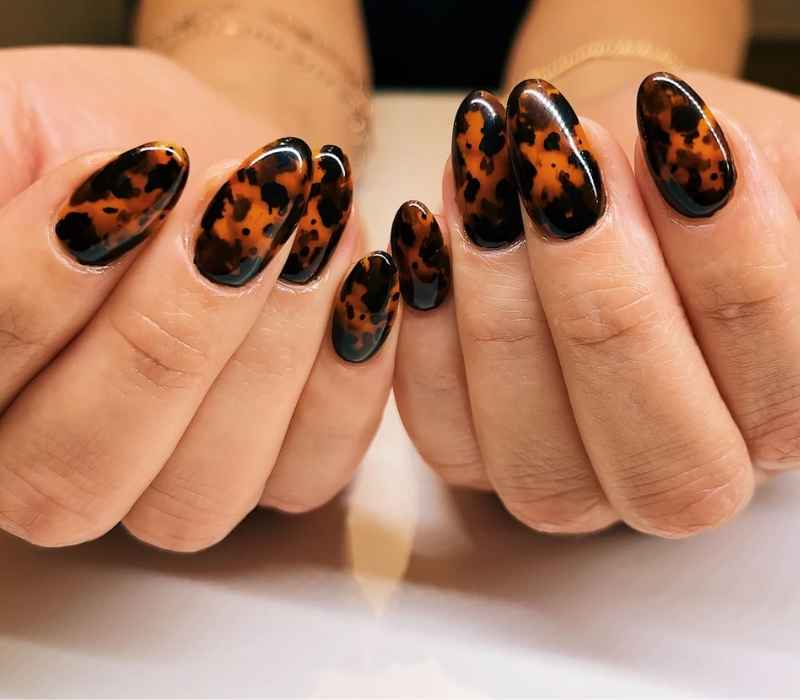
Tortoise Shell
A brown tortoiseshell mani is a HUGE trend right now. It’s a chic way to rock a solid brown look while adding dimension. If you love a vintage yet polished feel, this fall nail style is perfect for you.
How to Achieve This Look
1️⃣ Start with a Base
Apply a warm, medium brown polish as your base color. Let it dry completely.
2️⃣ Add Darker Brown Spots
Using a small brush or dotting tool, paint irregular dark brown spots or patches randomly on your nails.
3️⃣ Blend with a Lighter Shade
Add some lighter amber or caramel tones around the spots to create the tortoise shell’s signature layered effect.
4️⃣ Finish with Gloss
Seal your design with a shiny top coat to enhance the depth and give a smooth, glass-like finish.
Pro tip: Use a fine detail brush to softly blend the colors for a natural tortoiseshell look without harsh edges.
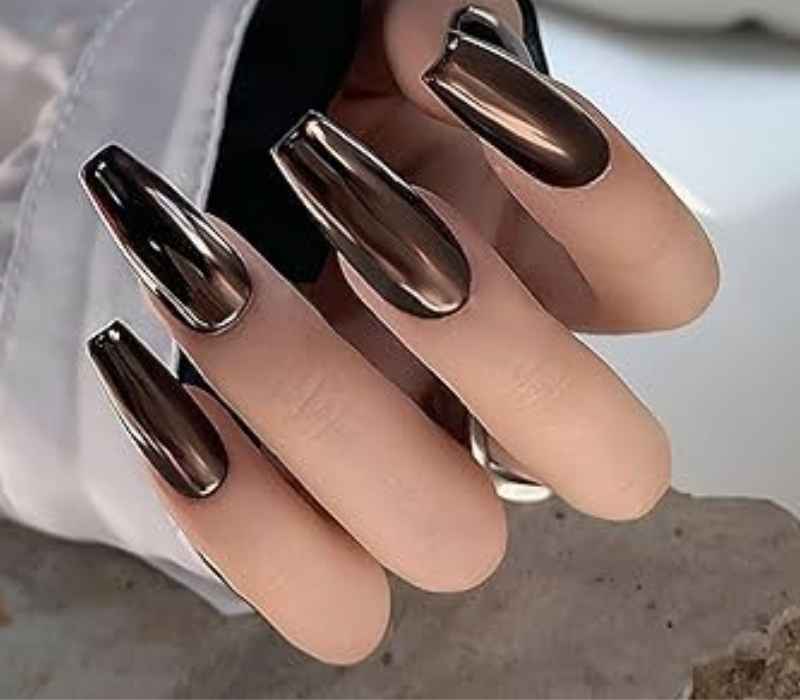
Chrome Nails
Chocolate brown chrome-effect nails are all about elegance and bold shine. With a rich, reflective finish, these nails blend earthy tones with a modern edge. They’re perfect for the fall wardrobe, especially if you love neutrals and layered looks.
How to Achieve This Look
1️⃣ Prep Your Nails
Start with clean, filed nails. Apply a base coat to protect your natural nails.
2️⃣ Apply a Brown Base Color
Choose a rich chocolate brown polish and apply two thin coats. Let each coat dry fully.
3️⃣ Use Chrome Powder
Once the polish is almost dry but still tacky, gently rub chrome powder onto your nails using a sponge applicator or silicone tool.
4️⃣ Seal with Top Coat
Finish with a no-wipe gel top coat or a glossy regular top coat to lock in the chrome shine and add durability.
Pro tip: For the best reflective effect, use a no-wipe gel top coat and cure under a UV lamp to avoid dullness.
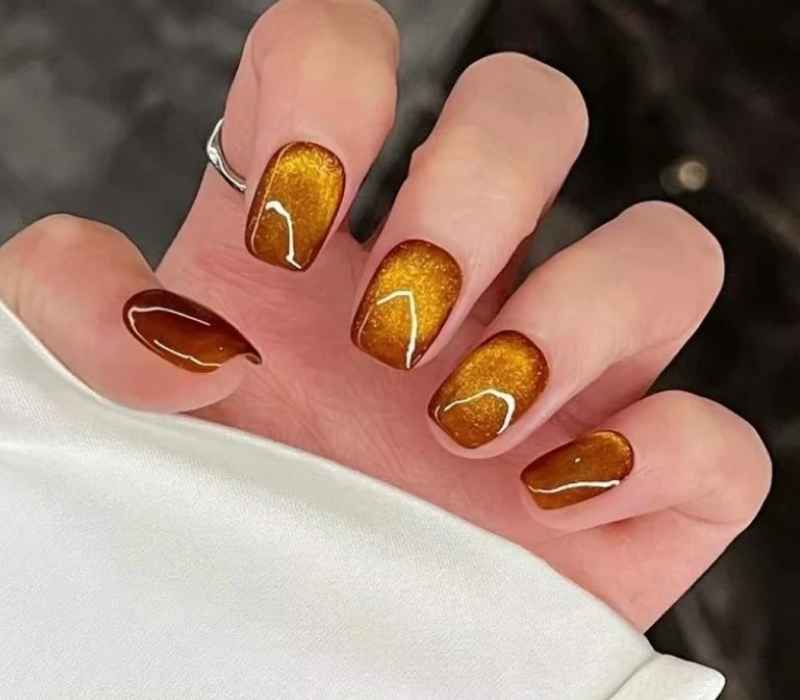
Brown Retro Sparkle Nails
If you’re into metallic finishes, this nail look is for you. It has a decadent bronze shine that feels both bold and stylish. The original mani was created with Cirque Colors Nail Polish in the shade Zeitgeist, which is now discontinued. However, a similar option would be Eye of the Beholder by the same brand.
How to Achieve This Look
1️⃣ Prep Your Nails
Clean, shape, and apply a base coat to protect your nails.
2️⃣ Choose Your Bronze Base
Apply two coats of a metallic bronze polish like Eye of the Beholder by Cirque Colors or a similar shimmer shade.
3️⃣ Add Sparkle
For extra shine, lightly dab a bronze or gold glitter polish on top or mix in fine shimmer powder while the polish is still wet.
4️⃣ Seal with Top Coat
Finish with a glossy top coat to enhance the metallic effect and extend wear.
Pro tip: Apply thin layers and let each coat dry completely to avoid streaks and keep the shimmer smooth and even.
Simple Brown Gradient Nails
A brown manicure can be simple yet incredibly chic. This design is fun and nostalgic and takes you back to the days when you’d paint each nail a different colour as a kid. The technique still works perfectly in adulthood, giving you an effortless yet stylish look.
How to Achieve This Look
1️⃣ Prep Your Nails
Start with clean, shaped nails and apply a clear base coat.
2️⃣ Pick Your Brown Shades
Select 3-4 shades of brown, ranging from light tan to deep chocolate.
3️⃣ Create the Gradient
Using a makeup sponge, dab the colors onto each nail, blending the shades gently from light to dark. Repeat for opacity.
4️⃣ Clean Up & Finish
Remove excess polish around nails with a brush dipped in nail polish remover. Seal your design with a glossy top coat.
Pro tip: Use a damp sponge to keep polish from drying too fast, helping create a smoother gradient transition.
Dark and Light Brown Micro Angled French Tips
Rather than a plain, single-colour French tip, this two-tone apex style brings a modern twist. Created by Nguyen using Essie Nail Polish in Mink Muffs (now discontinued), you can find a similar shade to Crochet Away. Another great option is J. Hannah’s Carob. To get the perfect overlap, a nail art brush is essential.
How to Achieve This Look
1️⃣ Prepare Your Nails
Start with clean, filed nails and apply a clear base coat for smooth application.
2️⃣ Choose Your Browns
Pick a dark brown shade like J. Hannah’s Carob and a lighter brown similar to Essie’s Crochet Away.
3️⃣ Create the Micro Angled Tips
Using a fine nail art brush, carefully paint a thin angled tip on each nail with the dark brown. Once dry, paint a smaller angled tip overlapping the first one with the lighter brown.
4️⃣ Seal the Design
Finish with a glossy top coat to protect the design and add shine.
Pro tip: Use a steady hand and a fine brush for clean, sharp angles—practice on a nail wheel if needed.
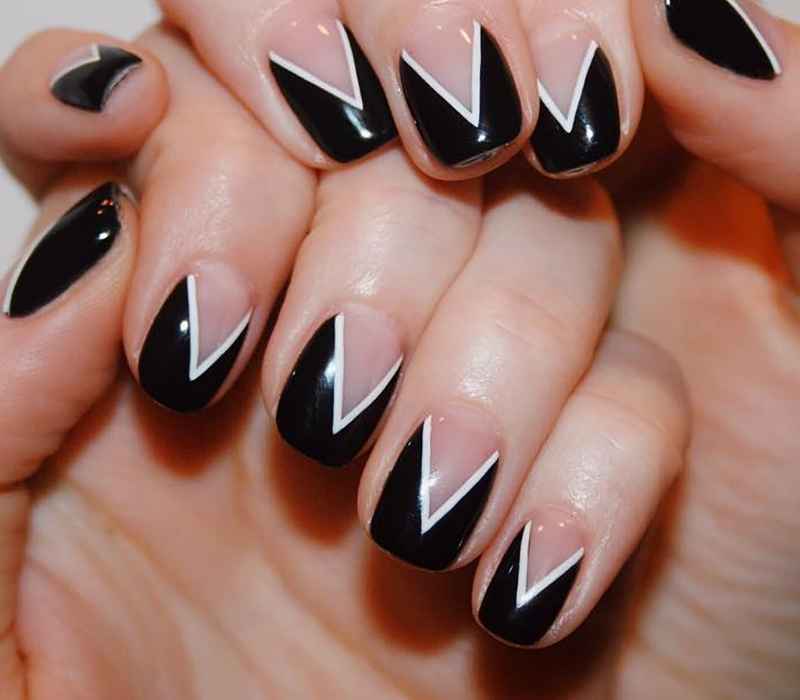
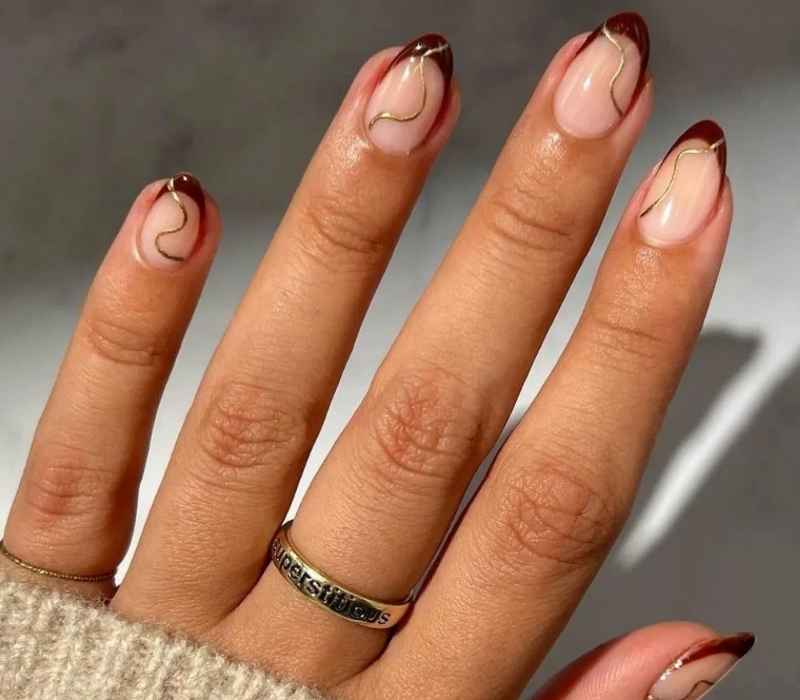
Negative Space Accents
For those who love a more artsy approach, negative space nails in brown are a great choice. This design has a seasonal mood that feels both cool and creative. It’s the kind of design you’ll want to show off on IG for some serious inspiration.
How to Achieve This Look
1️⃣ Prep Your Nails
Clean and file your nails, then apply a clear base coat for smooth polish application.
2️⃣ Map Out the Negative Space
Use striping tape or nail guides to mark off areas you want to keep natural (unpainted).
3️⃣ Apply Brown Polish
Paint the exposed sections with your favorite brown shade, such as a warm mocha or chocolate tone.
4️⃣ Remove Tape Carefully
Once the polish is semi-dry, gently peel off the tape to reveal crisp, clean negative space lines.
5️⃣ Seal With Top Coat
Finish with a clear top coat to protect your design and add shine.
Pro tip: Use fast-drying polish and remove tape slowly to avoid smudging the edges.
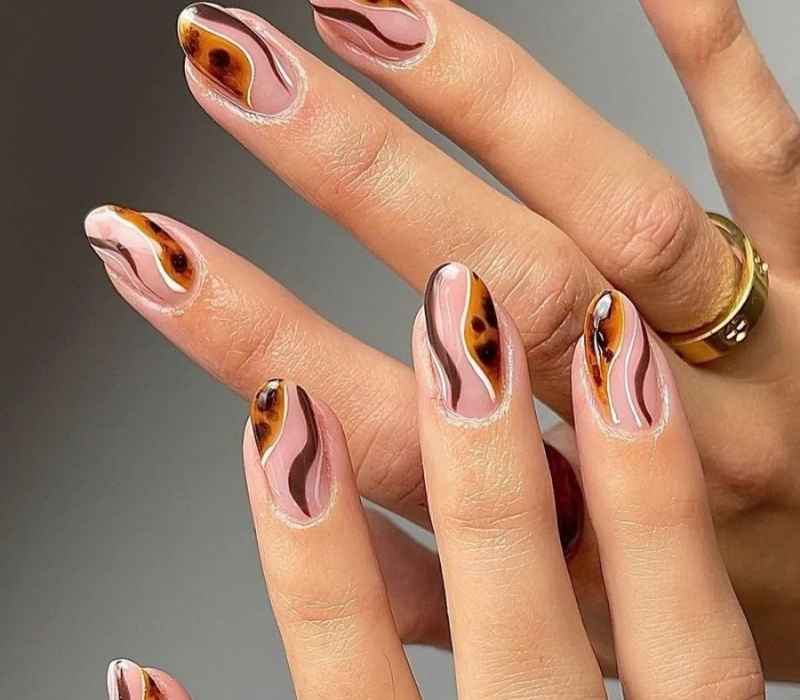
Chocolate Swirls
Pink nails mixed with chocolate brown swirls give off a retro-wave vibe while still being fall-friendly. This cute twist adds movement to your nails, bringing out the warmth in both rosy and chocolate tones.
How to Achieve This Look
1️⃣ Prep Your Nails
Start with clean, shaped nails and apply a base coat to protect your nails.
2️⃣ Apply Pink Base
Paint all nails with a soft pink polish. Let it dry completely.
3️⃣ Create Chocolate Swirls
Using a thin nail art brush or a toothpick, dip into chocolate brown polish and gently swirl patterns on each nail.
4️⃣ Let It Dry and Seal
Wait for the design to dry fully, then add a clear top coat to lock in the swirls and add shine.
Pro tip: Practice your swirls on paper first to get smooth, natural-looking lines before applying them on your nails.
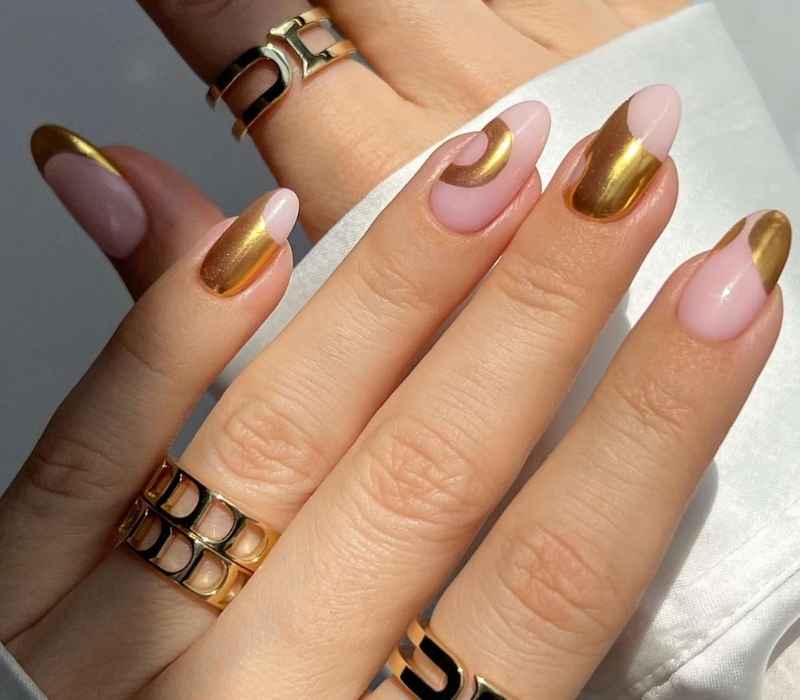
Chrome Rings
For a brown mani that feels luxurious, gold chrome ring accents are a major trend this season. They combine the jewellery-inspired nail trend with a grounded metallic finish. The bling from the chrome makes your nails stand out while still looking refined.
How to Achieve This Look
1️⃣ Prep and Base Color
Start with clean nails and apply a rich brown polish as your base. Let it dry completely.
2️⃣ Add Chrome Finish
Use a chrome powder or a chrome-effect polish on top of the brown base for a shiny, reflective look.
3️⃣ Apply Gold Ring Accents
Once dry, place thin gold chrome rings or metallic nail stickers near the cuticle or on accent nails for a luxe vibe.
4️⃣ Seal with Top Coat
Finish with a clear top coat to secure the chrome effect and the rings, adding extra shine and durability.
Pro tip: Use tweezers to place the gold rings precisely, ensuring they sit flat and stay longer.
Daisy Nails
Floral lovers can still embrace daisy accents even in the colder months. White daisies over a brown base give a cute but dark aesthetic, perfect for moody yet feminine nails. This design has been trending all over Pinterest boards for a reason!
How to Achieve This Look
1️⃣ Prep Your Nails
Clean and shape your nails, then apply a smooth, rich brown polish as your base. Allow it to dry fully.
2️⃣ Create Daisy Flowers
Using a small dotting tool or thin brush, paint white petals in a circle to form daisies on each nail. Add a tiny yellow or gold dot in the center for detail.
3️⃣ Add Final Touches
If you want, add a few tiny leaves with a fine green brush for extra charm.
4️⃣ Seal the Design
Apply a clear top coat to protect your floral art and add a glossy finish.
Pro tip: Practice the daisy petals on paper first to get smooth, even shapes before painting on your nails.

Glazed Ombre
The glazed brown ombre nails trend takes inspiration from the Hailey Bieber effect. If you’re still obsessed with that polished shine, this look is for you. Insta-ready and perfect for an autumn glow, this is the ultimate chic nail trend.
How to Achieve This Look
1️⃣ Prep Your Nails
Start with clean, shaped nails. Apply a clear base coat to protect your nails.
2️⃣ Create the Ombre Gradient
Using a makeup sponge, gently dab two or three shades of brown—light to dark—onto your nails, blending the colors smoothly from base to tip.
3️⃣ Add the Glaze
Once dry, apply a high-shine top coat or a clear gel polish to achieve that glossy, “glazed” effect.
4️⃣ Finish Up
Clean around your nails to remove excess polish for a neat, professional look.
Pro tip: Use a liquid latex barrier around your nails when sponging to keep clean edges and make cleanup easy.
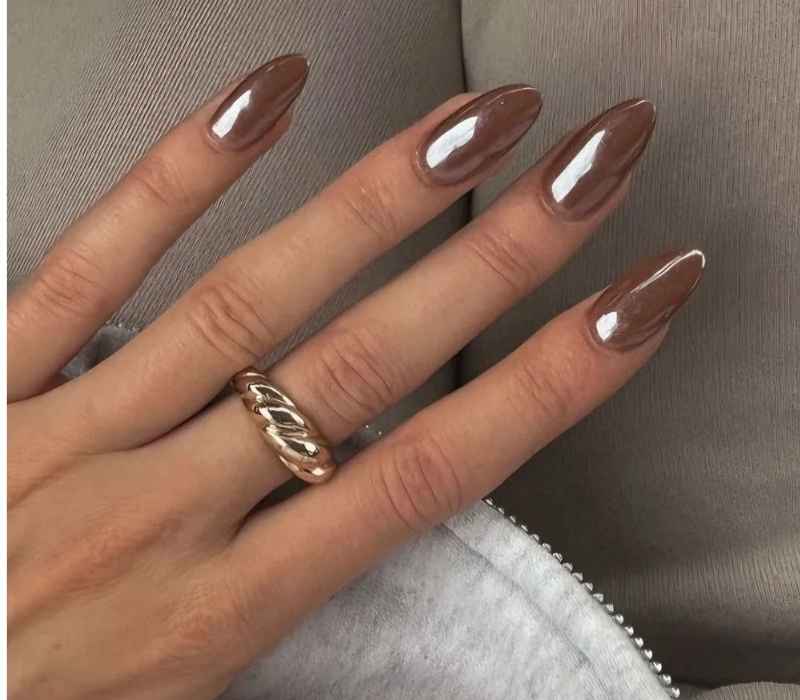
Penny Brown
If you love a minimalist look, penny brown nails are the perfect choice. The shiny and sleek finish gives off a quiet luxury vibe that feels effortlessly chic. It’s a timeless aesthetic that works with any outfit, making it a go-to for those who prefer classic elegance.
How to Achieve This Look
1️⃣ Prepare Your Nails
Clean and shape your nails. Apply a clear base coat to protect your natural nails.
2️⃣ Apply Penny Brown Polish
Choose a rich, warm brown polish with a glossy finish. Apply two even coats, letting each dry fully.
3️⃣ Seal with Shine
Finish with a high-gloss top coat to enhance the sleek, polished look.
4️⃣ Clean Up
Use a small brush dipped in nail polish remover to tidy edges for a flawless finish.
Pro tip: For a salon-quality shine, use a gel top coat cured under a UV lamp — it lasts longer and stays glossy.
This color is ideal for fall, bringing warmth and richness to your nails. Whether you’re keeping it simple or adding subtle details, the depth of brown makes every manicure stand out. It’s a dream for anyone who loves polished yet understated beauty.