
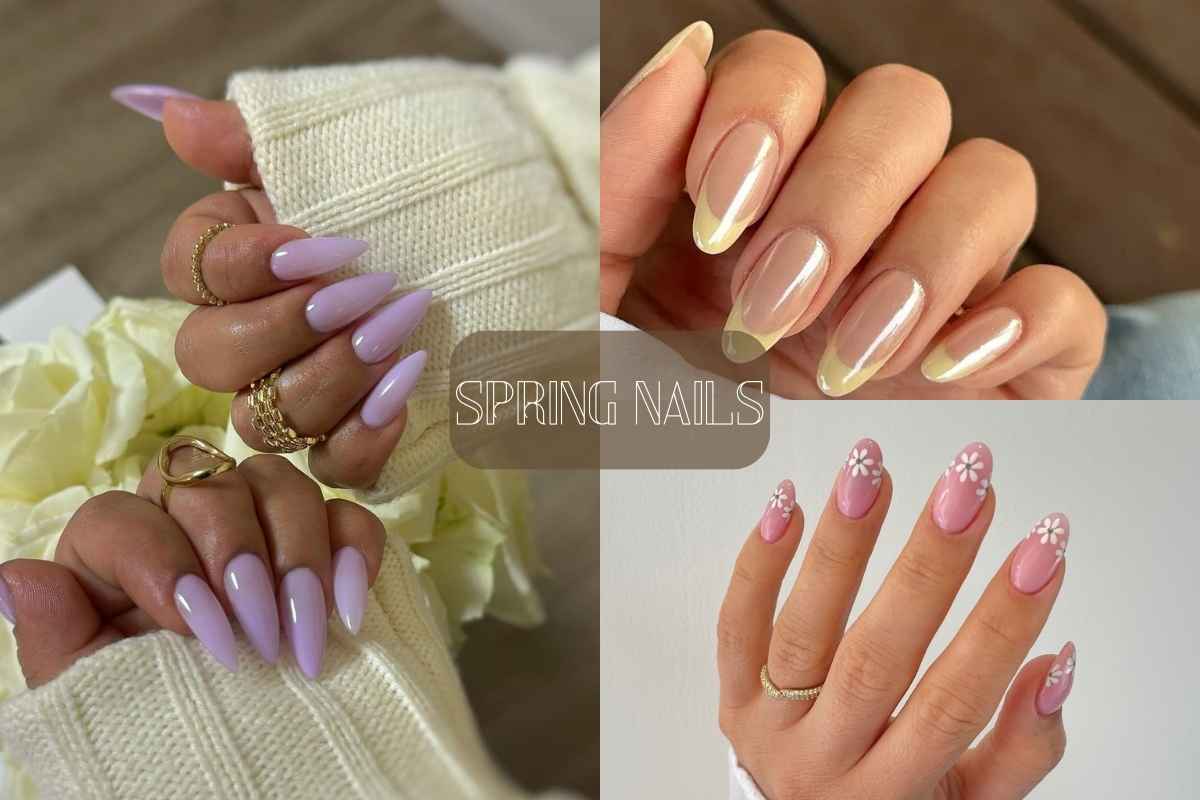
Spring is here, and it’s time to refresh your beauty routine with a fun switch-up in your nail designs! Say goodbye to dark, vampy shades and welcome brighter, lighter tones like yellow, green, blue, pink, and lavender.
Whether you prefer a solid colour, delicate florals, ombrés, or bold nail art, your manicure can be the perfect way to express yourself this season. As we step into March 2025, why not update your wardrobe with nails that match the fresh, blooming vibes?
Not sure what to choose? Don’t worry—we’ve rounded up some of the best manicure ideas just for you! Are you into classic looks? Try a French manicure, nail extensions, press-on nails, or soft earth tones. Want to go bold? Experiment with holographic nails, glitter nails, chrome nails, or edgy negative space nails.
If you love a pastel aesthetic, go for floral patterns, ombré effects, or playful nail art stickers.
And, of course, don’t forget nail care—keep your nails strong with cuticle care, nail strengthener, and essential nail tools. Whether you love DIY nail hacks and nail tutorials or follow nail influencers for inspo, this is your chance to get creative! So tell us—which mani are you excited to try out first? Scroll on, find your next favourite, and get ready to fall in love with your nails!
What Are Spring Colours for Nails?
Spring is all about light, fresh, and playful hues that bring a vibrant touch to your manicure. This year, soft pastels like baby pink, lavender, butter yellow, and baby blue are among the most popular nail colours.
These shades perfectly capture the essence of blooming flowers and sunny days, making them a go-to choice for spring nail inspo. If you prefer a bolder yet soft look, deeper tones like mauve, peach, cobalt blue, and mint green are also making waves this season.
Whether you love pretty spring nail colours or want to experiment with bold, vibrant options, the key is to embrace shades that feel fresh and light. You can go for a polished, simple look with a single shade or mix things up with ombré effects, delicate florals, or playful nail art. No matter what you choose, these trendy spring colours will give your nails the perfect update for 2025!
Types of Spring Nail Designs and Ideas for 2025
Get ready to refresh your nails this spring 2025 with minimalist designs and timeless colour palettes! If you love a fresh start, try the soap manicure trend or embrace neutral brown nails for a groundbreaking look this season. Prefer something bold? Bright and shimmery nail designs are a major trend, so don’t shy away from rhinestone nail art, glazed finishes, and reflective cat eye designs for that extra serotonin boost!
And, of course, floral nail ideas are here to stay! Give classic daisy designs a fresh makeover with unexpected colours, sparkly accents, and statement French tips. Whether you love simple and classy designs or eye-catching styles, there’s a perfect spring look waiting for you. Which trend will you try first? Tell me in the comment after reading the article:
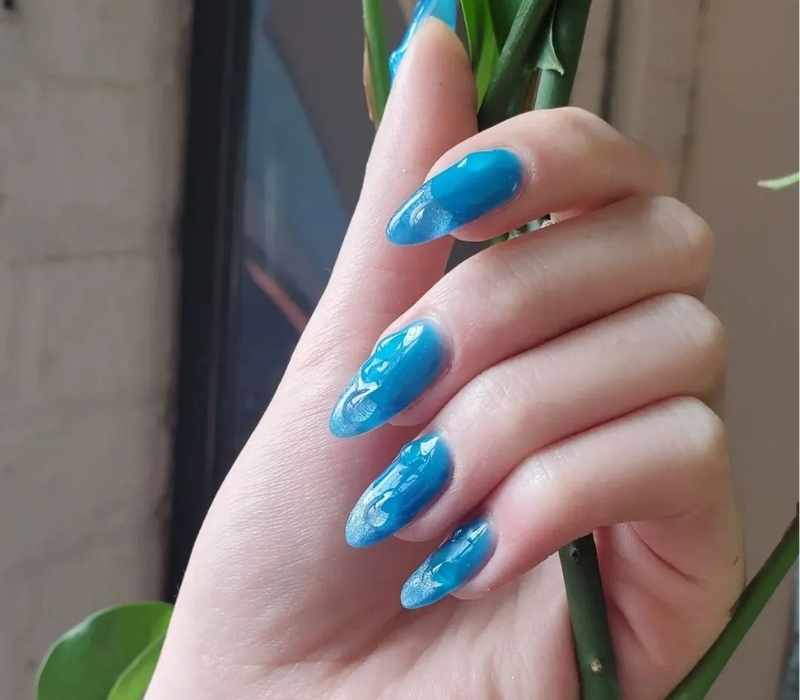
Water-Inspired Nails
If you love fresh and unique nail looks, seafoam green nails with silver accents are a must-try. Inspired by water droplets, this design mimics the beauty of nature with a three-dimensional effect. A reverse French style at the cuticle adds a trendy touch, making this manicure both stylish and refreshing.
How to Achieve Water-Inspired Nails at Home
1️⃣ Prep Your Nails: Clean, shape, and apply a clear base coat for protection.
2️⃣ Choose Your Base Color: Paint your nails with a soft seafoam green polish and let it dry.
3️⃣ Create a Reverse French: Use silver polish to carefully paint a thin, curved line near the cuticle area on each nail.
4️⃣ Add Dewdrop Details: Use a dotting tool with clear or silver gel polish to create tiny 3D water droplets on a few nails. Cure under a UV lamp if using gel.
5️⃣ Seal with Top Coat: Apply a glossy top coat for shine and durability.
🌟 Pro Tip: For a more dramatic look, use a metallic silver polish for the accents.
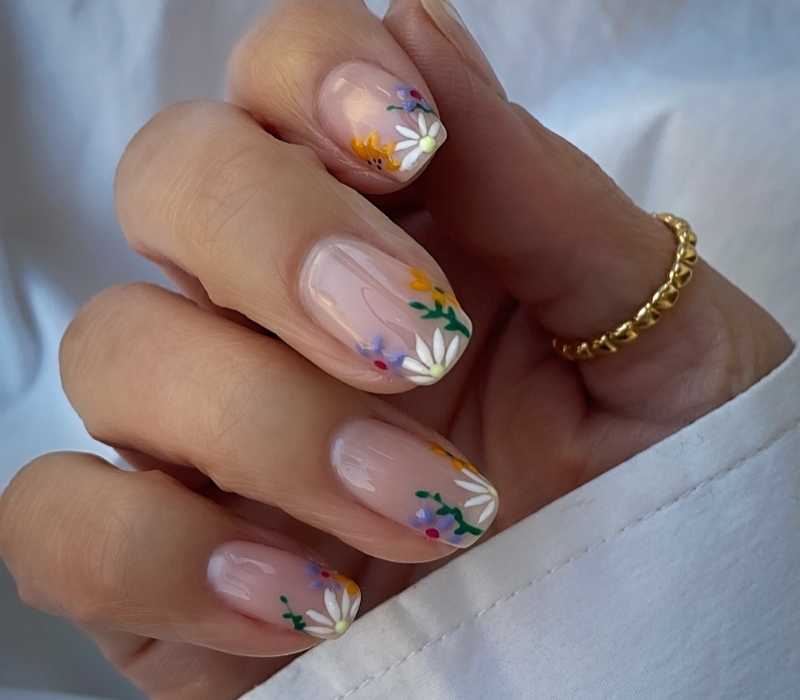
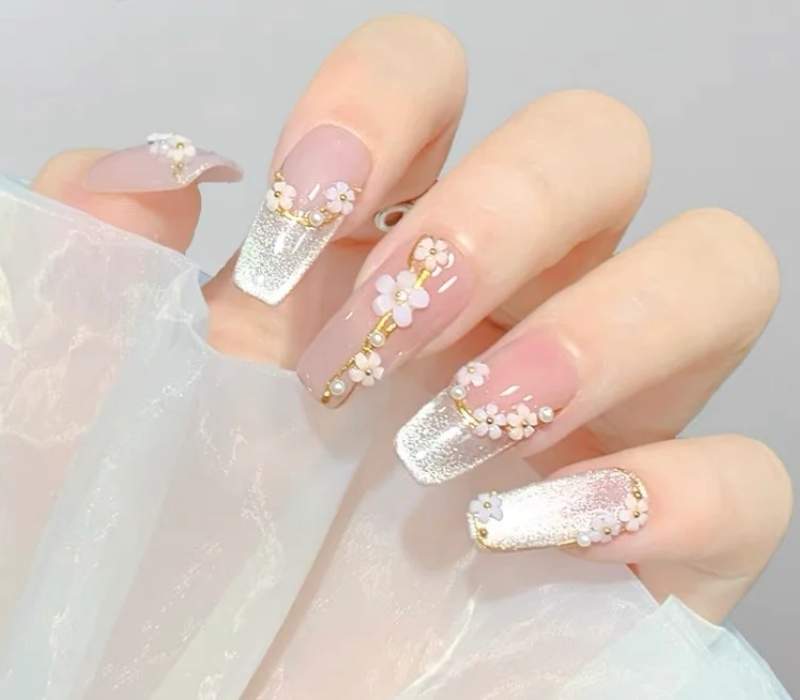
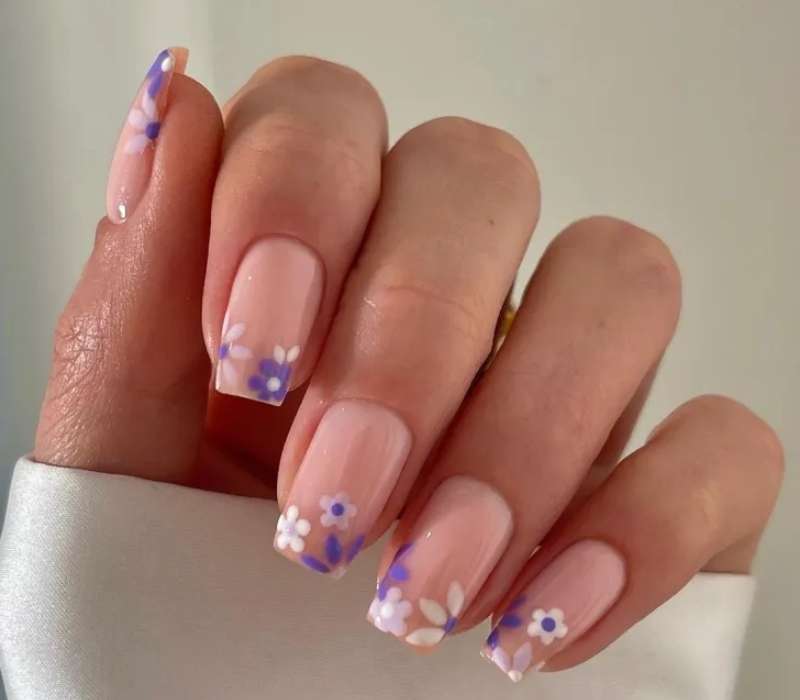
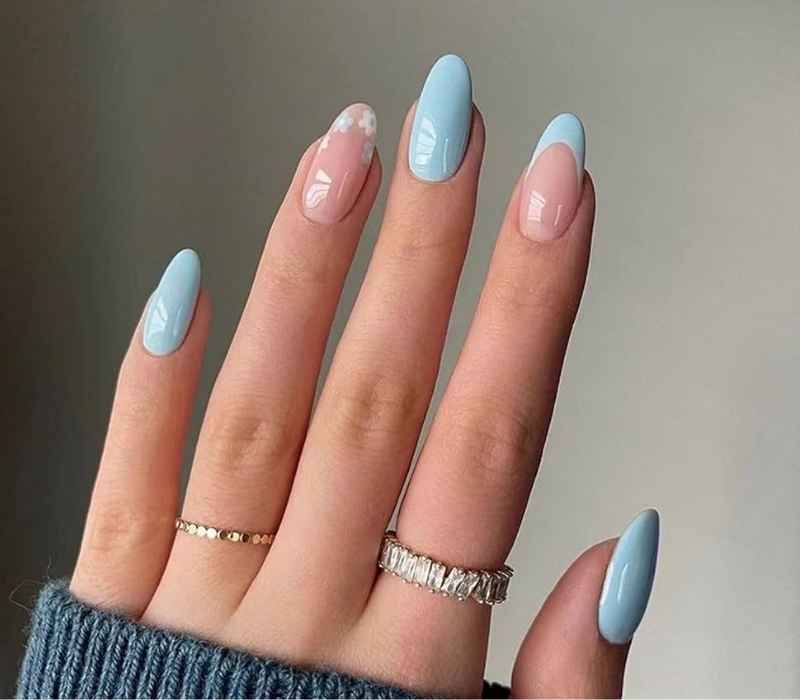
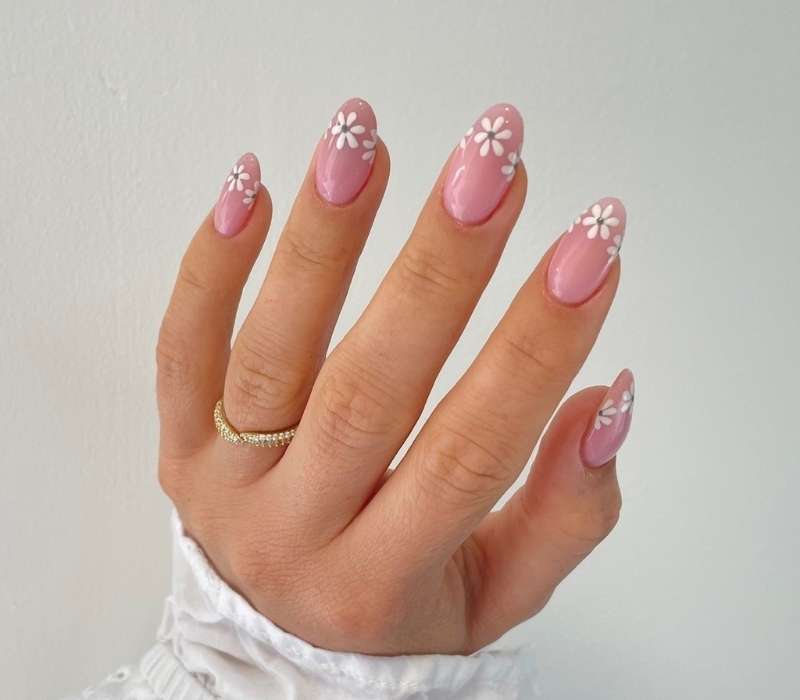
Dainty Floral Nails
Spring is all about floral nail art, and tiny pastel-coloured flowers are the perfect way to welcome the season. Whether you prefer a subtle design or something playful, these teeny tiny blooms bring a soft, elegant vibe to your manicure. The best part? They transition effortlessly into any spring look!
How to Achieve Dainty Floral Nails at Home 🌸
1️⃣ Prep Your Nails: Clean, shape, and apply a clear base coat for protection.
2️⃣ Choose a Soft Base Color: Use a pale pink, light blue, or soft lavender as your background.
3️⃣ Create Tiny Flowers: Use a dotting tool or toothpick dipped in pastel colors to make small dots for flower petals. Add a tiny yellow or white dot in the center.
4️⃣ Add Leaves (Optional): Use a thin brush with green polish for tiny leaves around the flowers.
5️⃣ Seal with Top Coat: Apply a glossy top coat to protect your floral design and add shine.
🌟 Pro Tip: Space the flowers randomly for a natural, garden-inspired look.
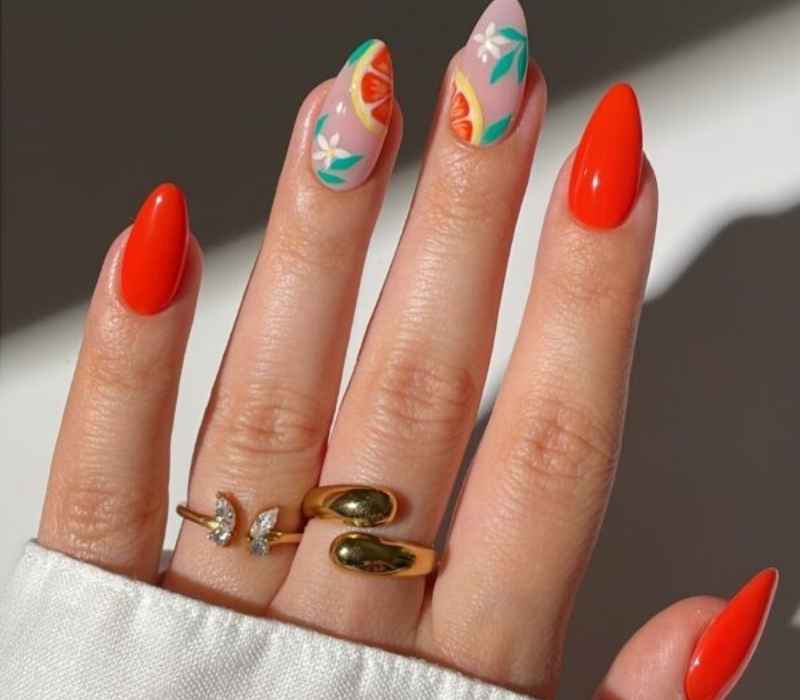
Fruit and Flowers
Nothing says sunshine like fun, fruity nails mixed with floral elements. This design is perfect for anyone who loves a shorter nail but still wants something fresh and lively. It’s an easy way to celebrate the season while keeping your manicure cute and simple.
How to Achieve Fruit and Flowers Nails at Home 🌸
1️⃣ Prep Your Nails: Clean, shape, and apply a clear base coat for protection.
2️⃣ Choose a Light Base Color: Use a soft pastel shade like pale pink, mint green, or light yellow.
3️⃣ Add Floral Designs: Use a dotting tool to create tiny flower petals with pastel shades, adding a small dot in the center for detail.
4️⃣ Draw Fruits: Use a thin brush or dotting tool to add tiny fruit shapes like strawberries, cherries, or oranges on one or two nails.
5️⃣ Seal with Top Coat: Finish with a glossy top coat to protect your design and add shine.
🌟 Pro Tip: Keep the designs tiny and minimal for a fresh, balanced look.
Flower Tips
A floral twist on the classic French tips? Yes, please! This simple yet effective nail look gives you a spring-ready manicure that feels fresh and stylish. Whether you choose delicate blooms or a bold floral accent, this design is easy to recreate and perfect for any occasion.
How to Achieve Floral French Tips at Home 🌸
1️⃣ Prep Your Nails: Clean, shape, and apply a clear base coat for a smooth foundation.
2️⃣ Paint the Base Color: Choose a soft nude or pastel shade for a clean, classic look.
3️⃣ Create French Tips: Use white polish to paint thin tips on each nail. You can use a guide sticker for clean lines.
4️⃣ Add Floral Accents: With a dotting tool or thin brush, draw tiny flowers along the tips. Choose soft shades like pink, lavender, or yellow.
5️⃣ Finish with Gloss: Apply a glossy top coat to protect your design and add shine.
🌟 Pro Tip: Keep it subtle with tiny flowers just on the tips, or go bold with larger blooms.

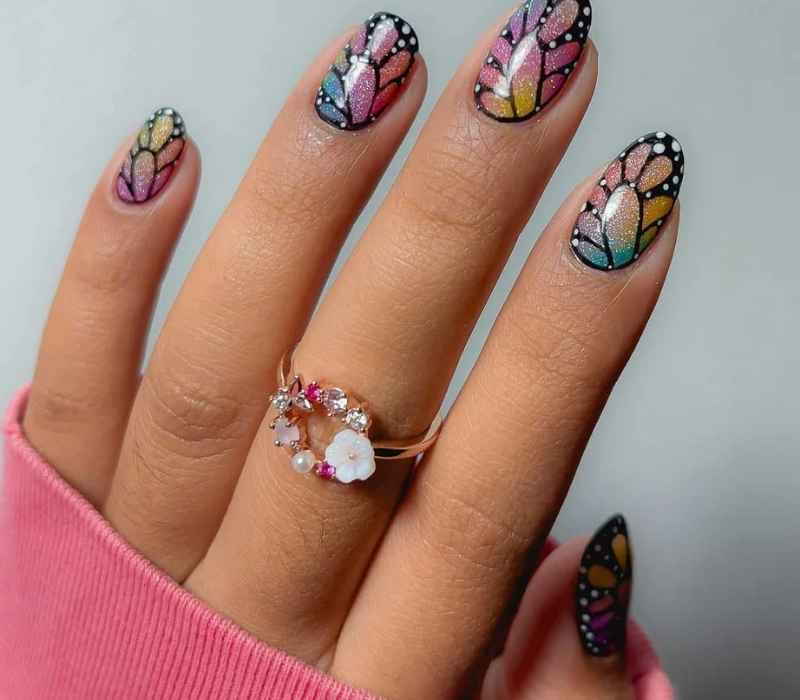
Rainbows and Butterflies
If you love colourful designs, try a mix of pastel rainbows, butterflies, flowers, and hearts for a playful manicure. This full set embraces everything fun about spring, bringing obsessed-worthy shapes and colours together in one bright, cheerful look.
How to Achieve Rainbows and Butterflies Nails at Home
1️⃣ Prep Your Nails: Clean, shape, and apply a clear base coat for protection.
2️⃣ Choose a Light Base Color: Use a soft, neutral shade like pale pink or light blue to let your designs pop.
3️⃣ Draw Rainbows: Use a thin brush to create tiny, curved rainbow stripes on a few nails. Keep them pastel for a soft, dreamy look.
4️⃣ Add Butterflies and Flowers: Use a dotting tool to make tiny flowers and a fine brush to paint delicate butterfly wings. Finish with tiny heart shapes for extra charm.
5️⃣ Seal with Top Coat: Apply a glossy top coat for shine and lasting protection.
🌟 Pro Tip: Use a thin nail art brush for better control and crisp details.
Flowers and French Tips
Can’t decide between solid pink nails or floral nail art? Why not mix flowers, solid pink nails, and a yellow French tip for the ultimate spring set? This combination gives you the best of both worlds—classic elegance with a fresh, trendy spin.
How to Achieve Flowers and French Tips at Home 🌸
1️⃣ Prep Your Nails: Clean, shape, and apply a clear base coat for smooth, protected nails.
2️⃣ Paint Solid Pink Nails: Apply a soft pink polish on a few nails for a classic base.
3️⃣ Create French Tips: Use yellow polish to carefully paint the tips of the remaining nails. A guide sticker can help keep the lines clean.
4️⃣ Add Floral Designs: On the pink nails, use a dotting tool to create tiny white or pastel flowers. Add a small dot in the center for detail.
5️⃣ Seal with Top Coat: Apply a glossy top coat to protect your design and add shine.
🌟 Pro Tip: Keep your flowers minimal for a chic look, or add extra blooms for a bolder style.
Read Also: French Tip Nail Ideas Perfect for Fall
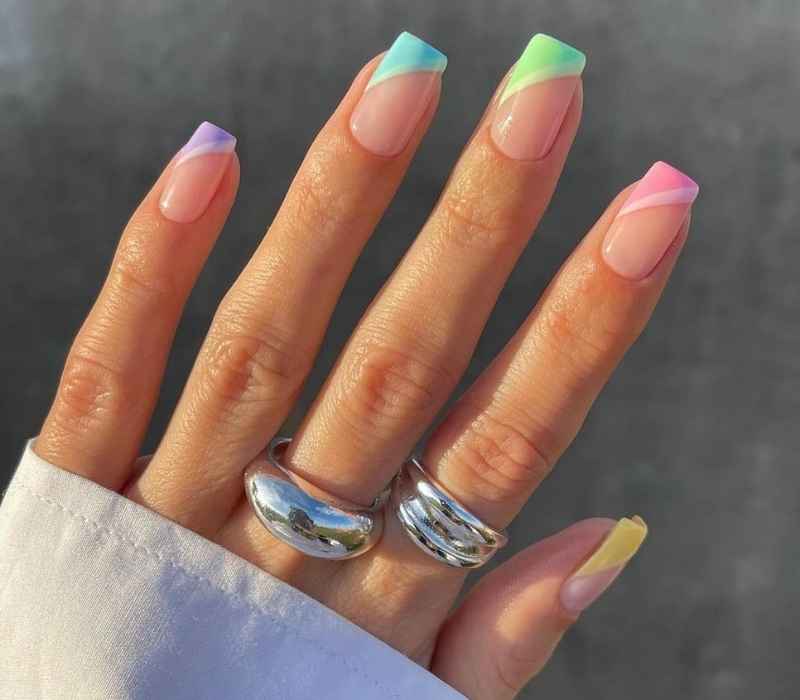
Simple Pastel Rainbow Spring Nail Designs
Say goodbye to grey skies and hello to a dopamine boost with fresh, simple spring nails! This year, pastel hues are everywhere, making them perfect for an effortless yet trendy spring manicure.
Try a rainbow colour palette with asymmetrical French tips or a lined cuticle swoosh for a chic, fashion-forward look. These designs blend seamlessly with your spring wardrobe, ensuring that your nails stay stylish all season long.
How to Achieve Simple Pastel Rainbow Spring Nails
1️⃣ Prep Your Nails: Clean, shape, and apply a clear base coat for smooth, protected nails.
2️⃣ Choose Your Pastel Colors: Pick five soft pastel shades like baby pink, mint green, pale yellow, sky blue, and lavender.
3️⃣ Create Asymmetrical French Tips: Use each pastel shade to paint a diagonal or curved French tip on each nail.
4️⃣ Try Cuticle Swoosh (Optional): Use a thin brush to create a soft, pastel line along the cuticle for a chic twist.
5️⃣ Seal with Top Coat: Apply a glossy top coat for a smooth, shiny finish.
🌟 Pro Tip: Keep the lines soft and uneven for a playful, trendy look.
Cute + Simple Spring Bouquet Nail Art
If you love adorable nail art, then this season’s spring bouquet trend is for you! Imagine delicate daisy bouquets tied with classy bows, bringing a dainty, fun, and playful touch to your feminine aesthetic.
You can even use cute bow nail stickers to make the design pop. Whether you prefer tiny, soft-hued flowers or a mix of floral patterns, this look is a perfect way to embrace nail creativity with a minimalistic approach.
How to Achieve Cute + Simple Spring Bouquet Nails
1️⃣ Prep Your Nails: Clean, shape, and apply a clear base coat for smooth, protected nails.
2️⃣ Pick a Soft Base Color: Use a gentle pastel shade like pale pink, light peach, or creamy white.
3️⃣ Create Floral Bouquets: Use a dotting tool or thin brush to paint tiny flowers in soft colors (white, yellow, lavender). Cluster them together like a mini bouquet.
4️⃣ Add Bow Details: Use a thin brush to draw tiny bows beneath the flowers, or use bow nail stickers for a neat finish.
5️⃣ Seal with Top Coat: Apply a glossy top coat to protect your design and add shine.
🌟 Pro Tip: Keep the flowers small and dainty for a clean, elegant look.
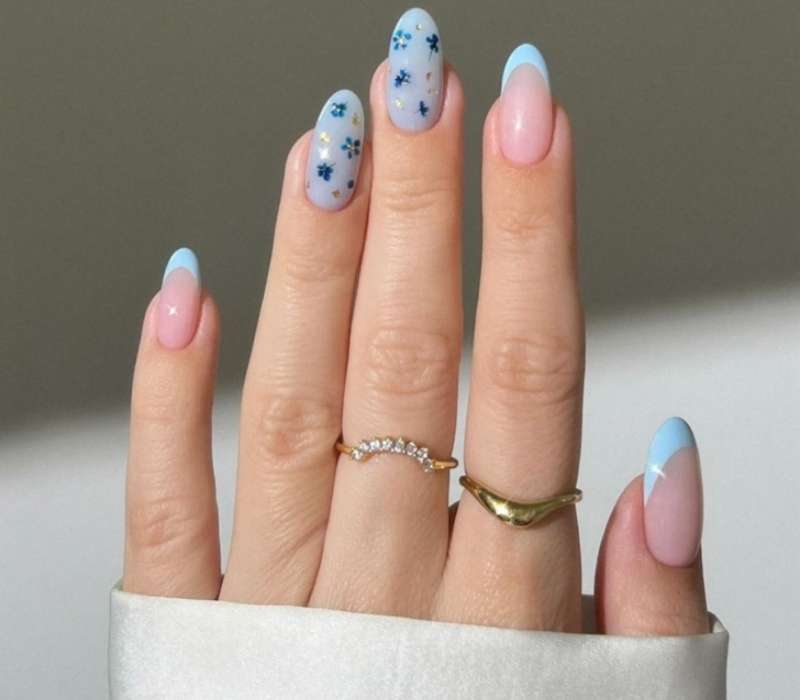
Baby Blue Petals
Nothing says elegant nails like baby blue petals against a warm translucent base. Some nails can feature a French manicure with sky-blue tips, while others showcase a mix of soft colours and floral elements.
This modern manicure brings together a subtle nail art aesthetic with a fresh seasonal beauty vibe, making it ideal for self-care lovers who enjoy DIY nails.
How to Achieve Baby Blue Petal Nails 🌸💙
1️⃣ Prep Your Nails: Clean, shape, and apply a clear base coat for smooth, protected nails.
2️⃣ Choose a Warm Translucent Base: Use a sheer nude or light pink polish as your base color.
3️⃣ Add Baby Blue Tips (Optional): For a modern twist, paint a soft sky-blue French tip on a few nails.
4️⃣ Create Blue Petals: Use a thin brush or dotting tool to draw tiny baby blue petals on your remaining nails. Space them delicately for a clean look.
5️⃣ Seal with Top Coat: Apply a glossy top coat for a smooth, shiny finish that protects your design.
🌟 Pro Tip: For a fresh, airy look, keep the petal designs small and scattered.
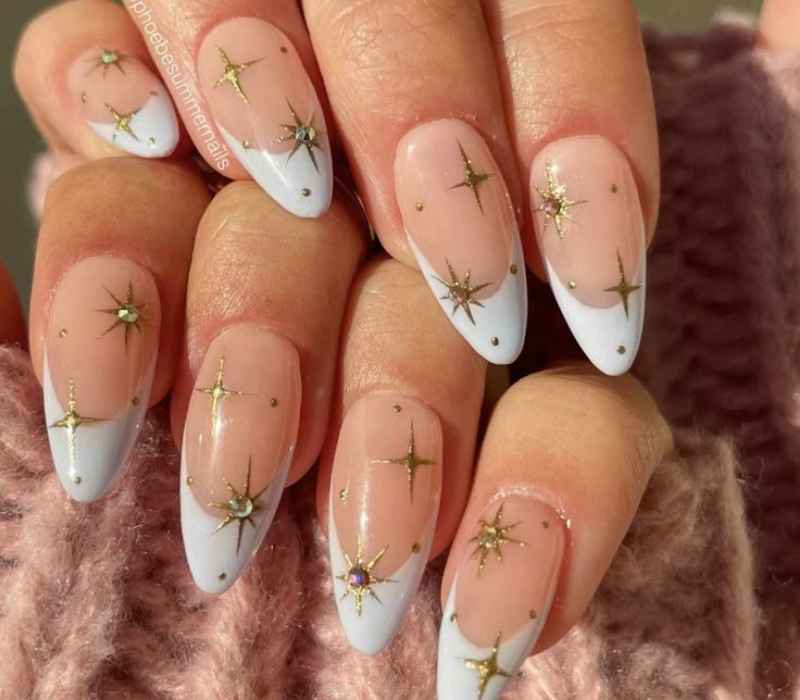
Pastel Stars
Not a fan of florals? No worries! Pastel-coloured star accents are a warmer weather must-have. This dreamy and whimsical design brings a nail colour trend that captures the magic of spring vibes.
Whether you opt for a manicure routine at a nail salon or try DIY nails at home, these statement nails are perfect for showcasing your love for aesthetic appeal and colour harmony.
How to Achieve Pastel Stars
1️⃣ Prep Your Nails: Clean, shape, and apply a clear base coat for smooth, protected nails.
2️⃣ Choose a Light Base Color: Opt for a soft, neutral shade like pale pink, lilac, or baby blue.
3️⃣ Add Star Accents: Use a dotting tool or thin brush to draw tiny star shapes in various pastel colors (yellow, pink, mint, and lavender).
4️⃣ Scatter Stars for a Dreamy Look: Place the stars randomly across your nails for a whimsical, floating effect.
5️⃣ Seal with Top Coat: Apply a glossy top coat to protect your design and keep it shiny.
🌟 Pro Tip: For an extra dreamy look, add a touch of fine glitter on top.
Trendy Chocolate Ombre Spring Nail Designs
If you love warm, rich chocolate tones, this chic ombré design is perfect for your spring nail makeover. This trend blends gooey caramel, dark espresso, and mocha mousse into a smooth gradient, creating an indulgent nail look that feels just like your favourite dessert in nail form.
Unlike traditional bright spring colours, this timeless neutral adds a touch of elegance and pairs beautifully with any outfit.
How to Achieve Chocolate Ombre Nails 🍫
1️⃣ Start with Clean Nails: Shape and buff your nails, then apply a clear base coat.
2️⃣ Pick Your Shades: Choose three chocolate-inspired colors—light caramel, medium mocha, and dark espresso.
3️⃣ Create the Gradient: Use a makeup sponge to gently dab the colors on your nails, blending them smoothly from light to dark.
4️⃣ Perfect the Blend: Repeat dabbing until the colors transition seamlessly.
5️⃣ Finish with a Top Coat: Seal the ombré with a glossy top coat to add shine and protect your nails.
🌟 Pro Tip: Clean up edges with a small brush dipped in nail polish remover for a neat finish.

Blossoming Milky Way
This dreamy spring nail design features a clear base manicure with whimsical pastel flowers blooming at the tips. The delicate floral details create a soft, serene garden-inspired look that feels straight out of a fairytale.
Whether you prefer subtle or bold fingertips, this design adds a fresh twist to your seasonal beauty routine with its dreamy aesthetic.
How to Achieve the Blossoming Milky Way Look 🌼
1️⃣ Prep Your Nails: Clean, shape, and apply a clear base coat.
2️⃣ Create the Clear Base: Paint all nails with a sheer nude or clear polish for a fresh canvas.
3️⃣ Add Pastel Flowers: Using a small nail art brush or dotting tool, paint tiny flowers in soft pastel colors (like pink, lavender, and baby blue) on the tips.
4️⃣ Highlight with Details: Add small white dots or leaves around the flowers for extra charm.
5️⃣ Seal It: Finish with a glossy top coat to protect your design and add shine.
🌟 Quick Tip: Use nail stickers if you want a faster way to get perfect flowers.
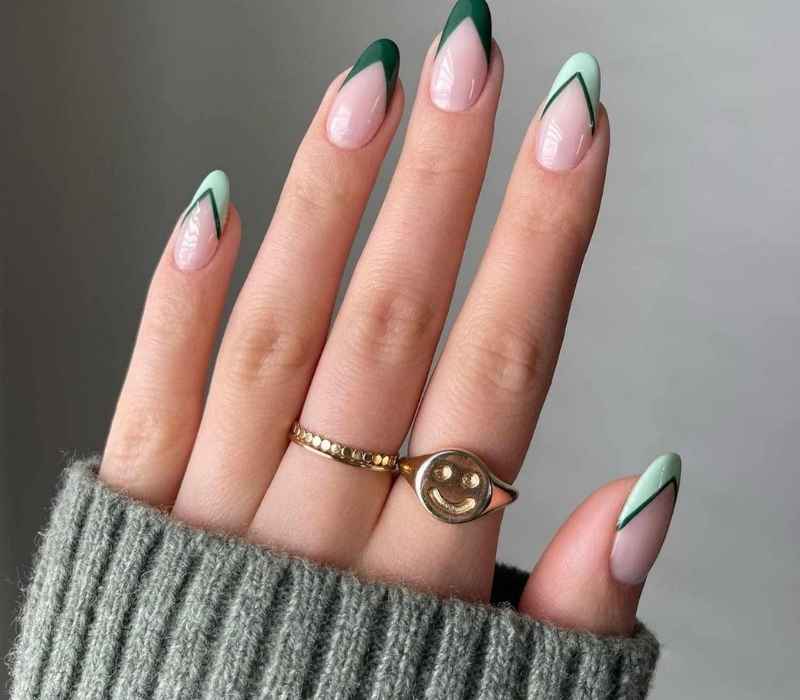
Pale Green French Tips
For a fresh take on French tips, this muted green French tip manicure offers a sophisticated manicure with a unique contrast. The thin white line beneath the green tips pops and adds a sleek and polished finish, making it a must-have in your spring vibes collection. It’s a simple yet subtle nail trend that works for both casual days and formal events.
How to Achieve the Pale Green French Tips Look
1️⃣ Prep Your Nails: Clean, file, and apply a clear base coat for smooth nails.
2️⃣ Create the Base: Paint your nails with a soft nude or sheer pink polish as the background.
3️⃣ Add White Line: Use a thin nail art brush or striping tape to draw a delicate white line just beneath where the tips will be.
4️⃣ Paint Green Tips: Carefully paint the tips with a muted pale green polish, staying above the white line for that clean contrast.
5️⃣ Seal with Top Coat: Finish with a glossy top coat to protect your mani and add shine.
🌟 Pro Tip: Use nail guides or French tip stickers for perfect, even lines.
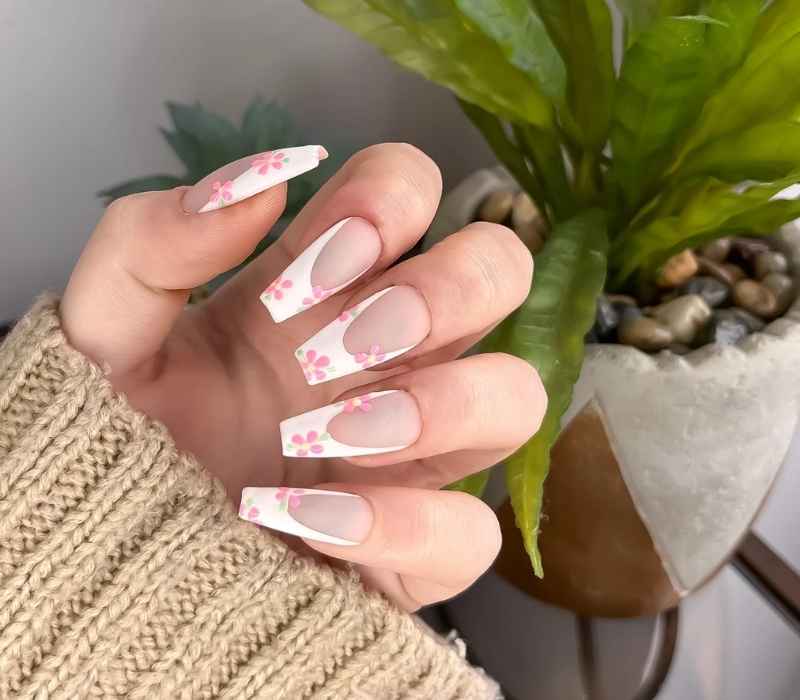
Pink and White Flowers
A perfect blend of fun and elegance, this funky French tip manicure features pink and white floral accents for a cute spring aesthetic. Whether you’re dressing up for a special event or keeping it casual, this minimalist nail approach is a go-to for those who love striking nail designs. With its effortless charm, it’s one of the best spring nail inspirations to try this year.
How to Achieve the Pink and White Flowers Look
1️⃣ Prepare Nails: Start with clean, shaped nails and apply a clear base coat.
2️⃣ French Tip Base: Paint the tips white for a classic French manicure base.
3️⃣ Add Pink Base: Apply a soft pink polish over the rest of the nail to create a delicate background.
4️⃣ Create Floral Accents: Use a thin brush or dotting tool to paint small white flowers along the tips or at the corners. Add tiny pink dots or details to complete the flowers.
5️⃣ Finish with Top Coat: Seal your design with a shiny top coat for long-lasting wear.
🌟 Tip: Floral nail stickers or stamps can speed up the process and keep it neat.
Clear Nails with Flower Tips
If you love glossy nails with a fresh spring vibe, try this look! Tiny pastel flowers on a longer nail create a delicate, feminine style that’s a springtime must. Whether you prefer a soft or bold floral touch, this design keeps things fresh and elegant.
How to Achieve the Clear Nails with Flower Tips Look
1️⃣ Prep Your Nails: Start with clean, filed nails and apply a clear base coat for shine and protection.
2️⃣ Add Glossy Clear Polish: Paint your nails with a high-shine clear polish or gel for that fresh, glass-like finish.
3️⃣ Create Floral Tips: Using a thin brush or dotting tool, paint small pastel flowers just on the nail tips. Use soft colors like baby pink, lavender, or mint for a gentle spring vibe.
4️⃣ Seal with Top Coat: Apply a glossy top coat to lock in your flowers and add extra shine.
🌟 Quick Tip: Use floral nail stickers if you want to save time but keep the look flawless.
Natural Nail with Single Flower
For a minimalist yet stylish manicure, natural nails with a neutral base colour and a single pale pink flower are the perfect choice. This simple, sophisticated design adds just the right amount of charm while keeping your nails effortlessly classy.
How to Achieve the Natural Nail with Single Flower Look
1️⃣ Prep Your Nails: Clean and shape your nails, then apply a neutral or nude base polish to keep it natural.
2️⃣ Paint the Base: Use a creamy beige, soft taupe, or light pink shade for a smooth, subtle foundation.
3️⃣ Add the Flower Accent: With a thin brush or dotting tool, paint a small pale pink flower on just one nail (usually the ring or middle finger). Keep it simple with 4-5 petals.
4️⃣ Seal and Shine: Finish with a clear glossy top coat to protect your design and add shine.
🌟 Pro Tip: Use a nail sticker or decal if you want a perfect flower without the fuss.
Pink and Orange Flowers
Add a pop of colour with vibrant pink and orange shades! This design combines flower accent nails with full colour for a balance of fun and professional—perfect for both casual days and special occasions.
How to Achieve the Pink and Orange Flowers Look
1️⃣ Prep Your Nails: Clean and shape your nails, then apply a base coat to protect them.
2️⃣ Apply Base Colors: Paint some nails with bright pink polish and others with a lively orange shade to create contrast.
3️⃣ Add Flower Accents: On one or two nails, use a thin brush or nail stickers to create small pink and orange flowers. Keep the design simple for a balanced look.
4️⃣ Finish with Top Coat: Seal your mani with a glossy top coat to keep your nails shiny and long-lasting.
🌟 Pro Tip: Use a dotting tool for neat flower petals or mix the two colours for a fun gradient effect.

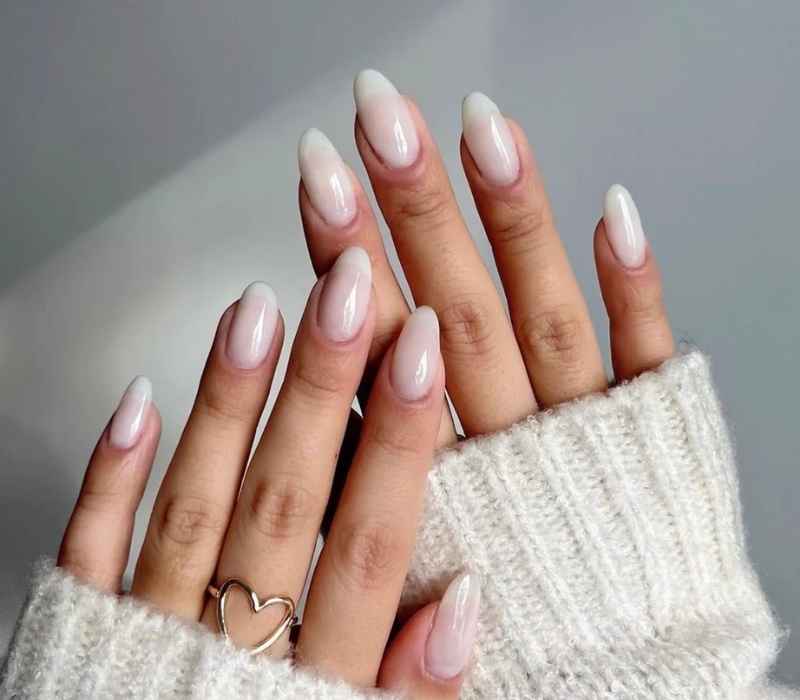
Milky White
A clean, timeless manicure never goes out of style! Milky white nails are elegant, effortless, and go with everything. Whether on short nails or long nails, this staple shade is a favourite for simple spring nail lovers.
How to Achieve the Perfect Milky White Manicure
1️⃣ Prep Your Nails: Start by cleaning and shaping your nails. Apply a base coat to protect your natural nails.
2️⃣ Apply Milky White Polish: Use two thin coats of a milky white polish for a smooth, even finish. Let each coat dry fully before the next.
3️⃣ Clean Up Edges: Use a small brush dipped in nail polish remover to fix any mistakes around the edges.
4️⃣ Seal with Top Coat: Finish with a glossy top coat to add shine and increase wear time.
🌟 Pro Tip: Choose a slightly sheer milky white for a soft, natural look or a more opaque formula for a bold statement.
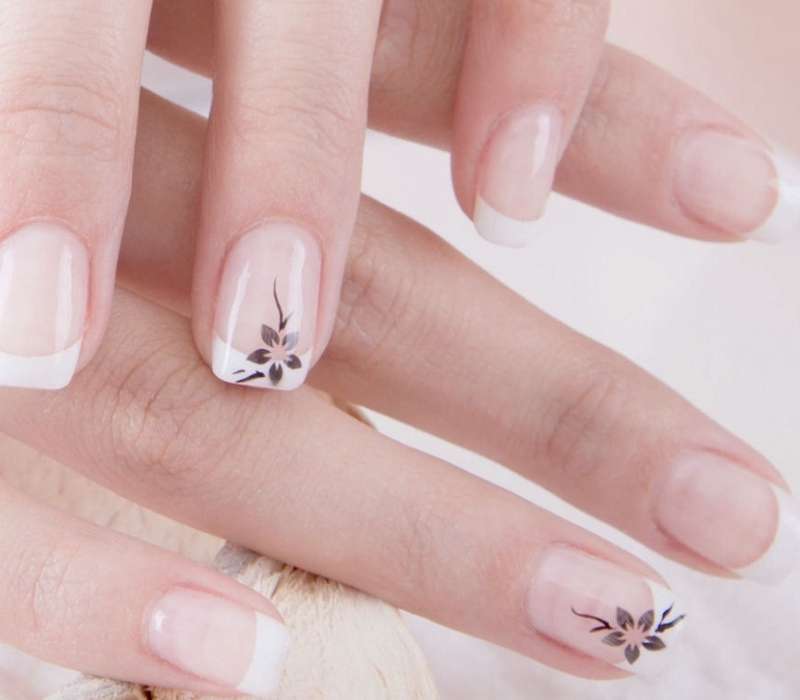
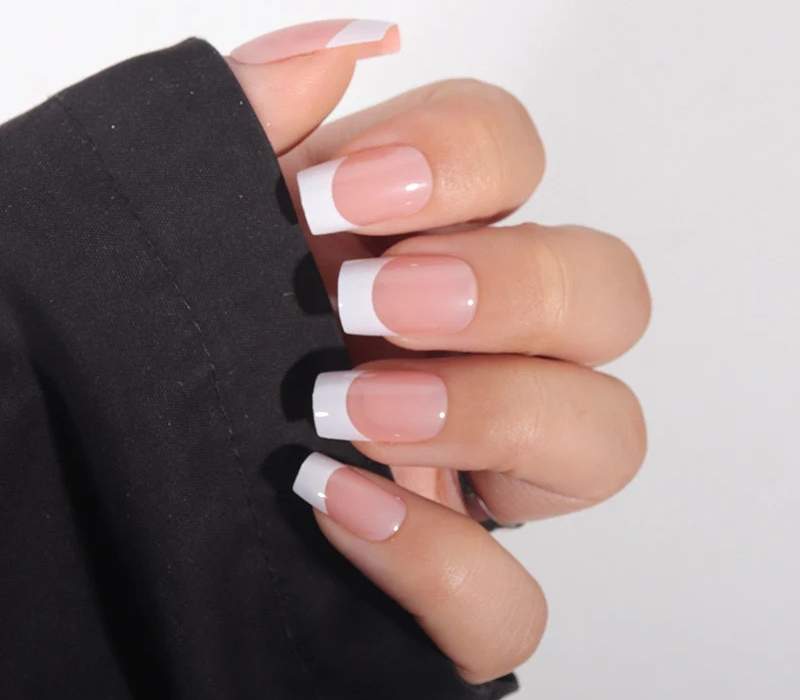
Classic Square French Manicure
Nothing is as chic as a classic square French manicure. This effortlessly elegant look proves that some nail designs never go out of style. Whether kept natural or given a modern twist with a glossy finish, this timeless winner looks stunning on short square nails and is a must for classy spring nail designs.
How to Achieve the Perfect Classic Square French Manicure
1️⃣ Prep Your Nails: Clean, file, and shape your nails into a neat square shape. Apply a nourishing base coat.
2️⃣ Natural Base Color: Paint your nails with a sheer pink or nude polish for a soft, natural look. Allow it to dry completely.
3️⃣ Create the White Tips: Using white nail polish, carefully paint a clean, straight line along the tip of each nail. A French manicure guide strip can help for precision.
4️⃣ Add Gloss: Finish with a glossy top coat to seal the design and give a smooth, shiny finish.
✨ Pro Tip: For a modern twist, try a glossy or matte finish, depending on your mood!
Baby Blue French Tip with Daisies
Give your nails a floral touch with a baby blue French tip and daisy accents. The crisp, clean French tip in soft blue pairs beautifully with adorable daisy details, making it fresh, fun, and ideal for those who love cute nails with a bit of extra charm. These floral nails are the definition of spring—a chef’s kiss!
How to Achieve the Baby Blue French Tip with Daisy Nails
1️⃣ Prepare Your Nails: Clean and shape your nails into a neat square or rounded shape. Apply a clear base coat to protect your nails.
2️⃣ Paint the Base: Use a soft nude or pale pink polish as your base color. Let it dry fully for a smooth finish.
3️⃣ Add Baby Blue French Tips: Carefully paint the tips of your nails with a pastel baby blue polish. Use nail guides for a clean, precise line if needed.
4️⃣ Create Daisy Accents: With a thin nail art brush or dotting tool, add small white daisies on one or two accent nails. Use a tiny yellow dot in the center of each flower for realism.
5️⃣ Seal It In: Finish with a shiny top coat to protect your design and add a glossy glow.
✨ Pro Tip: Use quick-dry polish or a nail dryer for faster results and less smudging.
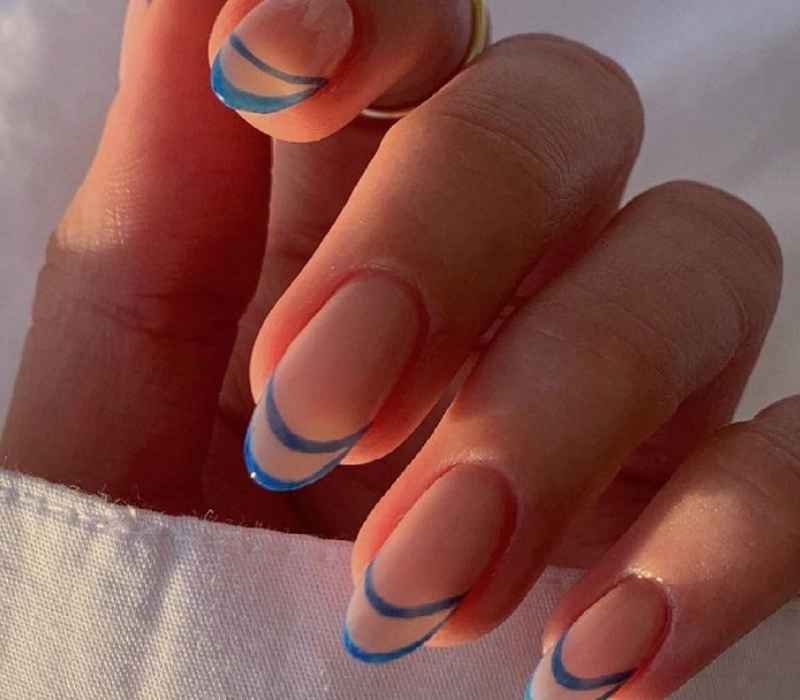
Blue Outlined French Tips
If you love a minimalist yet modern look, try blue-outlined French tips. Instead of a solid French tip, this design has a thin outlined tip in a striking cobalt blue. It’s sleek, effortlessly trendy, and gives that perfect cool-girl vibe without being too bold. Whether you’re dressing up or keeping it casual, this style adds just the right touch of elegance.
How to Achieve Blue Outlined French Tips
1️⃣ Prep Your Nails: Start by shaping your nails and applying a clear or soft nude base coat. Let it dry completely.
2️⃣ Draw the Blue Outline: Using a thin nail art brush or a fine-tip nail pen, carefully outline the tips of your nails with a cobalt blue polish. Aim for a slim, clean line along the edge.
3️⃣ Keep It Neat: If you make any mistakes, use a small brush dipped in nail polish remover to clean the edges gently.
4️⃣ Seal with Top Coat: Apply a glossy top coat over the entire nail to protect your design and add shine.
✨ Quick Tip: Practice the outline on a plastic sheet before applying it to your nails for steadier lines.
Squiggle French Tips
For a playful spin on the classic French manicure, go for squiggle French tips. Start with a neutral base, then add a soft baby-pink tip with deep pink squiggles.
The mix of abstract, fun, and artistic elements makes this a fresh alternative to traditional nail design ideas. This look is great for those who love something creative yet still chic.
How to Achieve Squiggle French Tips
1️⃣ Prep Your Nails: Start with clean nails and apply a neutral or soft pink base coat. Let it dry fully.
2️⃣ Add Baby-Pink Tips: Paint a soft baby-pink French tip on each nail, keeping the shape neat but slightly curved.
3️⃣ Draw Squiggles: Using a thin nail brush or nail art pen, create loose, deep pink squiggle lines over the tips for an abstract, artistic effect.
4️⃣ Clean Up: Fix any mistakes with a small brush dipped in nail polish remover for crisp edges.
5️⃣ Finish: Seal your design with a clear top coat to add shine and protect your art.
Pink Floral Frenchies
A feminine, dainty, and soft style, pink floral Frenchies bring all the spring energy to your nails. A pink base paired with a darker pink French tip creates a girly manicure that is both dreamy and romantic.
Add delicate daisy accents for the ultimate spring nail inspo, making your nails look fresh and full of life!
How to Achieve Pink Floral Frenchies
1️⃣ Prep Your Nails: Start with clean nails and apply a soft pink base coat. Let it dry fully.
2️⃣ Paint Dark Pink Tips: Carefully paint the tips with a darker pink polish for that classic French tip look.
3️⃣ Add Daisy Accents: Use a fine brush or dotting tool to paint small white daisies on one or two accent nails. Add yellow dots in the center for a cute detail.
4️⃣ Clean Up: Fix any smudges with a brush dipped in nail polish remover.
5️⃣ Seal Your Design: Finish with a glossy top coat to protect your nails and add shine.
Quick tip: Practice painting the French tips or daisy outlines on a plastic sheet before applying to your nails to get steadier, cleaner lines.
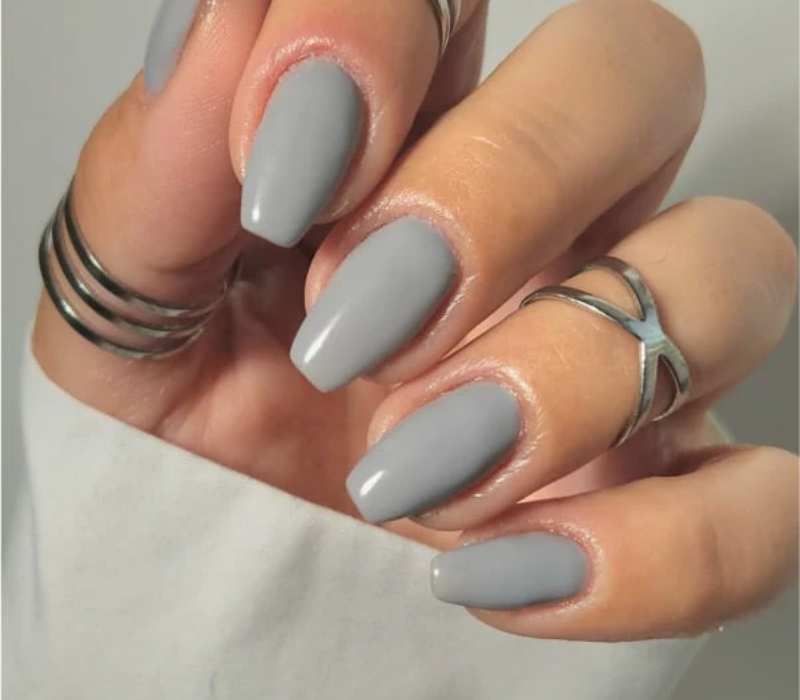
Stormy Grey
Not all spring nail colours need to be soft and pastel. If you love a moody, sophisticated look, stormy grey nails are the perfect choice.
This shade is understated yet bold, making it ideal for both short spring nails and classy spring nail ideas. The chic, modern vibe of this colour pairs well with any outfit, ensuring your manicure stays fresh and elegant all season.
How to Achieve Stormy Grey Nails
1️⃣ Prep Your Nails: Clean and shape your nails, then apply a clear base coat to protect them.
2️⃣ Apply Grey Polish: Use two thin coats of stormy grey polish for even, smooth coverage. Let each layer dry fully.
3️⃣ Add Shine: Finish with a glossy top coat to seal the color and add a polished look.
4️⃣ Clean Edges: Use a small brush dipped in nail polish remover to clean any mistakes around your nails.
Quick tip: If you want to elevate your look, try adding a subtle matte top coat on one nail for a trendy contrast.
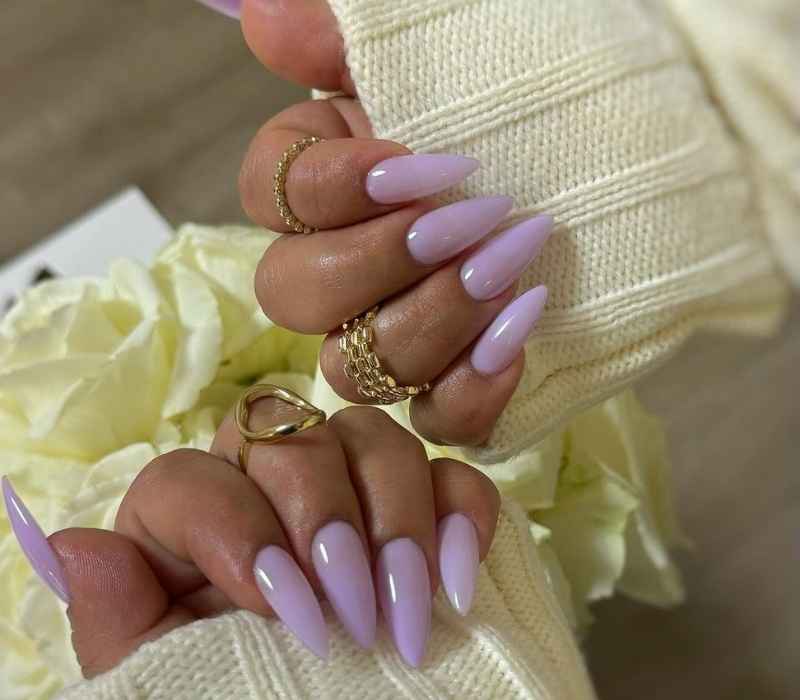
Milky Lavender
Soft, dreamy, and effortlessly elegant, milky lavender nails are a top pick for Spring 2025. This pastel hue strikes the right balance between muted and vibrant, making it a favourite for cute spring nail lovers.
Whether you go for a glossy finish or a velvety matte look, this shade blends seamlessly with any style, adding a touch of sophistication and charm to your manicure.
How to Achieve Milky Lavender Nails
1️⃣ Prep Your Nails: Start with clean, shaped nails and apply a clear base coat to protect your natural nails.
2️⃣ Apply Lavender Polish: Use two even coats of milky lavender polish for smooth, opaque coverage. Let each layer dry well.
3️⃣ Finish with a Top Coat: Choose a glossy top coat for shine or a matte one for a soft, velvety finish.
4️⃣ Clean Up: Gently remove any polish on your skin with a small brush and nail polish remover.
Quick tip: For extra style, add a tiny white dot or delicate silver stripe on one nail to keep it playful yet chic.
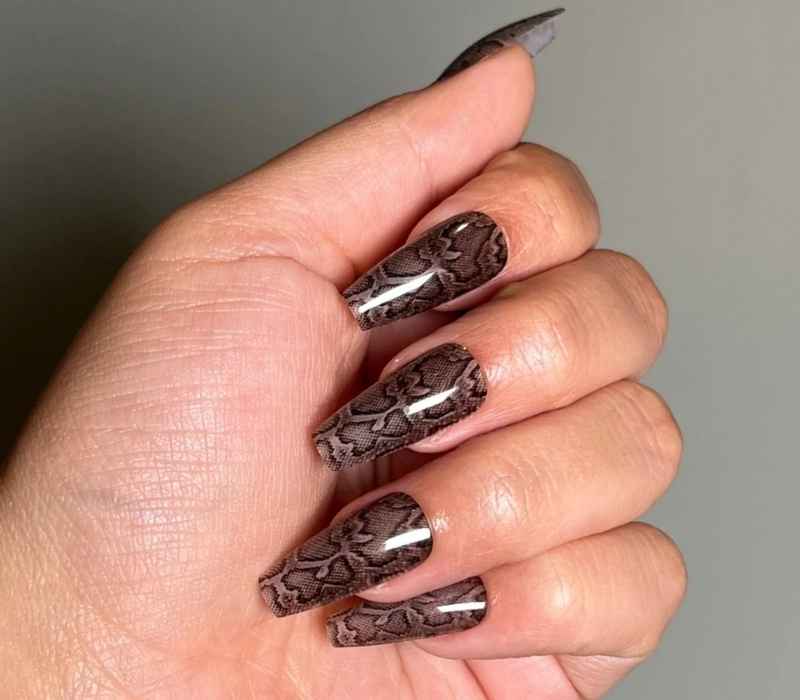
Snake Print
Looking for a bold and edgy twist? Snake print nails are here to make a fashion-forward statement. A light pink base with white serpent-like prints adds texture and uniqueness, making this design stand out.
It’s an excellent way to mix trendy nail designs with a bit of attitude while keeping things chic.
How to Achieve Snake Print Nails
1️⃣ Prepare Your Nails: Clean, shape, and apply a clear base coat to protect your nails.
2️⃣ Apply Base Colour: Paint two coats of light pink polish and let dry completely.
3️⃣ Create the Snake Print: Using a thin nail art brush or nail stamping plate, draw or stamp white irregular snake patterns over the pink base. Keep the lines loose and organic for a natural effect.
4️⃣ Seal the Design: Finish with a glossy top coat to add shine and protect your nail art.
Quick tip: Practice the snake pattern on paper first for steadier lines before applying it to your nails.
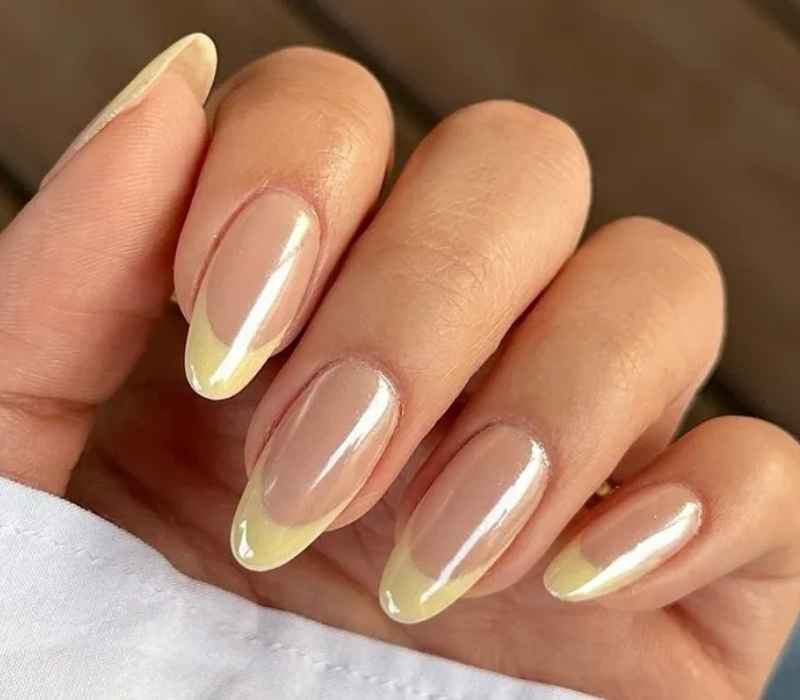
Butter Yellow Nails
For a fun and cheerful touch, butter-yellow nails bring instant sunshine to your look. This soft, warm, pastel-perfect shade is a standout choice for anyone looking to brighten up their spring nail colours.
Whether paired with floral accents or kept minimal and glossy, this happy hue is the perfect way to welcome the new season.
How to Achieve Butter Yellow Nails
1️⃣ Prep Your Nails: Clean, shape, and apply a clear base coat for smooth application.
2️⃣ Apply Butter Yellow Polish: Use two thin coats of a soft yellow polish to get full, even coverage. Let each layer dry completely.
3️⃣ Optional Floral Accents: Add tiny white or pastel flowers on one or two nails for a delicate spring touch.
4️⃣ Seal with Top Coat: Finish with a glossy top coat for shine and long-lasting wear.
Quick tip: Use thin coats to avoid streaks and ensure a smooth, buttery finish.
No matter your style, Spring 2025 is the perfect time to refresh your nails with fun, trendy, and elegant designs. From soft pastels like milky lavender and butter yellow to bold choices like snake print and stormy grey, there’s a look for everyone.
Whether you love classic French tips, floral accents, ombré effects, or statement nail art, this season is all about embracing creativity and self-expression. So grab your favorite nail tools, press-ons, or polish, and let your manicure reflect the beauty of spring!