

Pink nails are more than just a beauty trend—they’re an iconic statement that never goes out of style. Whether you love ballet pinks for a soft-girl aesthetic, bold magenta for a striking touch, or chrome metallics for a modern twist, there’s a trendy look for everyone. From coquette bows and Y2K swirls to luxe OTT tips and cute manicures, pink offers endless possibilities.
With the Barbiecore trend spreading after the launch of the film Barbie, Pink Nails remains a top choice. Whether you prefer a classic pink-and-white French manicure, delicate florals and hearts, or campy kitsch with 3D gems and jelly finishes, there’s no limit to how you can express yourself.
Pink suits every outfit and occasion, making it a must-have for nail lovers everywhere. So, if you’re looking for the best designs, get ready to screenshot ASAP—because pink nails are here to stay!
25 Top Pink Nail Ideas For 2025
If you love simple pink nail designs, try to mix different shades for a fresh look. I’ve rounded up the best cute styles to get you inspired for your next manicure. These 34 best pink nails of 2025 from the trendiest nail artist will give you endless ideas for your next manicure.
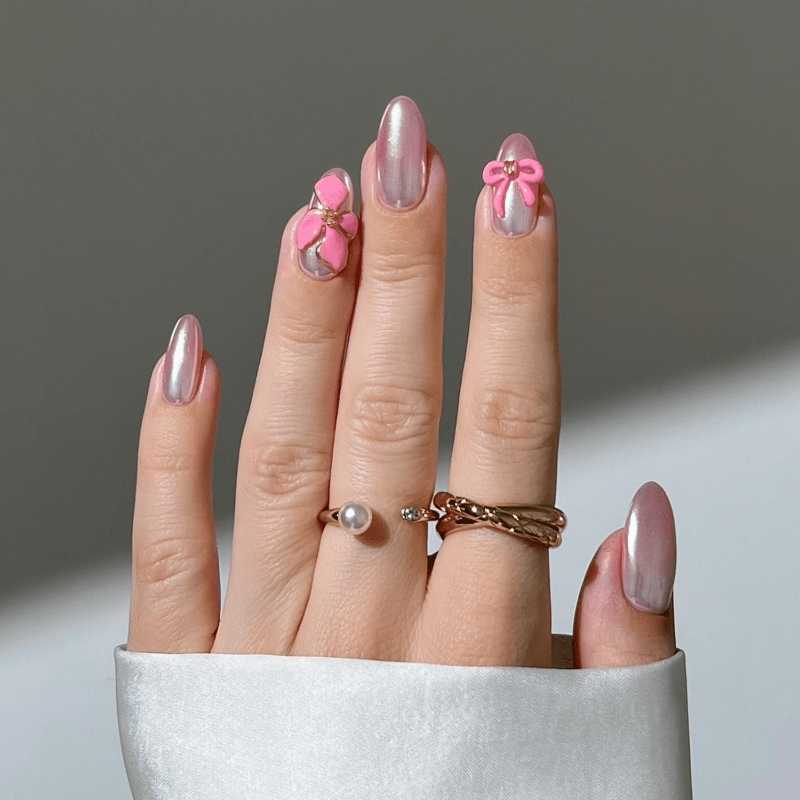
3D Bows
If you love coquette vibes, you need to try milky pink nails with 3D bows! This Pinterest-core style is all about soft-girl energy, featuring a glossy soft pink base that looks fresh and delicate. Adding accent nails with tiny bows makes this the ultimate choice for a pretty, dainty pink mani. Would you go for this dreamy look?
How to Achieve 3D Bows Nails
1️⃣ Prep Your Nails: Start with clean, filed nails. Apply a base coat to protect them.
2️⃣ Choose a Soft Pink Shade: Apply two coats of a milky pink polish. Let each layer dry completely.
3️⃣ Add 3D Bow Accents: Use nail glue to attach tiny 3D bows to a few accent nails. You can also use stickers if you prefer a flat look.
4️⃣ Seal with a Top Coat: Apply a clear, glossy top coat to lock in your design and add extra shine.
💎 Pro Tip: For a more luxurious look, add a little glitter to one of your nails for a subtle sparkle.
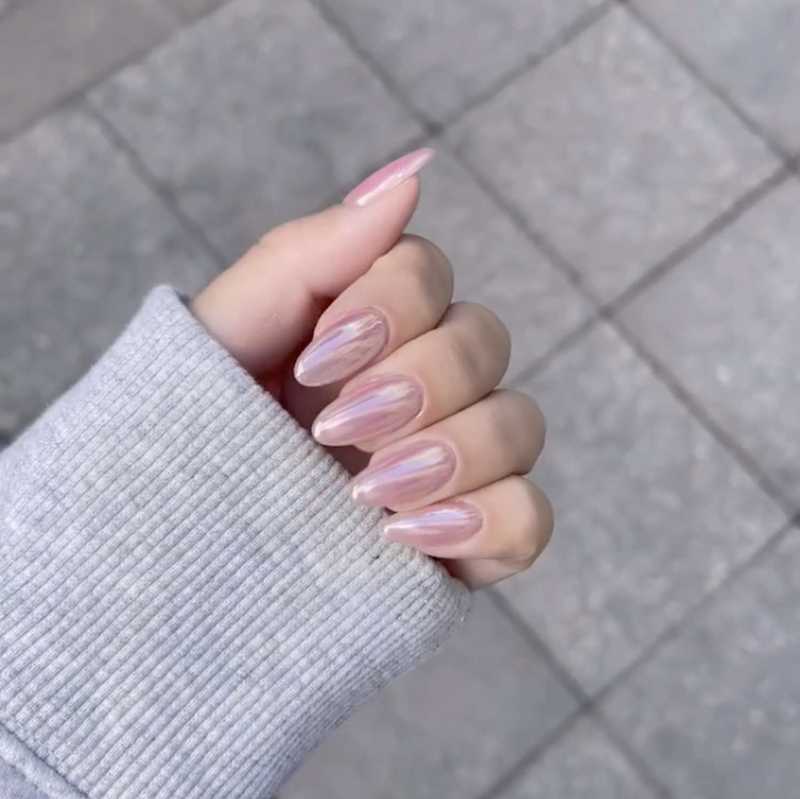
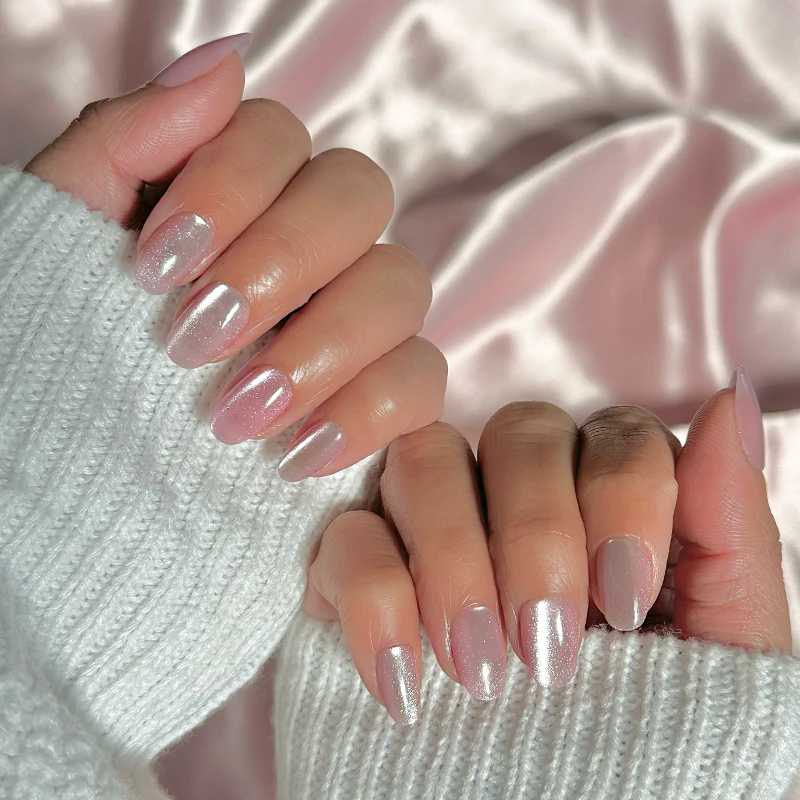
Pink Chrome
Imagine your nails looking like liquid metal—because that’s exactly what pink chrome does! A soft base paired with a mirror-shine finish makes this classy, cute, and totally rich-looking. The full chrome effect catches the light beautifully, so if you want that effortlessly luxe feel, this one’s for you. Are you ready to shine?
How to Achieve Pink Chrome Nails
1️⃣ Start with Clean Nails: File and shape your nails as desired. Apply a base coat for protection.
2️⃣ Apply Base Color: Use a light pink or neutral polish as your base. Make sure it’s fully dry before moving to the next step.
3️⃣ Add Chrome Powder: Using an applicator, gently rub pink chrome powder over your nails. Keep layering until you get the perfect metallic shine.
4️⃣ Top Coat Finish: Use a clear gel top coat to seal the chrome effect. Cure it under a UV lamp for a flawless, mirror-like finish.
💎 Pro Tip: For an even shinier look, use a non-wipe top coat before applying the chrome powder.
Light Pink Nails
For those who love an effortlessly elegant look, light pink nails are a must. Whether you choose a glossy, velvety, or matte look, this style is perfect for any season or occasion. It gives that clean girl aesthetic, making your nails look polished and refined. Do you prefer your light pink nails minimal or with a little extra design?
How to Achieve Light Pink Nails
1️⃣ Prep Your Nails: Start with clean, trimmed nails. Shape them to your desired length and apply a base coat for protection.
2️⃣ Pick Your Pink Shade: Use a soft, light pink polish. You can choose between glossy, matte, or velvety finishes. Apply two coats for full coverage.
3️⃣ Customize Your Look: For a minimal style, keep it simple. For extra flair, add tiny silver dots, a thin French tip, or even a subtle shimmer on an accent nail.
4️⃣ Top Coat Perfection: Finish with a high-shine or matte top coat, depending on your style.
🌸 Pro Tip: Keep a nail oil handy to maintain that fresh, healthy look.
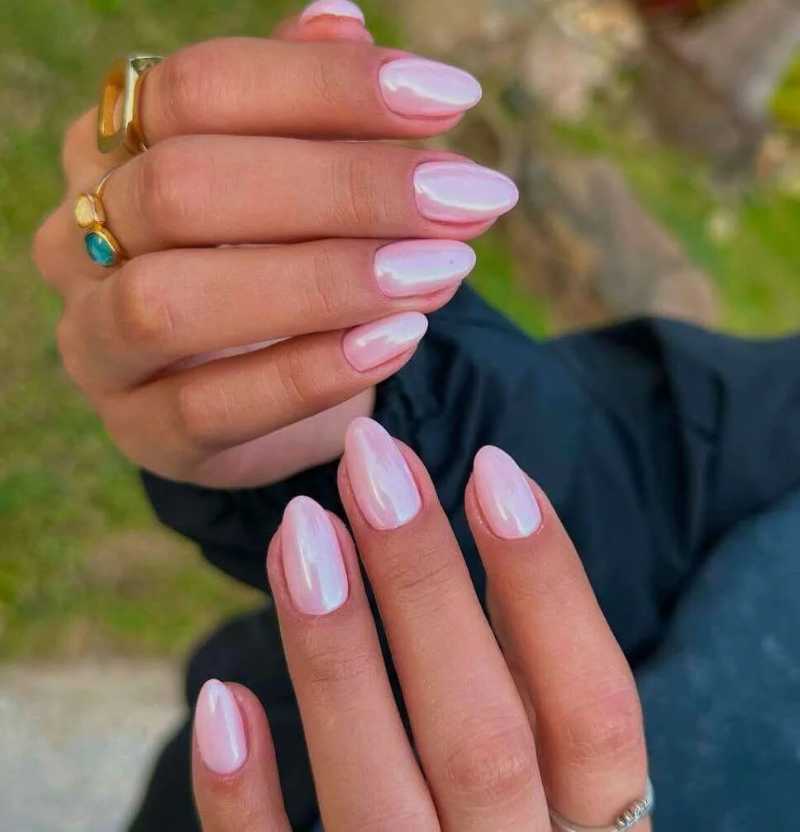
Light Pink Chrome Nails
The blush nails trend is still going strong, and pink chrome is the ultimate way to join in. Think Hailey Bieber’s viral glazed donut nails but with a pink twist—shiny, sleek, and seriously gorgeous. If you love trendy nails, this one’s for you! Would you try this chic look?
How to Achieve Light Pink Chrome Nails
1️⃣ Prep Your Nails: Start with clean, filed nails. Apply a base coat to protect your natural nails.
2️⃣ Choose Your Base Shade: Go for a soft, light pink polish. Apply two coats for even coverage. Let it dry completely.
3️⃣ Apply Chrome Powder: Once your base is dry, gently rub pink chrome powder onto each nail using an eyeshadow applicator or silicone tool.
4️⃣ Seal with Top Coat: Use a clear, non-wipe gel top coat to lock in the chrome effect. Cure it under a UV lamp for a high-shine finish.
✨ Pro Tip: For a super smooth, mirror-like effect, use a non-wipe top coat before adding the chrome powder.
Disco Darling
If you love sparkles, this dazzling look is for you! A pink glitter base, topped with allover pink sequins, creates a fun and eye-catching effect. Perfect for nights out or whenever you want to feel extra glam! What’s your take on glitter nails—too much or just right?
How to Achieve Disco Darling Nails
1️⃣ Prep Your Nails: Start with clean, filed nails. Apply a clear base coat for protection.
2️⃣ Pick Your Base Shade: Choose a pink glitter polish. Apply two coats for a sparkling, even base.
3️⃣ Add Sequins: While the polish is still slightly tacky, carefully place pink sequins using a dotting tool or tweezers. Arrange them evenly for a neat look.
4️⃣ Seal with Top Coat: Use a thick, clear top coat to lock in the sequins and give your nails a smooth, glossy finish.
🌟 Pro Tip: For extra sparkle, use a holographic top coat over the sequins for a dazzling disco effect.
Party on Top
This fun, pink, and sparkly manicure is like a party on your nails! With a mix of stars, sequins, and confetti glitter, plus a gradient tip on almond-shaped nails, this one is all about having fun with your look. Would you rock this playful style?
How to Achieve Party on Top Nails
1️⃣ Prep Your Nails: Start with clean, shaped nails—almond shape works best for this look. Apply a clear base coat for protection.
2️⃣ Create a Gradient Base: Use a soft pink polish and blend it towards the tips for a gradient effect. Use a makeup sponge for a smooth blend.
3️⃣ Add Glitter Elements: While the gradient is slightly tacky, carefully place stars, sequins, and confetti glitter across the tips. Use tweezers for precision.
4️⃣ Seal Everything: Apply a thick, clear top coat to lock in your glitter and give your nails a glossy, smooth finish.
🎉 Pro Tip: For a more playful look, mix holographic stars and multi-sized glitter pieces for an extra party vibe.

Pink On Pink French Tip Nails
A French tip nails with a twist! This stunning revisited version layers different tones of hot pink, creating a fresh and stylish effect. It tops it all off with a bold, modern touch. How do you feel about bold French tips—love them or prefer the classic version?
How to Achieve Pink on Pink French Tip Nails
1️⃣ Prep Your Nails: Start with clean, filed nails. Apply a base coat to protect your natural nails.
2️⃣ Apply Base Color: Choose a soft pink shade for the base. Make sure it’s fully dry before moving on.
3️⃣ Create Dual Pink Tips: Use a fine nail art brush or French tip stickers. First, apply a lighter pink shade, then add a hot pink line just below it for a layered look.
4️⃣ Top Coat for Shine: Seal everything with a clear, glossy top coat to enhance the colours and give a smooth finish.
💖 Pro Tip: If you want a bolder look, switch one of the pinks to a neon shade for an extra pop.
READ ALSO: French Tip Nail Ideas Perfect for Fall

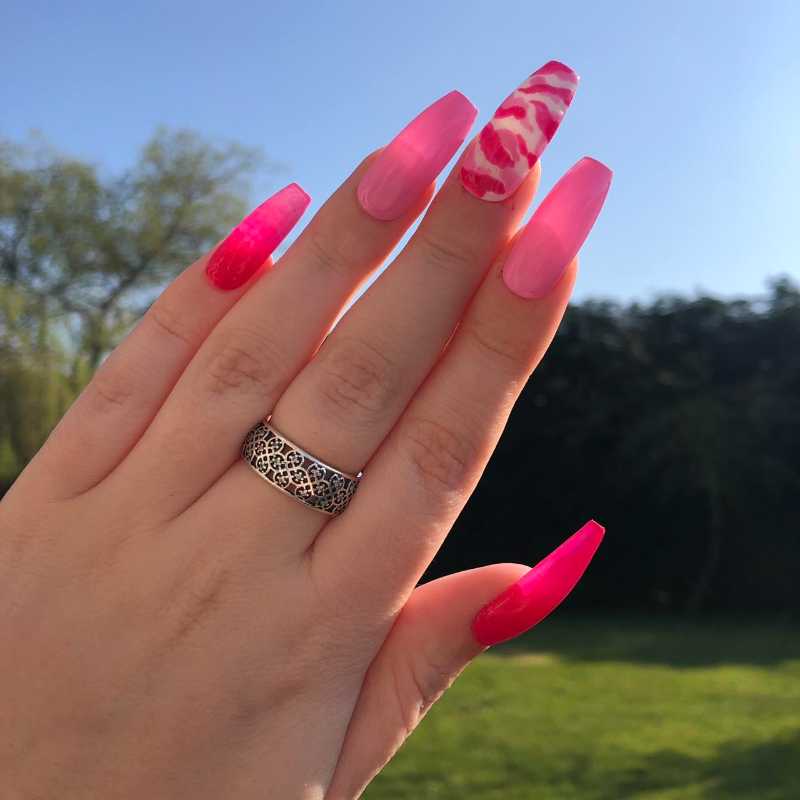
Neon Pink And Gold Short Nails
Want something bold? Get inspired by this stunning nail design featuring gold foil swirls on the ring finger. The pink, approaching neon, is particularly suitable for summer or dark skin, giving a bright, eye-catching effect. Would you try this striking combo for your next mani?
How to Achieve Neon Pink and Gold Short Nails
1️⃣ Prep Your Nails: Clean, shape, and file your nails to your desired length. Apply a base coat for protection.
2️⃣ Apply Neon Pink Base: Choose a bold, neon pink polish and apply two even coats. Let each layer dry for a smooth finish.
3️⃣ Add Gold Foil Accent: On your ring finger, carefully apply gold foil. Use a thin layer of clear polish as an adhesive, then gently press the foil for a chic, swirled effect.
4️⃣ Top Coat for Lasting Shine: Seal your design with a clear, glossy top coat for a long-lasting, high-shine finish.
✨ Pro Tip: If you want an even bolder look, try adding a touch of gold foil on other nails for a balanced, luxurious vibe.
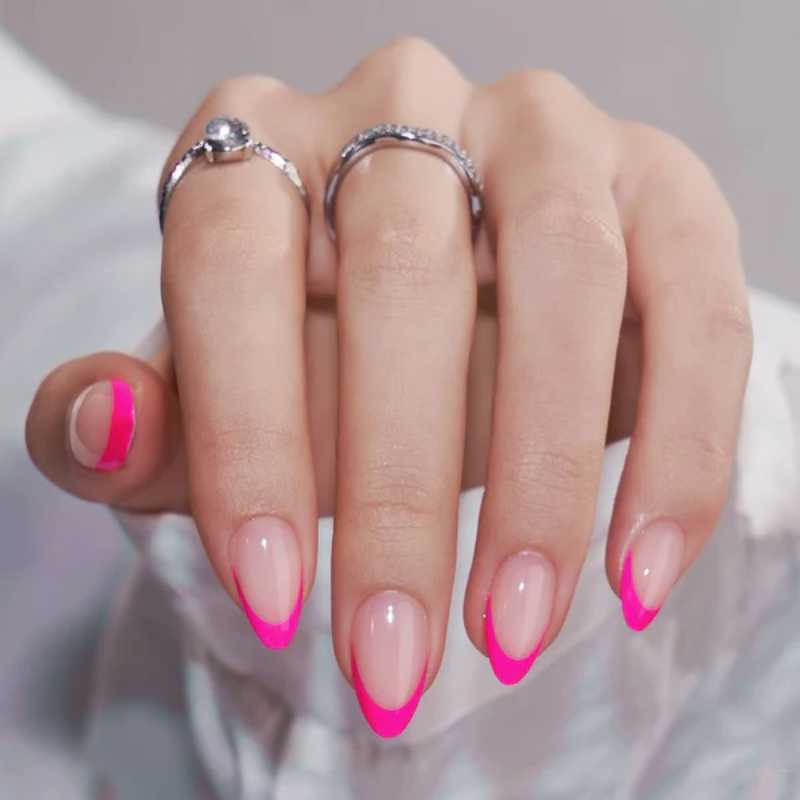
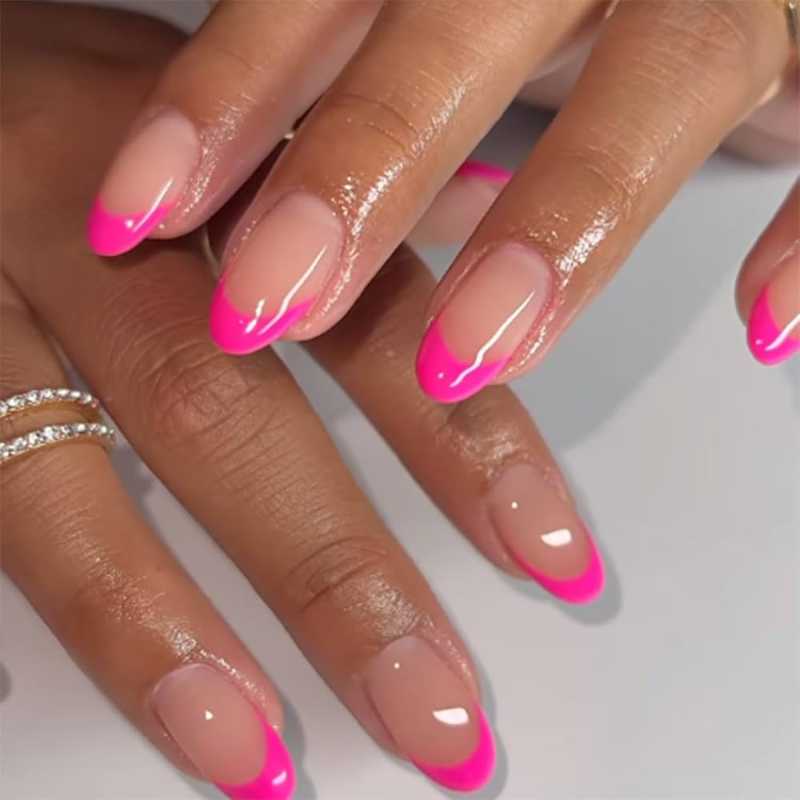
Pink French Tip Nails
If you’re looking for a fresh take on a timeless classic, you’ll love pink French tip nails! Instead of the traditional white tip, swap it for a soft baby pink or nude pink shade for a more modern look.
The contrast between the base and tip makes this design stand out, and if you want to add extra oomph, a few gemstones will give it that elegant touch. Would you try this chic style for your next manicure?
How to Achieve Pink French Tip Nails
1️⃣ Prep Your Nails: Clean, shape, and file your nails to your desired length. Apply a base coat to protect your natural nails.
2️⃣ Choose Your Base Shade: Use a soft, nude pink polish for the base. Apply two coats for a smooth, even look.
3️⃣ Create Pink French Tips: Carefully use a light pink polish for the tips. You can freehand it or use French tip guides for a neat, symmetrical finish.
4️⃣ Add Gemstone Details (Optional): For extra elegance, place tiny gemstones along the smile line or at the base of your accent nail. Secure them with clear polish.
💎 Pro Tip: Seal everything with a high-shine top coat for a glossy, salon-like finish that lasts.
Pink Ombre Nails
If you love a gradient effect, then pink ombre nails are perfect for you! The fade from baby pink to blush or a soft nude creates a seamless transition, giving your nails a natural yet elegant feel.
These cute nails take minimal effort, so whether you prefer a simple or stylish look, this design works for any occasion. Do you prefer ombre nails subtle or bold?
How to Achieve Pink Ombre Nails
1️⃣ Prep Your Nails: Start with clean, filed nails. Apply a base coat to protect your natural nails and create a smooth surface.
2️⃣ Choose Your Shades: Pick two pink shades—one light (like baby pink) and one darker (like blush). These will blend perfectly for the ombre effect.
3️⃣ Apply the Ombre Effect: Use a makeup sponge to dab the two colours onto your nails, starting with the lighter shade at the top and the darker shade at the tip. Gently tap until you get a seamless gradient.
4️⃣ Smooth and Seal: Apply a sheer pink polish over the ombre for a blended look. Finish with a glossy top coat for a salon-quality shine.
🌸 Pro Tip: For a softer blend, use a damp sponge and dab lightly. This technique creates a more natural gradient.

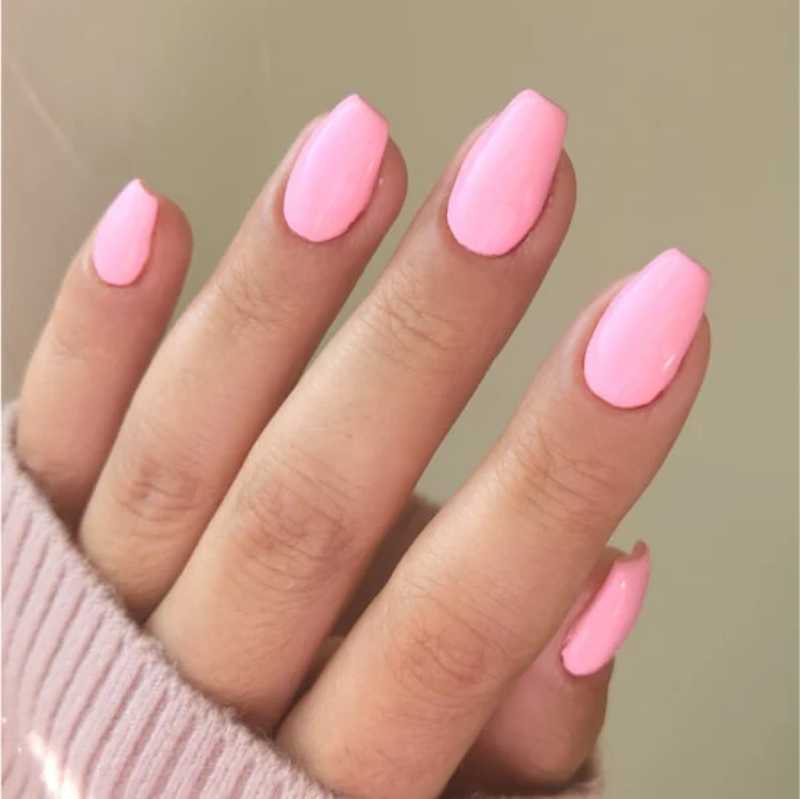
Nearly Neon
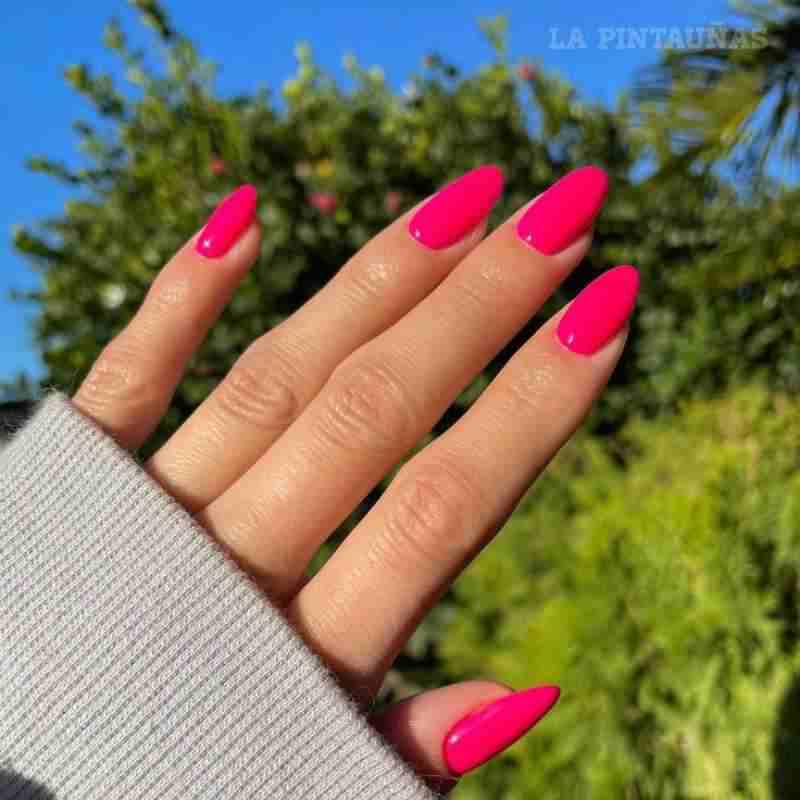
If you love a bold look, go for a hot pink that stands out. A block color keeps things bright, making your nail designs pop effortlessly. It’s perfect for those who want to make a statement without adding too many details.
How to Achieve Nearly Neon Nails
1️⃣ Prep Your Nails: Start with clean, trimmed nails. Shape them to your desired length and apply a base coat to protect your natural nails.
2️⃣ Pick Your Neon Shade: Choose a bold, hot pink polish. For the brightest look, apply a white base first, then layer your neon pink polish for extra pop.
3️⃣ Apply Even Coats: Use thin coats of the neon pink polish, allowing each layer to dry completely. Two to three coats will give you full, vibrant coverage.
4️⃣ Seal and Shine: Use a high-shine top coat to keep your neon nails looking glossy and fresh.
🌟 Pro Tip: If you want an even bolder look, add a neon pink chrome powder over your polish for a dazzling effect.
Dot to Dot
A pale pink base is the perfect background for delicate details. Adding polka dots gives a cute and playful vibe to your nails. Whether you go for a subtle or bold pattern, this design adds charm to your manicure.
How to Achieve Dot to Dot Nails
1️⃣ Prep Your Nails: Start with clean, shaped nails. Apply a base coat to protect them and ensure your polish lasts longer.
2️⃣ Choose Your Base Shade: Use a soft, pale pink polish as your base. Apply two coats for a smooth, even finish. Let it dry completely.
3️⃣ Create Your Dots: Dip a dotting tool or a toothpick in white or contrasting polish, then gently dot your nails in your desired pattern—random dots for a playful look or a neat grid for a classic style.
4️⃣ Seal Your Design: Finish with a clear, glossy top coat to protect your dots and give your nails a beautiful shine.
🎨 Pro Tip: For a chic look, keep the dots small and minimal. But if you want a bolder style, go for larger dots in different colors.

Pink Tips and Other Tricks
Pink shades are great for experimenting, so why not mix a few different tones? Ask your technician to dust some pink chrome powder for a shimmer effect. If you love extra glam, press on some nail jewels, stickers, or studs to add interest to your nails.
How to Achieve Pink Tips and Other Tricks
1️⃣ Prep Your Nails: Start with clean, shaped nails. Apply a base coat to protect them and ensure your polish lasts longer.
2️⃣ Choose Your Pink Shades: Pick two or three pink tones—light pink for the base, a brighter pink for the tips, and a shimmery pink chrome powder for a glamorous touch.
3️⃣ Create Your Design: Apply the light pink base first. Once dry, use the brighter pink to create French tips. For a shimmering effect, lightly dust pink chrome powder over the tips.
4️⃣ Add Some Glam: If you love extra sparkle, apply tiny jewels, stickers, or studs on one or two accent nails for a fun, customized look.
💎 Pro Tip: Use a fine brush for sharp, clean tips, and always seal with a glossy top coat for a long-lasting finish.
Try Out Some Tips
For a modern spin on a French manicure, mix solid shades with pink tips on a couple of nails. This simple change keeps your nails looking fresh while still being classy.
How to Achieve the “Try Out Some Tips” Look
1️⃣ Prepare Your Nails: Clean and shape your nails to your preferred length. Apply a base coat to protect your nails and help polish last longer.
2️⃣ Pick Your Colors: Choose a neutral or soft pink shade for most nails and a bright or pastel pink for the tips on a couple of accent nails.
3️⃣ Apply Base Color: Paint all your nails with the neutral or soft pink color and let them dry completely.
4️⃣ Add Pink Tips: On one or two nails, carefully paint the tips with your chosen pink shade for a fresh twist on the classic French manicure.
5️⃣ Seal the Look: Finish with a clear top coat to add shine and protect your design.
✨ Pro Tip: Use tape or nail guides for neat, even tips — perfect for a polished, modern manicure!
Curated Cuticles
A long, oval-shaped manicure with a pink pearlescent base and glitter cuticles makes for a stunning design. Flip the usual glitter tips by sweeping the sparkle to the base. A fine, multicolored array creates a sprinkle-like effect, but swapping it for silver gives a bubbly champagne vibe.
How to Achieve the Curated Cuticles Look
1️⃣ Shape Your Nails: File your nails into a long, elegant oval shape for a classy base.
2️⃣ Apply Base Color: Paint your nails with a pink pearlescent polish and let it dry fully.
3️⃣ Add Glitter at Cuticles: Using a small brush, gently sweep multicolored or silver glitter along the cuticle area—this reverses the usual glitter tip look for a fresh twist.
4️⃣ Blend and Set: Lightly blend the edges of the glitter for a soft sprinkle effect, then seal everything with a glossy top coat.
✨ Pro Tip: Use fine glitter for a delicate sparkle that adds subtle glam without overpowering the pearly base.
Pink Clouds
A pinkish nude mani with soft white clouds is the definition of dreamy. The pale pink polish paired with cloud accents makes this a delicate and elegant nail look.
How to Achieve the Pink Clouds Nail Look
1️⃣ Prep Your Nails: Start with clean, shaped nails and apply a clear base coat to protect your natural nails.
2️⃣ Apply Base Color: Paint your nails with a soft pinkish nude polish. Apply two coats for a smooth, even finish and let it dry.
3️⃣ Create Cloud Accents: Using a small nail art brush or a dotting tool, gently paint soft white cloud shapes on one or two accent nails. Keep the edges fluffy and light for that dreamy effect.
4️⃣ Seal with Top Coat: Finish with a glossy top coat to protect your design and add a polished shine.
☁️ Pro Tip: Practice your cloud shapes on paper first to get the perfect soft look before painting on your nails.
READ ALSO: 30 Best Black and White Nails Designs for 2025

Light Pink Nails With Black Dots
Want something super cute yet stylish? A long, round nail shape with a bubble gum pink tone and black dots is the way to go. This nail design is simple, yet it will seal the deal for any outfit.
How to Achieve Light Pink Nails with Black Dots
1️⃣ Prep Your Nails: Clean and shape your nails into a long, rounded style. Apply a clear base coat to protect your nails.
2️⃣ Apply Pink Base: Paint your nails with a bubble gum pink polish. Use two coats for full coverage and let it dry completely.
3️⃣ Add Black Dots: Using a dotting tool or a toothpick, carefully place small black dots randomly or in a pattern on your nails. Focus on one or two accent nails for a chic look.
4️⃣ Finish with Top Coat: Seal your design with a glossy top coat to keep it smooth and long-lasting.
🖤 Pro Tip: Vary the size of the dots for a playful yet stylish effect that complements any outfit.

Long Baddie Hot Pink Nails
A trendy baddie look calls for beautiful hot pink nails. The gel polish makes them pop, while the color adds a feminine touch. This nail design is all about confidence and style.
How to Achieve Long Baddie Hot Pink Nails
1️⃣ Prep Your Nails: Start by shaping your nails long and sharp for that bold baddie vibe. Clean and buff your nails, then apply a base coat.
2️⃣ Choose Your Hot Pink Gel: Pick a vibrant hot pink gel polish. Apply two thin coats, curing each layer under a UV or LED lamp.
3️⃣ Add Extra Shine: Finish with a glossy gel top coat to lock in color and give your nails that high-shine, flawless finish.
4️⃣ Maintain Your Look: Use cuticle oil daily to keep your nails healthy and your manicure fresh.
💅 Pro Tip: Keep your nails long and well-shaped to really own the confident, stylish baddie look!
Pink Velvet
If you love a rich, velvety effect, these bright pink velvet nails are for you. This shimmer-packed manicure is designed to create a soft yet luxurious look that rivals plush textiles. The smooth finish on long almond nails adds a modern touch, making them perfect for any occasion.
How to Achieve Pink Velvet Nails
1️⃣ Prepare Your Nails: Shape your nails into a long almond style for that elegant feel. Clean, file, and apply a base coat to protect your nails.
2️⃣ Apply Pink Base Color: Use a bright pink polish as your base. Apply two smooth coats and let it dry completely.
3️⃣ Add Velvet Effect: While the polish is still slightly tacky, gently sprinkle pink velvet powder or flocking powder over your nails to create that soft, plush texture.
4️⃣ Seal Lightly: Use a no-wipe top coat on nails without velvet. For velvet nails, avoid heavy top coats to keep the texture intact.
✨ Pro Tip: Keep the velvet effect limited to a few accent nails for a trendy, balanced look.
READ ALSO: 25 Stunning Almond Nail Ideas for a Flawless Look In 2025!
Blush Aura
The blush pink nails trend is everywhere, and it’s easy to see why. This dreamy aura design features a soft white twinkle star effect, giving it a galaxy-inspired look. To enhance the beauty further, you can add dainty dots for a more totally love-worthy style.
How to Achieve Blush Aura Nails
1️⃣ Prep Your Nails: Clean and shape your nails to your liking. Apply a base coat to protect your nails and ensure longer wear.
2️⃣ Apply Blush Pink Base: Paint your nails with a soft blush pink polish. Apply two coats for smooth, even coverage and let dry completely.
3️⃣ Create Twinkle Star Effect: Using a thin nail art brush or a dotting tool, add tiny white stars and small dots randomly across your nails for that dreamy, galaxy-inspired vibe.
4️⃣ Finish with Top Coat: Seal your design with a clear, glossy top coat to protect your nail art and add shine.
🌟 Pro Tip: Keep your stars delicate and spaced out for a subtle, elegant look that works for any occasion.

Pink Camo
For a bold and edgy style, pink camo nails bring a red and pink camouflage twist to your mani. Start with a light base, then layer splotches of darker pinks over the tips for that rugged effect. The heart cutouts add a cute detail, but for a seamless look, an expert touch is necessary, especially if using extensions.
How to Achieve Pink Camo Nails
1️⃣ Prepare Your Nails: Clean, file, and shape your nails. Apply a base coat to protect them and create a smooth canvas.
2️⃣ Apply Light Base Color: Paint your nails with a soft, light pink polish. Let it dry fully before moving on.
3️⃣ Create Camo Pattern: Using a small brush or sponge, dab irregular shapes with darker pink and red tones over the tips. Layer them randomly for that authentic camo look.
4️⃣ Add Heart Details: Carefully place small heart cutouts or paint tiny hearts on accent nails for a playful touch.
5️⃣ Seal with Top Coat: Finish with a clear, glossy top coat to protect your design and add shine.
💡 Pro Tip: For the best results, consider visiting a nail pro, especially if you want perfect hearts or use nail extensions.
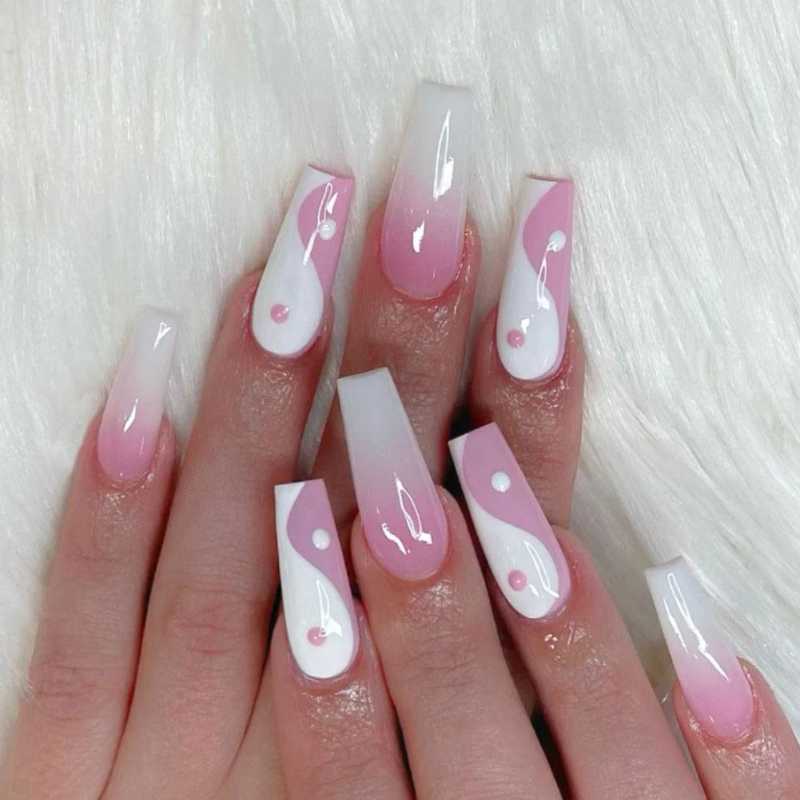
Pink Yin and Yang
A subtle nod to harmony, this design features a ballet pink glossy base coat topped with a tiny pink yin-and-yang symbol. It’s simple yet stylish, perfect for those who love meaningful nail art with a chic touch.
How to Achieve Pink Yin and Yang Nails
1️⃣ Prep Your Nails: Start with clean, filed nails. Apply a base coat for smooth application and protection.
2️⃣ Choose Your Base Color: Use a soft ballet pink polish for that elegant, glossy finish. Apply two coats for full coverage.
3️⃣ Create the Yin-Yang Design: Using a fine nail art brush, draw a small circle for the yin-yang symbol on your accent nail. Fill one half with a slightly darker pink shade. Add two tiny dots—one light, one dark—to complete the look.
4️⃣ Perfect Your Design: Use a toothpick or a dotting tool for precision. If freehand is tricky, try a yin-yang nail sticker for a clean look.
5️⃣ Seal with a Top Coat: Apply a clear top coat to protect your design and add a glossy shine.
✨ Pro Tip: Keep a steady hand or rest your finger on a flat surface when drawing the yin-yang for a neater finish.
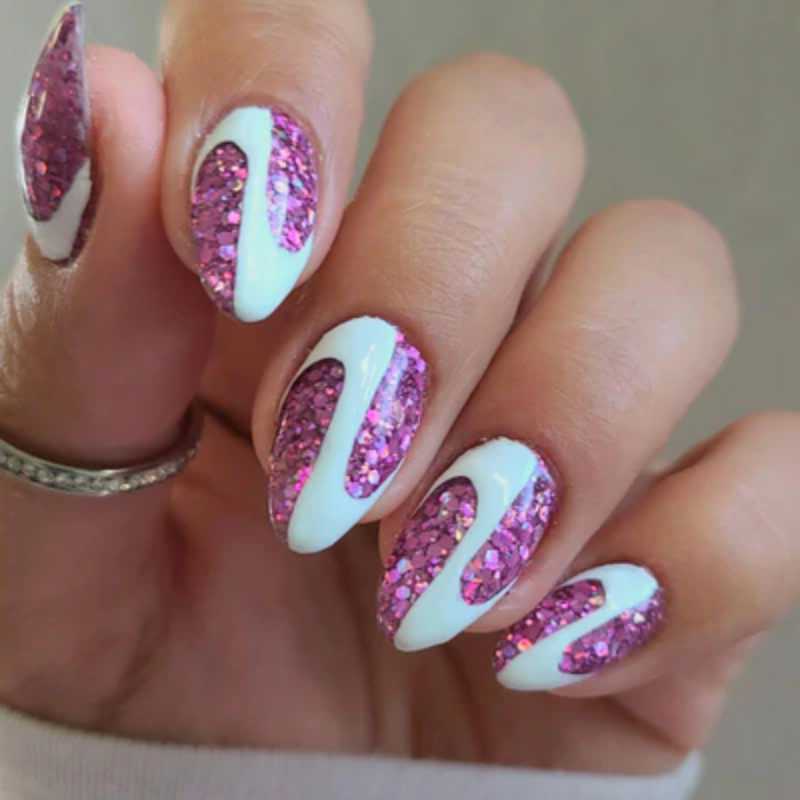
Pink and White with Squiggly French Tips
A traditional pink and white French mani gets a fresh, modern spin with a pop of hot pink. This classic look stays elegant while adding a playful twist, making it perfect for any occasion!
How to Achieve Pink and White with Squiggly French Tips
1️⃣ Prep Your Nails: Start with clean, shaped nails. Apply a clear base coat for a smooth and protected surface.
2️⃣ Choose Your Base Color: Use a soft pink or nude polish for the base. Apply two thin coats and let them dry completely.
3️⃣ Create Squiggly French Tips: Use a thin nail art brush dipped in white polish to draw wavy, squiggly lines along the tips of your nails. Don’t worry about perfect lines—this design is meant to look playful.
4️⃣ Add a Pop of Hot Pink: Outline the white squiggles with a hot pink shade for a fun contrast. You can also alternate between pink and white squiggles for variety.
5️⃣ Finish with a Top Coat: Apply a clear top coat to lock in your design and give your nails a glossy, polished look.
🌸 Pro Tip: Use a nail art pen for even more control when creating the squiggly tips.
Chic Pink and Mauve Geometric Look
If you love a modern touch, a geometric nail pattern with pink, white, and mauve is a must-try. This mix of sharp lines and soft tones will surely turn heads while keeping your nails looking chic and stylish. It’s a great way to add some artistic flair without going overboard.
How to Achieve Chic Pink and Mauve Geometric Nails
1️⃣ Prep Your Nails: Start with clean, shaped nails. Apply a clear base coat to protect them and ensure a smooth application.
2️⃣ Choose Your Base Colors: Use a light pink or mauve as your main base color. Apply two coats for full coverage and let it dry.
3️⃣ Create Geometric Patterns: Using a thin nail art brush or nail tape, paint geometric shapes with white and mauve. Play with triangles, rectangles, or diagonal lines for a unique look.
4️⃣ Add Finishing Touches: For a bolder look, outline the shapes with a metallic silver or gold polish. Keep some nails solid for a balanced design.
5️⃣ Seal with a Top Coat: Apply a clear, glossy top coat to lock in your geometric design and give your nails a shiny, polished finish.
🎨 Pro Tip: If freehand isn’t your thing, use nail stickers or stencils to get those crisp geometric lines effortlessly.
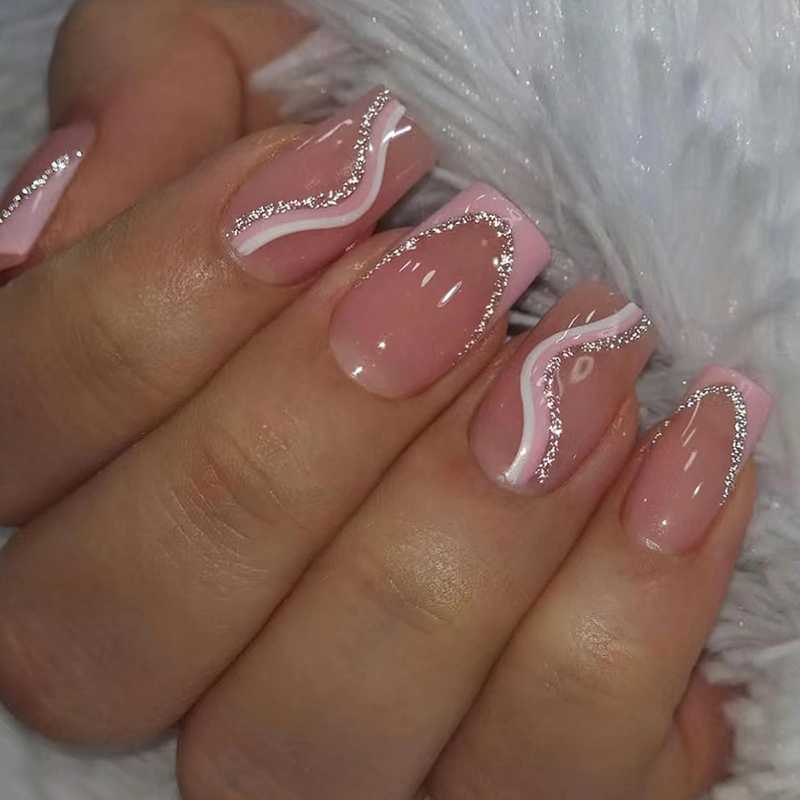
Slanted Metallic and Pink French
A fresh take on the French manicure, the pink-slanted look blends modern iterations with a sleek, stylish design. Instead of the usual straight tips, a diagonal cut with a metallic finish makes this look stand out. Whether you love subtle elegance or bold statements, this twist on a classic never fails to impress.
How to Achieve Slanted Metallic and Pink French Nails
1️⃣ Prep Your Nails: Start with clean, filed nails. Apply a base coat to protect your natural nails and ensure a smooth surface.
2️⃣ Choose Your Base Color: Opt for a soft pink or nude base. Apply two coats for an even, polished look. Let it dry completely.
3️⃣ Create Slanted Tips: Use nail tape or a fine nail art brush to paint diagonal, slanted tips. Choose a metallic shade like gold, silver, or rose gold for a bold contrast.
4️⃣ Perfect the Edges: Make sure the slanted lines are crisp and clean. You can correct any mistakes with a thin brush dipped in polish remover.
5️⃣ Top It Off: Seal your design with a glossy top coat to enhance shine and protect the metallic finish.
✨ Pro Tip: For a bolder look, try a chrome metallic finish, or add a thin black outline to make your slanted tips pop.

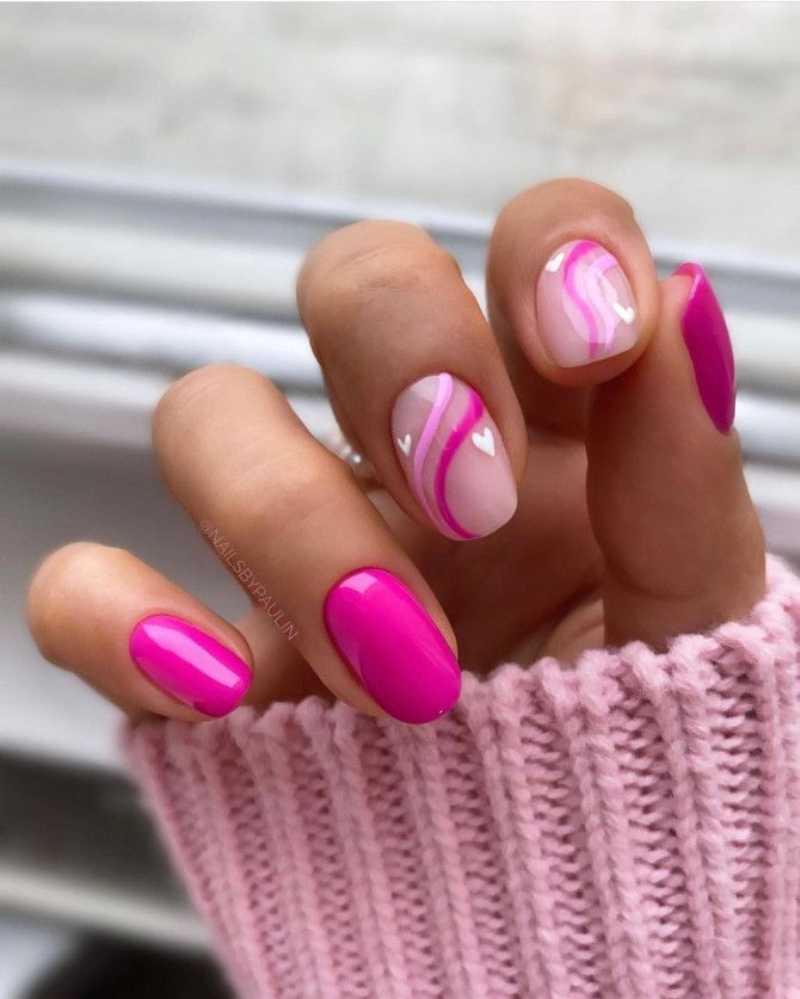
Romantic Pink Hearts and Swirls
For a bold yet simple design, a nude base with pink swirls and hearts is perfect. This romantic style adds a delicate and detailed touch, making your nails feel soft yet playful. Whether for a special occasion or just because, this look brings out the beauty of pink in an elegant way.
How to Achieve Romantic Pink Hearts and Swirls Nails
1️⃣ Start with Clean Nails: File and shape your nails to your desired length. Apply a clear base coat for a smooth surface.
2️⃣ Apply a Nude Base: Use a soft, nude polish for a subtle and elegant background. Let it dry completely.
3️⃣ Create Pink Swirls and Hearts: Use a fine nail art brush with pink polish to draw delicate swirls and tiny hearts. You can alternate between light and dark pink shades for dimension.
4️⃣ Seal Your Design: Apply a clear, glossy top coat to protect your art and add shine.
💖 Pro Tip: If drawing hearts is tricky, use a dotting tool to create two dots side by side and drag them together into a point—easy, perfect hearts!
Abstract Swirls
If you’re tired of plain nails, why not try something fun and artsy? A soft and milky pink base paired with abstract neon swirls creates a fresh, stylish look.
This DIY mani is perfect when you want something eye-catching but not too overwhelming. Instead of sticking to solids, let your creativity flow with unique patterns that feel both playful and modern.
How to Achieve Abstract Swirls Nails
1️⃣ Prep Your Nails: Shape and file your nails as desired. Apply a clear base coat to protect your nails.
2️⃣ Apply a Milky Pink Base: Choose a soft, milky pink polish for a clean and subtle background. Apply two coats for full coverage.
3️⃣ Create Abstract Swirls: Use a thin nail art brush with neon shades (like pink, green, and yellow) to draw swirling patterns. Make them flow freely for an organic, artistic look.
4️⃣ Lock It In: Apply a glossy top coat to seal your design and give it a smooth, shiny finish.
🌟 Pro Tip: Don’t worry about perfection—the beauty of abstract designs is in their free-flowing, creative look.

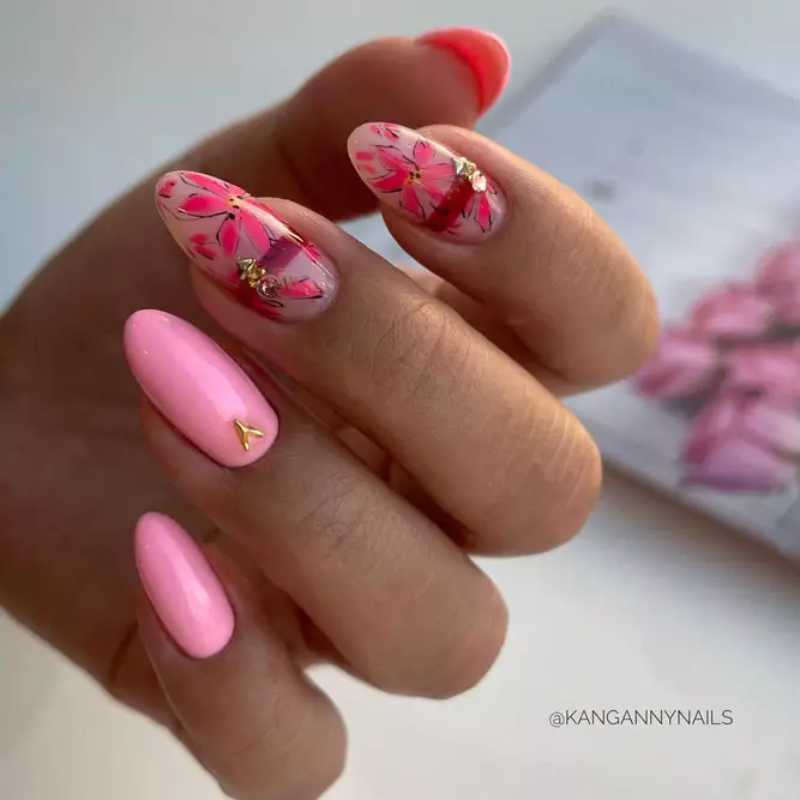
Floral French
A delicate mix of light pink French tips and chunky flower petals makes this style a true love story for nail art lovers. The natural base keeps it soft, while the florals add a charming accent.
Whether you’re embracing the cutest spring vibe or just looking for something romantic, these nails bring a fresh touch of nature to your fingertips.
How to Achieve Floral French Nails
1️⃣ Start with a Clean Base: File and shape your nails. Apply a clear base coat to protect your natural nails.
2️⃣ Apply Light Pink French Tips: Use a soft pink polish to create classic French tips. For a clean edge, use French tip guides or freehand with a thin brush.
3️⃣ Add Floral Details: Use a dotting tool or a fine brush to create chunky flower petals in soft colors like white or pastel pink. Add a small dot in the center for a realistic look.
4️⃣ Seal with a Glossy Top Coat: Apply a clear, glossy top coat to lock in your design and give your nails a shiny finish.
🌸 Pro Tip: For a more artistic look, add a few leaves with a thin brush or sprinkle some glitter for extra sparkle.

Ombre Design
A fresh twist on ombre, this pink manicure blends into a chrome fade for a shiny, smooth finish. The topcoat adds that extra glow, making it look drop-dead cute. This mani truly understands the assignment, giving you a flawless gradient effect that stands out effortlessly.
How to Achieve Ombre Design Nails
1️⃣ Prep Your Nails: Start with clean, shaped nails. Apply a base coat to protect your natural nails.
2️⃣ Apply Base Color: Use a soft pink or nude shade as your base and let it dry completely.
3️⃣ Create the Ombre Effect: Use a makeup sponge with one end dipped in pink polish and the other in chrome polish. Gently dab it onto your nails until you get a smooth gradient effect.
4️⃣ Seal with a Top Coat: Apply a glossy top coat for a smooth, shiny finish that enhances the chrome effect.
✨ Pro Tip: For a more dramatic look, you can add tiny sparkles to the chrome section for an extra touch of glam.

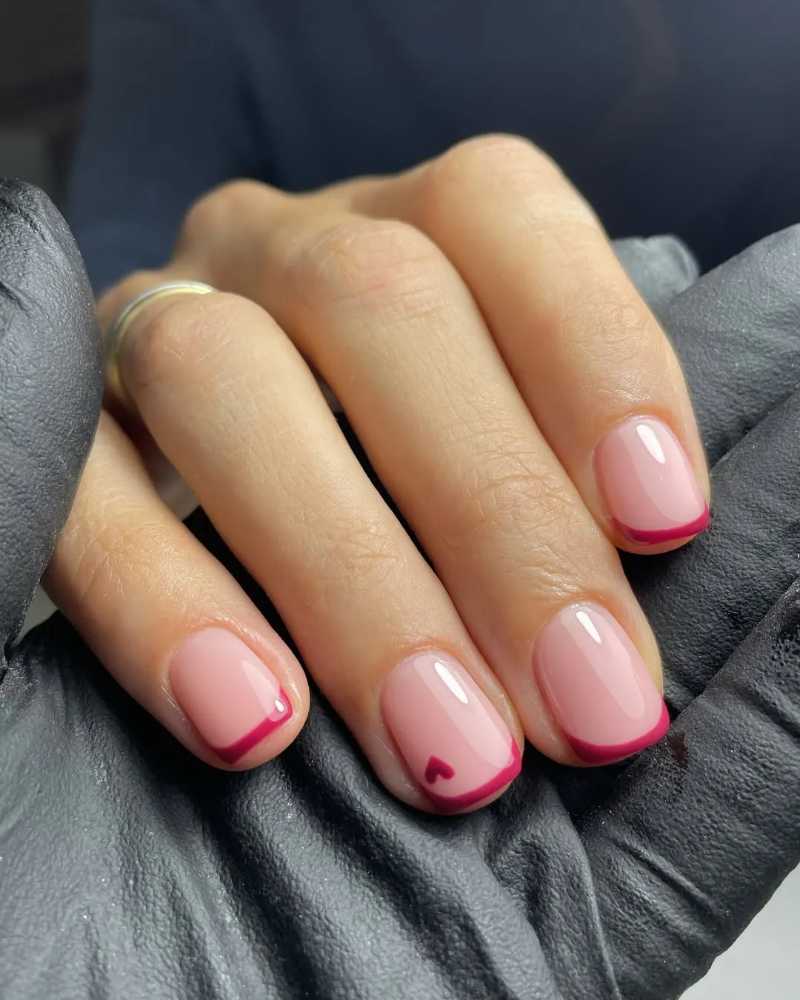
Heart Accents
Nothing beats a pink manicure with red hearts—it’s an iconic duo. A semi-sheer base with tiny, adorable accents makes it perfect for Valentine’s, or just when you’re feeling cute 365 days a year. Whether you love romantic styles or just enjoy playful nail art, this one is a heart-stealer!
How to Achieve Heart Accents Nails
1️⃣ Prep Your Nails: Start with clean, filed nails. Apply a base coat to protect your natural nails.
2️⃣ Choose Your Base Shade: Go for a semi-sheer pink or nude polish. Apply two coats for a smooth finish.
3️⃣ Add Heart Accents: Use a thin nail art brush or dotting tool to create tiny red heart shapes on your nails. Focus on the tips or place them randomly for a playful look.
4️⃣ Seal with a Top Coat: Use a glossy top coat to lock in your design and add a beautiful shine.
❤️ Pro Tip: If you want a more 3D effect, use tiny heart stickers instead and secure them with a thick top coat.

Magenta Power
Looking for something bold? Magenta pink nails will make a statement. Alternate between a solid color and French tips for a striking contrast moment that feels stylish and modern.
This shade is powerful on its own, so you don’t need extra designs—because it is the extra. Whether you love minimalistic or daring styles, this look balances both perfectly.
How to Achieve Magenta Power Nails
1️⃣ Prep Your Nails: Clean, file, and shape your nails to your desired length. Apply a base coat for protection.
2️⃣ Apply Magenta Polish: Use a bold magenta pink shade as your base. You can alternate between full-color nails and French tips for a striking look.
3️⃣ Perfect the French Tips: For the French tips, use a fine brush or French tip guide to create clean, sharp lines with the same magenta color.
4️⃣ Top It Off: Seal with a glossy top coat for a vibrant shine and longer-lasting color.
💖 Pro Tip: If you want to add a little twist, try a matte top coat on your French tips while keeping the full-color nails glossy.

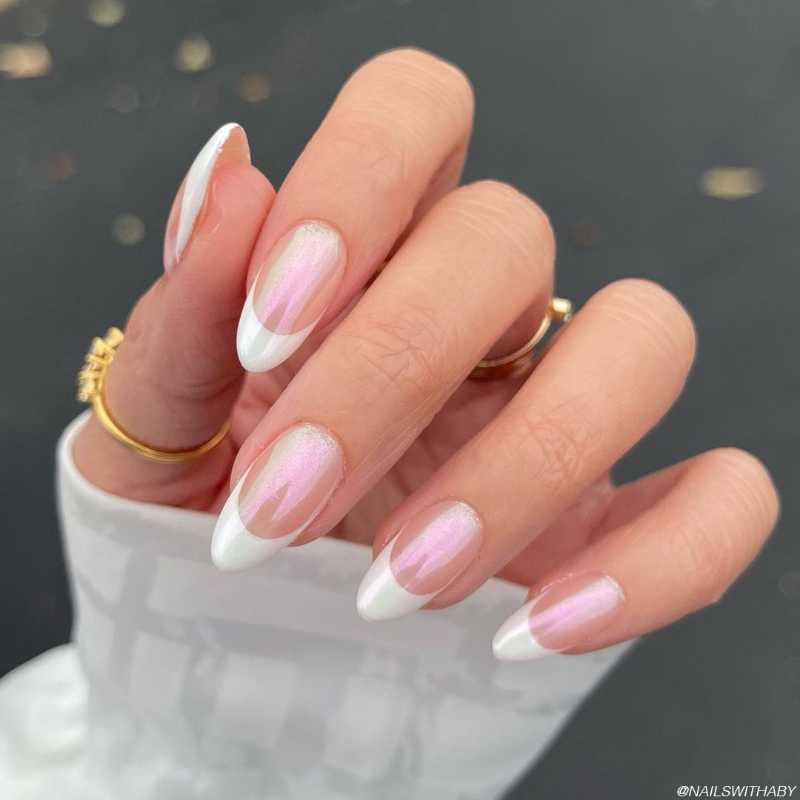
Glazed French
Nothing looks as effortlessly chic as sheer nails with an icy pink touch. This ultra-glossy style blends a natural base with soft French tips, topped off with a chrome finish for that dreamy glow. Whether you’re going for a minimal yet elegant look or something subtle but trendy, this design is a perfect match.
How to Achieve Glazed French Nails
1️⃣ Prep Your Nails: Clean, file, and shape your nails. Apply a clear base coat for a smooth start.
2️⃣ Create the Base: Use a sheer, natural pink polish as your base. Let it dry completely.
3️⃣ Add the French Tips: Carefully paint soft pink French tips using a fine brush for precision.
4️⃣ Apply Chrome Powder: Gently rub chrome powder over your French tips for that glossy, glazed effect.
5️⃣ Top Coat Shine: Finish with a clear, glossy top coat to lock in the look and keep your nails extra shiny.
💖 Pro Tip: For a flawless, mirror-like finish, use a no-wipe top coat before applying the chrome powd
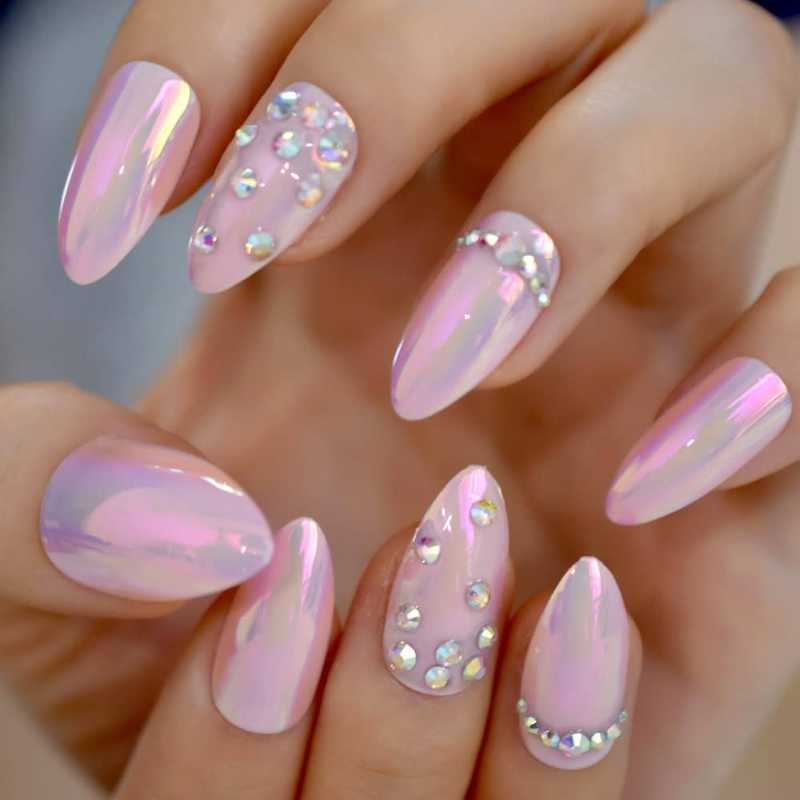
Gems & Chrome
For those who love variety, alternate solid pink with chrome, white French tips, and rhinestone cuticles. This look is both formal and playful, making it a go-to for special occasions.
The best of both worlds, it combines classic elegance with a modern, eye-catching twist. The reflective chrome effect brings an edgy feel, while the rhinestones add a touch of luxury. If you want your nails to shine, this is the way to do it!
How to Achieve Gems & Chrome Nails
1️⃣ Prep Your Nails: Clean, file, and shape your nails. Apply a clear base coat for a smooth surface.
2️⃣ Choose Your Base Colors: Use a mix of soft pink, white, and chrome for variety. Alternate between solid pink, chrome, and French-tipped nails.
3️⃣ Add Rhinestones: Carefully place tiny rhinestones along your cuticles on a few nails for a luxe touch. Use nail glue for a secure hold.
4️⃣ Seal with Top Coat: Apply a glossy top coat to lock in the designs and keep them shiny.
💎 Pro Tip: Use a dotting tool for precise rhinestone placement, and always cure under a UV lamp for long-lasting wear.
Pink nails are more than just a trend—they’re a mood, a statement, and a little piece of happiness at your fingertips. Whether you love cute pink nails, glossy French tips, or dazzling chrome finishes, there’s a perfect style waiting for you.
Imagine the confidence boost of a fresh pink manicure, the way it catches the light, or the compliments that make your day. From elegant ombré to fun 3D bows, your nails should reflect your personality and vibe. If you love these ideas, don’t keep them to yourself—share this with your friends because sharing is caring, and everyone deserves a little pink perfection!