
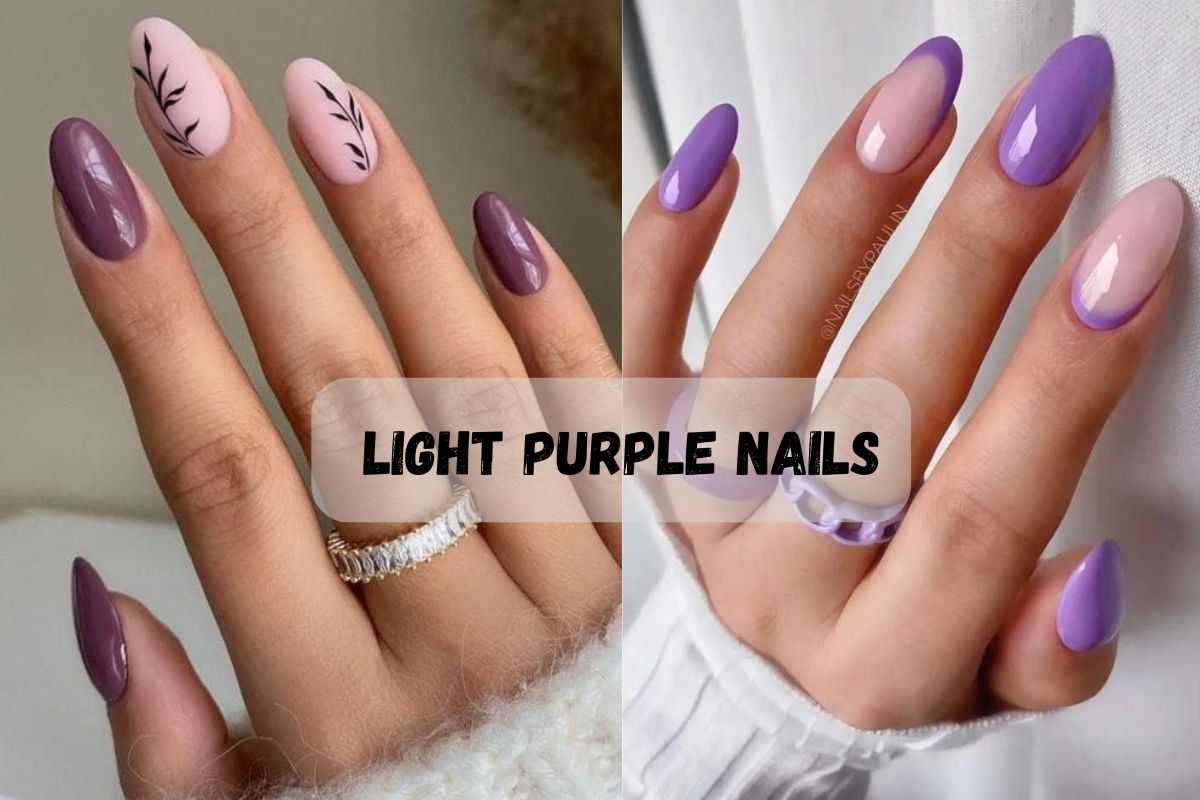
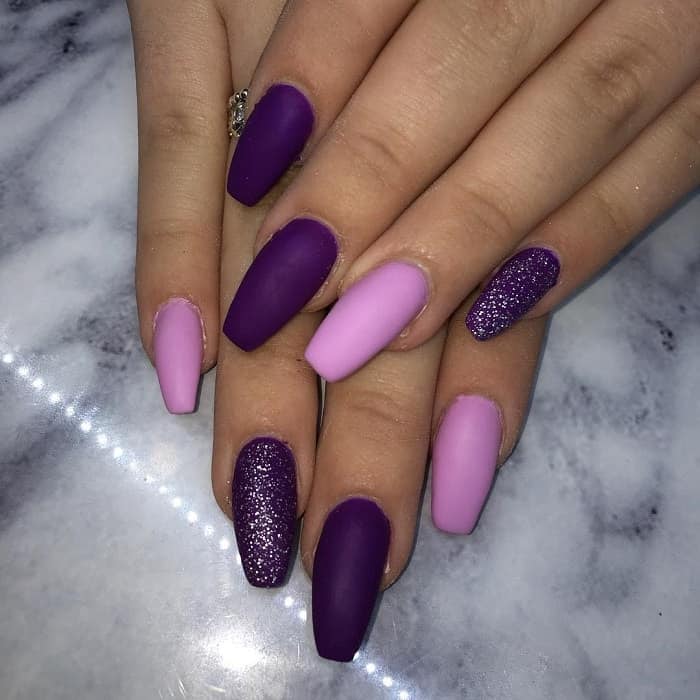
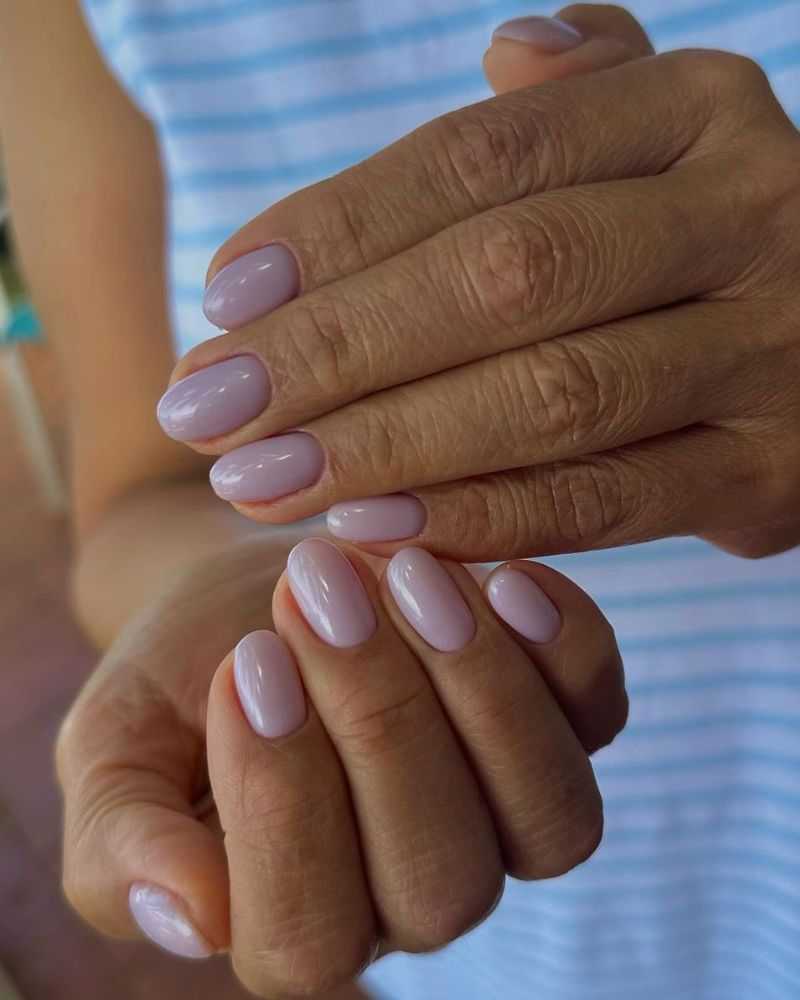
A purple manicure is always a vibe—so what’s your style? Do you love the dreamy look of soft lilac or the bold drama of deep plum? This regal colour, loved by icons like Taylor Swift and Prince, is your chance to feel like royalty every time you glance at your nails. Picture yourself rocking elegant French tips, delicate flowers, or even playful butterflies—which one suits you best?
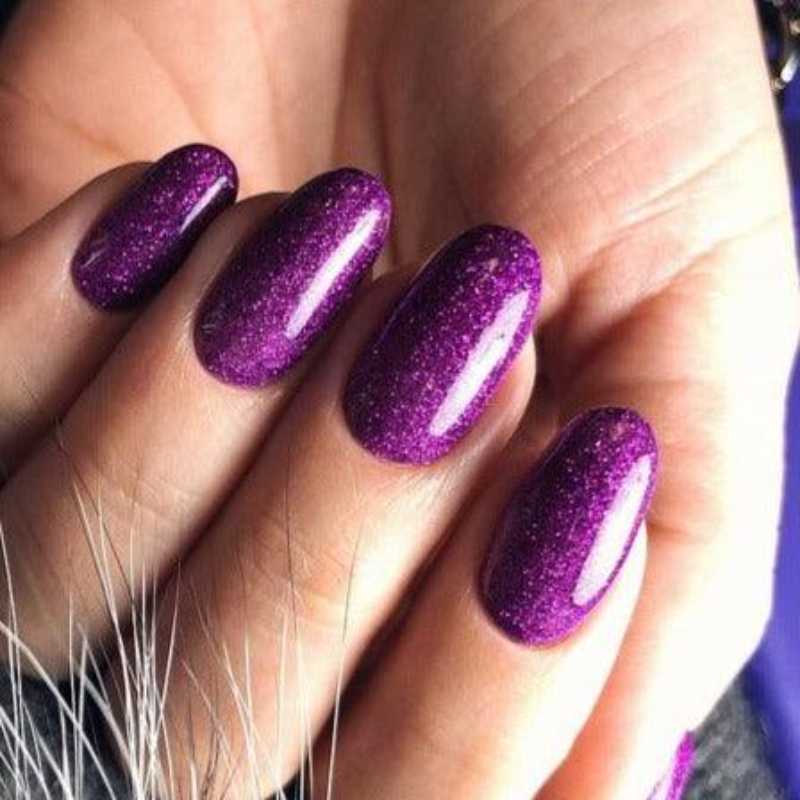
Feeling bold? Go for deep, moody tones, a sleek, glossy finish, or trendy ombre nails. Want something subtle? Soft pastels and chic matte nails are always a win. Whether you’re into gel nails, acrylic nails, or stylish nail extensions, there’s a perfect match for you.
So, next time you visit the nail salon, why not explore endless possibilities? Your feed will be glowing, and trust me—the compliments won’t stop!
Trendy Purple Nail Designs In 2025:
Every nail lover needs to see these purple designs—scroll down for pure manicure perfection! If you’re looking for light purple nails with design, these stunning ideas will definitely spark your next manicure inspiration.
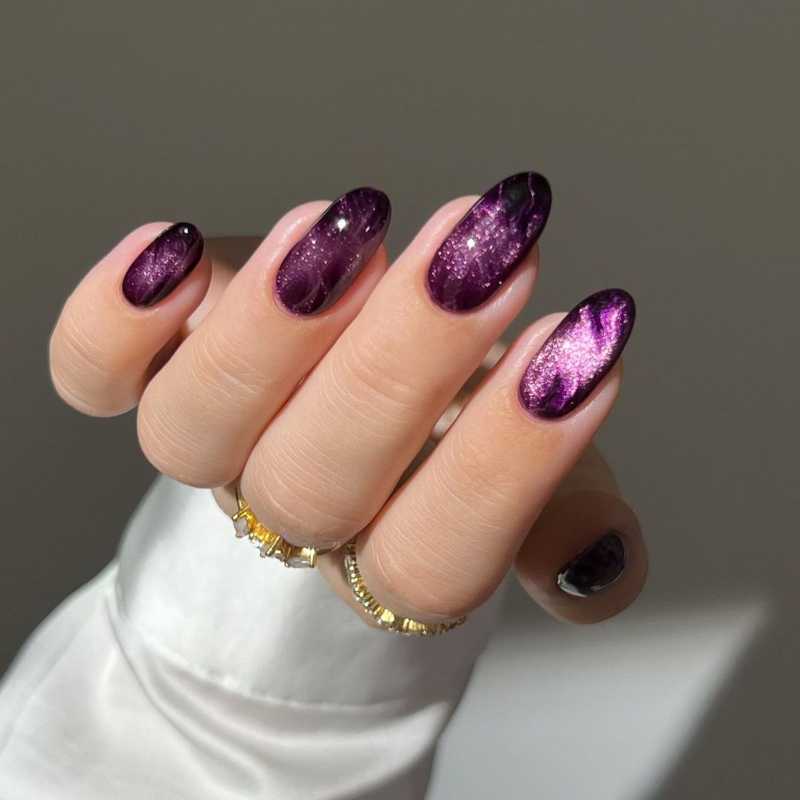
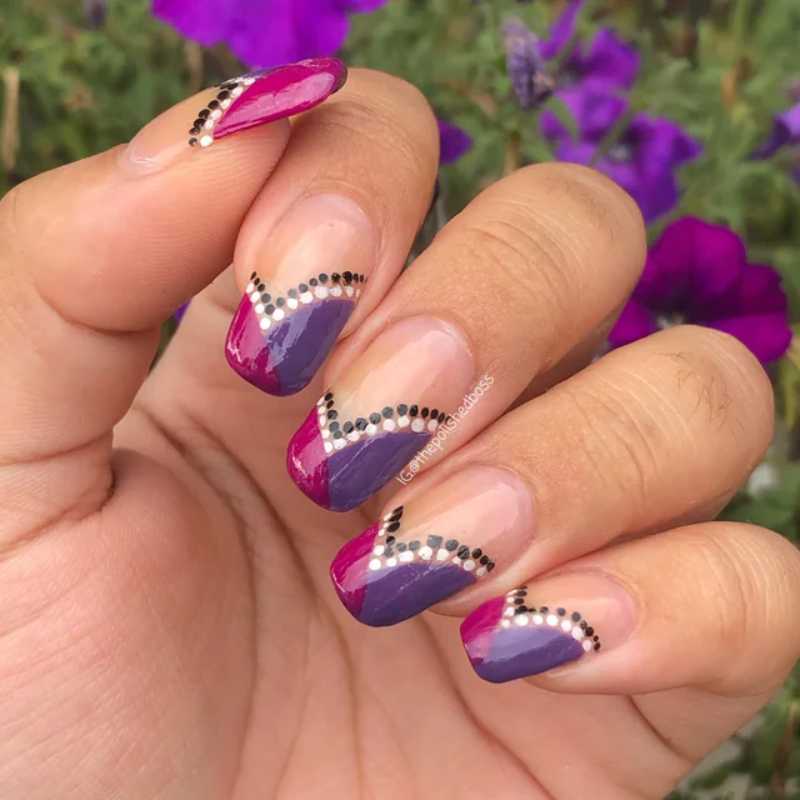
Abstract Plum Nails – Playful & Chic
Ready to have some fun with your purple nails? Try an abstract plum mani that mixes swirly designs and negative space for a modern, artsy vibe. This look is both chic and fun, perfect for those who love bold styles with a unique twist.
Whether you’re going for a trendy aesthetic or just want to switch things up, this design will have everyone asking where you got your nails done!
✨ How to Achieve Abstract Plum Nails – Playful & Chic
🧼 Prep Your Nails:
Start with clean, shaped nails. Gently push back your cuticles for a smooth base.
🎨 Create Your Abstract Design:
Begin with a neutral or sheer base coat. Use a deep plum shade to create swirly, abstract designs on different sections of each nail. Leave some areas bare for that trendy negative space effect.
✍️ Perfect Your Swirls:
Use a fine nail art brush for precise, fluid lines. Want more drama? Add a touch of metallic silver or gold for an eye-catching twist.
💅 Seal with a Glossy Top Coat:
Lock in your design with a high-shine top coat. This keeps your abstract plum nails looking fresh and vibrant.
💡 Pro Tip:
Experiment with different swirl shapes and thicknesses for a truly custom look.
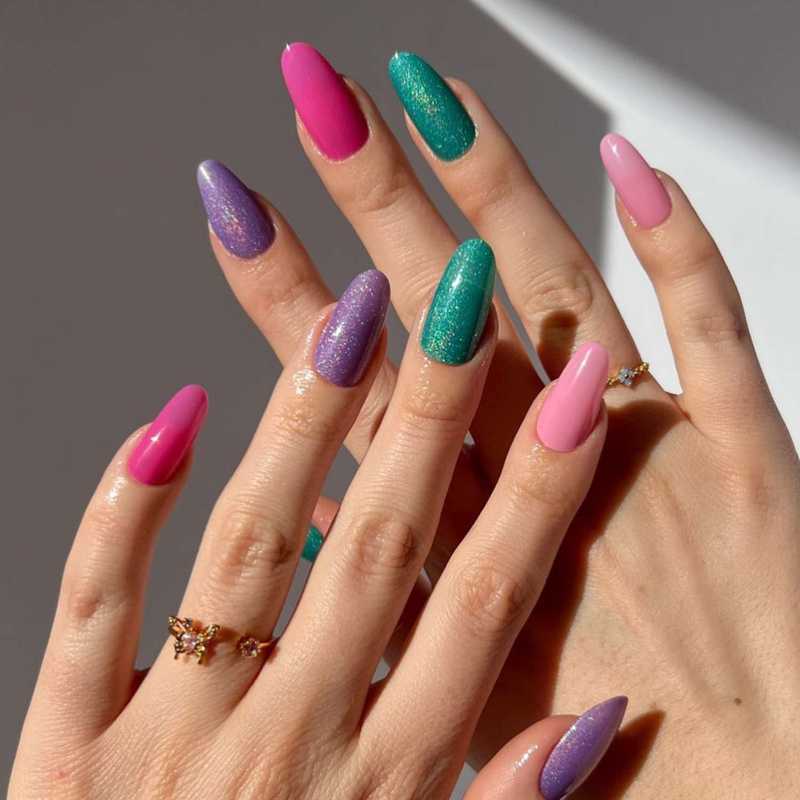
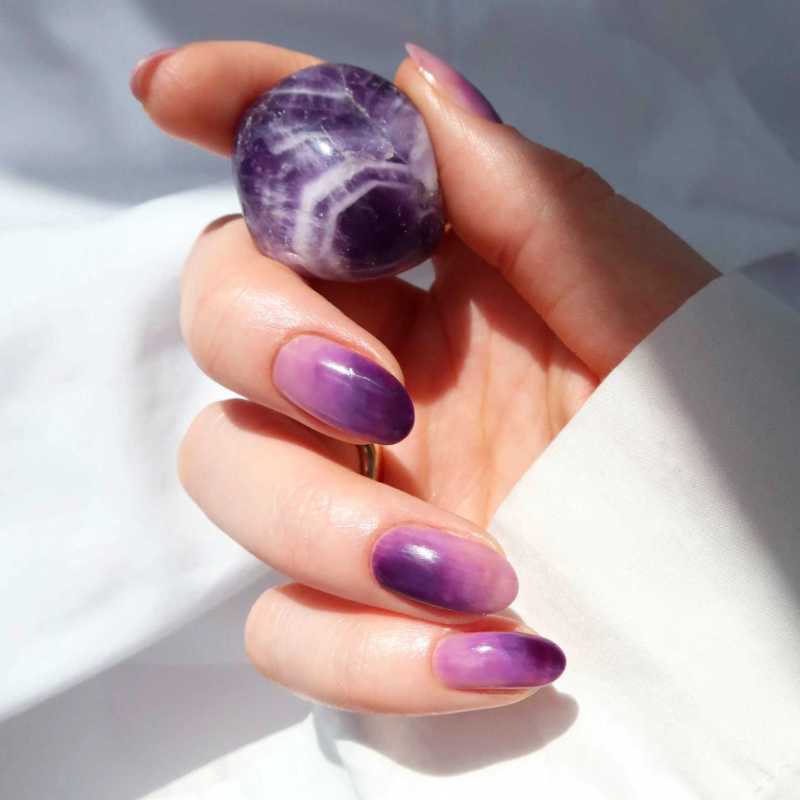
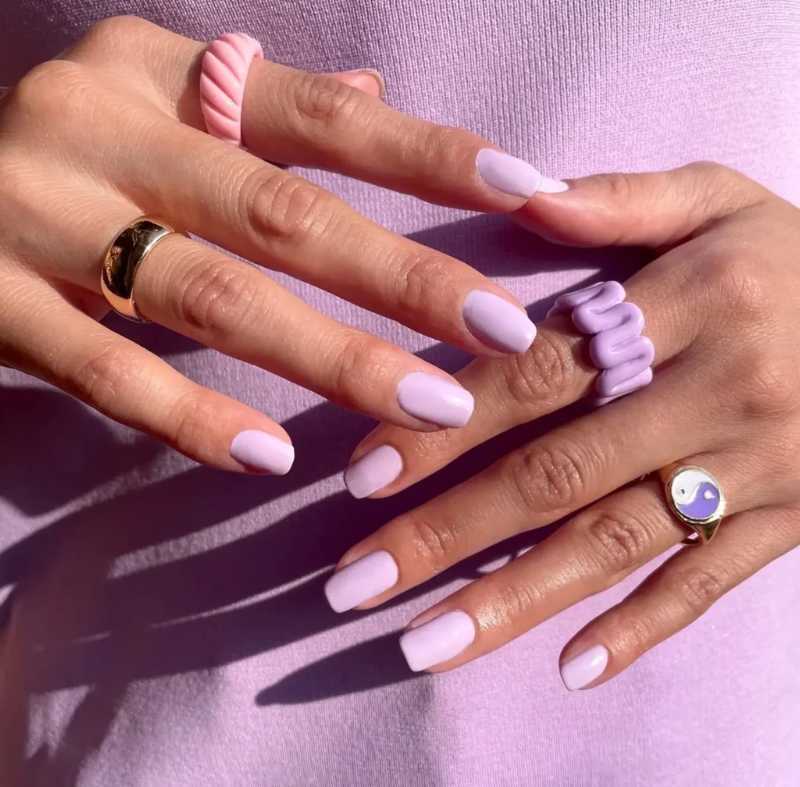
Purple Tonal Nails – A Perfect Color Mix
Why settle for one shade of purple when you can have them all? With purple tonal nails, each fingertip gets its unique hue, creating a mixed berries-inspired gradient that’s both bright and stylish.
Think of it like a box of chocolates—every nail is a delightful surprise! If you love colourful nails but still want something elegant, this is the perfect look for you.
✨ How to Achieve Purple Tonal Nails – A Perfect Color Mix
🧼 Prep Your Nails:
Start with clean, shaped nails. Gently push back your cuticles for a neat base.
🎨 Choose Your Purple Shades:
Pick five different shades of purple, from light lavender to deep plum. Arrange them from lightest to darkest for a gradient effect.
💅 Apply Your Shades:
Paint each nail with a different purple shade. Start with the lightest on your thumb and work your way to the darkest on your pinky, or mix it up for a fun twist.
🔄 Perfect the Finish:
Make sure each shade is evenly applied with two coats for a vibrant look. Allow each layer to dry before adding the next.
✨ Seal with a Glossy Top Coat:
Lock in your colorful gradient with a high-shine top coat for a sleek, long-lasting look.
💡 Pro Tip:
For a little extra sparkle, add a touch of fine glitter on one or two nails to enhance the tonal effect.
READ ALSO: Upgrade Your Purple Fall Nails with These 25 Stunning Ideas
Pale Purple Nails – Soft & Timeless
If you adore delicate, feminine nails, you’ll love a pale purple manicure with negative space accents. This design gives off total soft-girl glam vibes and is cute enough to wear year-round.
Whether you’re heading to brunch, a coffee date, or just treating yourself to a little self-care, this effortless style will have your nails looking perfect in any season.
✨ How to Get Soft & Timeless Pale Purple Nails
1️⃣ Prep: Start with clean, shaped nails. Push back cuticles gently.
2️⃣ Apply Pale Purple: Use a soft purple polish, leaving some areas bare for a chic negative space effect.
3️⃣ Perfect Edges: Use striping tape for crisp lines. Apply two coats for even color.
4️⃣ Seal the Look: Add a glossy top coat for a smooth, lasting finish.
💡 Pro Tip: Add a silver or gold line along the negative space for subtle elegance.
Skittle Nails – A Fun Pop of Purple
Who says you have to pick just one colour? Skittle nails let you mix different shades of purple for a stylish and aesthetic manicure. From soft lilac to deep plum, this playful look is all about having fun with colours. If you love variety and can’t decide on just one shade, this is the trend for you!
✨ How to Get Fun Skittle Nails in Purple
1️⃣ Prep: Start with clean, shaped nails. Push back cuticles gently.
2️⃣ Pick Your Shades: Choose a range of purple shades, from soft lilac to deep plum.
3️⃣ Apply Colors: Paint each nail a different shade for a fun, skittle-inspired look.
4️⃣ Top Coat for Shine: Seal with a glossy top coat for a smooth, lasting finish.
💡 Pro Tip: For a trendy twist, add tiny silver dots or a subtle glitter accent to one or two nails.
Ametrine-Inspired Nails – Elegant & Creative
If you’re obsessed with crystals and gemstones, then these ametrine-inspired nails will be right up your alley. A stunning light purple base with gold outlining makes this design feel magical while bringing balance and creativity to your nails.
Whether you love mystical vibes or just want something uniquely beautiful, these gemstone-inspired nails are a must-try.
✨ How to Get Ametrine-Inspired Nails
1️⃣ Start with Prep: Clean and shape your nails. Push back cuticles gently.
2️⃣ Apply Light Purple Base: Use a soft lavender or lilac shade as your base.
3️⃣ Create Gold Outlines: Use a thin nail art brush to draw delicate gold lines, mimicking the look of a gemstone’s edges.
4️⃣ Finish with a Top Coat: Seal your design with a glossy top coat for a crystal-like shine.
💡 Pro Tip: Add tiny gold foil flakes for an extra magical, gemstone effect.
Purple Crushed Velvet Nails
Want a luxurious look? Purple crushed velvet nails bring all the shine and glamour you need! The magnetic effect gives them a soft, velvety appearance that’s perfect for a night out or even the holidays.
If you love a little sparkle and want a nail design that feels rich and sophisticated, this one will quickly become your new obsession.
✨ How to Get Purple Crushed Velvet Nails
1️⃣ Prep Your Nails: Clean, shape, and buff your nails for a smooth base.
2️⃣ Apply a Dark Purple Base: Use a deep, rich purple polish to set the foundation.
3️⃣ Create the Velvet Effect: Use a magnetic velvet polish and hold a magnet over your nails before it dries. This will give them that luxurious, crushed velvet look.
4️⃣ Seal with a Top Coat: Apply a glossy or matte top coat, depending on your style.
💡 Pro Tip: For extra glam, add a touch of fine glitter at the edges for a starry effect.
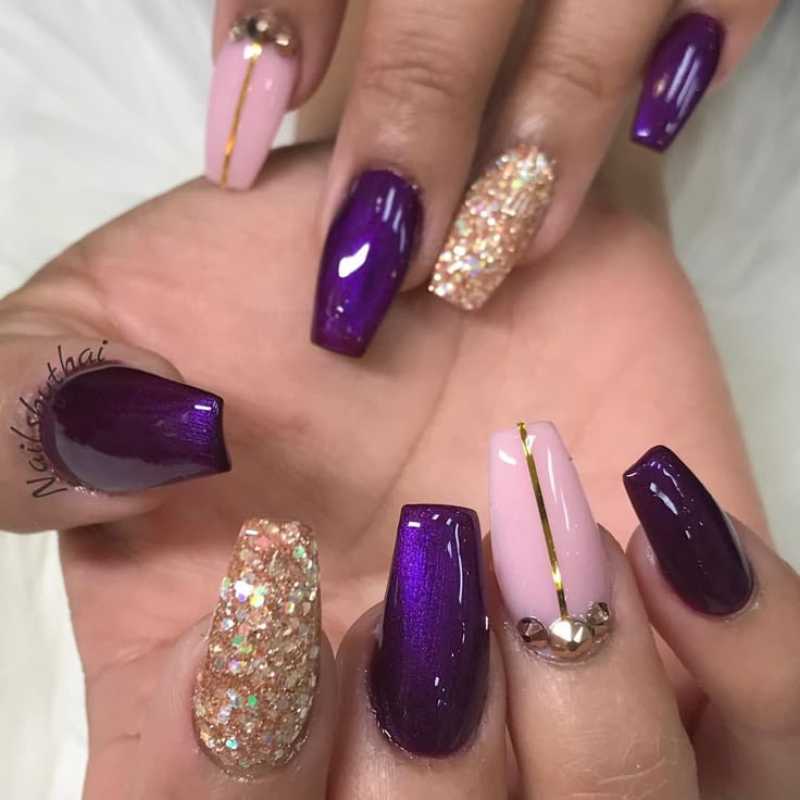
Purple & Gold – A Royal Touch
Nothing says queen energy like purple nails with gold accent lines. This classic colour combo feels both bold and elegant, making it a perfect choice for any season.
Whether you love a deep plum or a soft lilac base, adding a touch of gold instantly elevates the look. Plus, purple is a year-round mood, so you can rock this style whenever you want to feel extra luxurious!
✨ How to Get Purple & Gold Nails – A Royal Touch
1️⃣ Start with Clean Nails: Shape and buff for a smooth surface.
2️⃣ Choose Your Purple Base: Go for a deep plum for a dramatic look or a soft lilac for a subtle vibe.
3️⃣ Add Gold Accents: Use gold striping tape or a thin brush to draw clean, elegant lines. Focus on tips, edges, or create geometric patterns and add gold glitters on it.
4️⃣ Seal with a Glossy Top Coat: This keeps your design shiny and long-lasting.
💡 Pro Tip: For a luxe finish, add tiny gold studs at the base of one or two nails.
Purple Brushstrokes – Effortlessly Cool
If you love artsy nails, try random dark purple strokes over a lilac base for that cool-girl art vibe. This design is minimal yet striking, making it a great way to experiment with pastel shades.
It’s an easy way to bring spring-season energy to your nails without overdoing it. Simple, stylish, and totally eye-catching!
🎨 How to Achieve Purple Brushstrokes
1️⃣ Prep Your Nails: Clean, shape, and apply a lilac base coat. Let it dry completely.
2️⃣ Create Brushstrokes: Using a thin nail art brush or a small flat brush, paint random dark purple strokes on each nail. Keep the strokes uneven for an artsy, natural look.
3️⃣ Less Is More: Don’t cover the entire nail—leave some lilac showing for that minimalist vibe.
4️⃣ Finish with Top Coat: Seal your design with a clear, glossy top coat to protect your art and add shine.
💡 Tip: Practice on paper first to get comfortable with the brushstroke style before doing it on your nails!
Side Tips – A Chic Twist
Upgrade your nude nails with gradient purple tips—but instead of the usual French manicure, go for sideways accents. This fresh take on purple nail styling is perfect for both spring and summertime glow-ups.
Whether you’re heading to brunch or a beach vacation, this design adds just the right pop of colour while keeping things classy.
✨ How to Achieve Side Tips – A Chic Twist
1️⃣ Prep & Base: Start with clean, shaped nails and apply a nude or soft pink base coat. Let it dry fully.
2️⃣ Create Gradient Purple Tips: Using a sponge, dab different shades of purple on just one side of each nail—think of a sideways gradient rather than a full tip.
3️⃣ Clean Up: Use a small brush dipped in nail polish remover to tidy any edges for a sharp look.
4️⃣ Seal It In: Finish with a clear top coat to add shine and protect your stylish design.
💡 Pro Tip: Experiment with purples from light lavender to deep plum for a fun, fresh look that’s perfect for spring or summer!
Pink and Purple Swirls – A Playful Mix
Name a better duo than pink and purple swirls—we’ll wait! This design blends lilac and blush hues in curvy shapes, creating a soft yet fun manicure.
It’s a perfect pick if you love dreamy, artistic nails that stand out without being too bold. Plus, it’s the ultimate mani to put a smile on your face every time you look at your hands!
✨ How to Achieve Pink and Purple Swirls – A Playful Mix
1️⃣ Prep Your Nails: Clean and shape your nails, then apply a light pink or nude base coat. Let it dry completely.
2️⃣ Create Swirls: Using a thin nail art brush or dotting tool, paint soft purple and blush swirls randomly on each nail. Don’t worry about perfect shapes—this look is all about fun, flowing lines.
3️⃣ Add Depth: Layer the colors gently to blend for a dreamy, artistic effect.
4️⃣ Finish Strong: Seal your design with a glossy top coat for shine and long-lasting wear.
💡 Pro Tip: Keep the swirls soft and loose for a playful yet elegant vibe that’s perfect for everyday glam!
READ ALSO: Looking for Cute Pink Nails? Here Are 2025’s Hottest Styles!
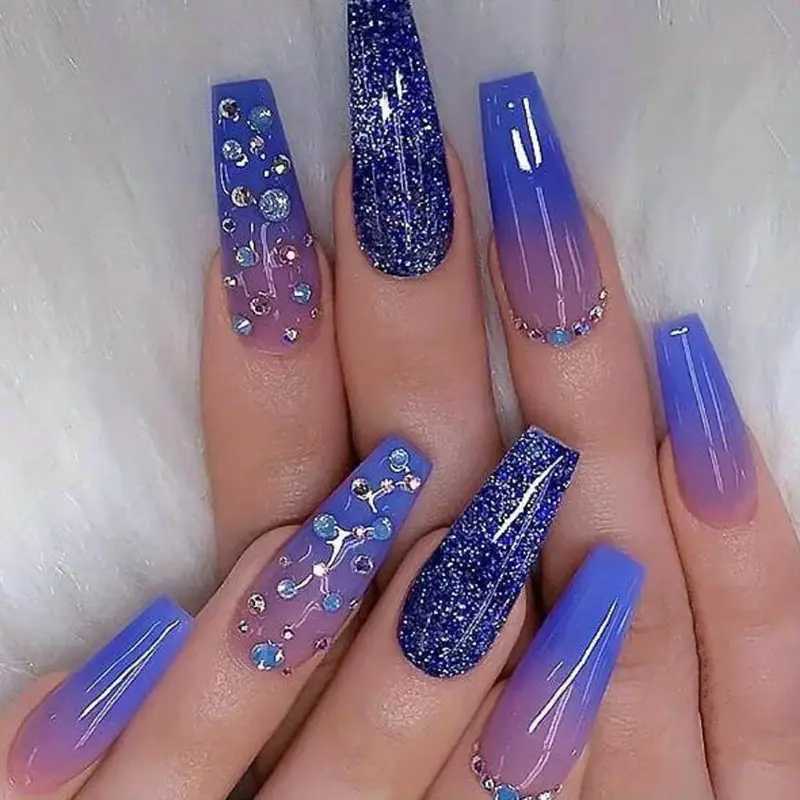
Aquatic Vibes Purple Nails
If you love a dreamy, ocean-inspired look, purple nails with a touch of blue glitter will give you serious Little Mermaid vibes. The sparkling effect creates a magical finish that makes your nails look like they belong underwater.
✨ How to Achieve Aquatic Vibes Purple Nails
1️⃣ Prep Your Nails: Start with clean, shaped nails and apply a light purple base coat. Let it dry completely.
2️⃣ Add Blue Glitter: Using a fine brush or sponge, gently dab blue glitter polish on the tips or randomly over the nails for a sparkling ocean effect.
3️⃣ Blend for Magic: Lightly blend the glitter into the purple base to create a smooth, watery transition.
4️⃣ Seal the Look: Finish with a glossy top coat to lock in the sparkle and add shine.
💡 Pro Tip: Use a mix of fine and chunky blue glitter to mimic the shimmer of underwater light for that true mermaid-inspired glow!
Short Light Purple Nails Design with Glitter
A simple yet eye-catching style, light purple nails with a subtle French tip and swirly pattern add elegance to your manicure. The glitter detail catches the light beautifully, making it a perfect choice for any season.
✨ How to Achieve Short Light Purple Nails with Glitter
1️⃣ Prep Your Nails: Clean and shape your nails, then apply a light purple base polish. Let it dry well.
2️⃣ Create French Tips: Use white or a slightly lighter purple polish to paint subtle French tips on each nail.
3️⃣ Add Swirls: With a thin brush, paint soft swirly patterns using a slightly darker purple shade for an elegant touch.
4️⃣ Glitter Accent: Dab a small amount of fine glitter polish along the tips or swirl edges for a gentle sparkle.
5️⃣ Seal It: Finish with a glossy top coat to protect your design and add shine.
💡 Pro Tip: Keep the glitter subtle for an elegant, wearable look that shines in any season!
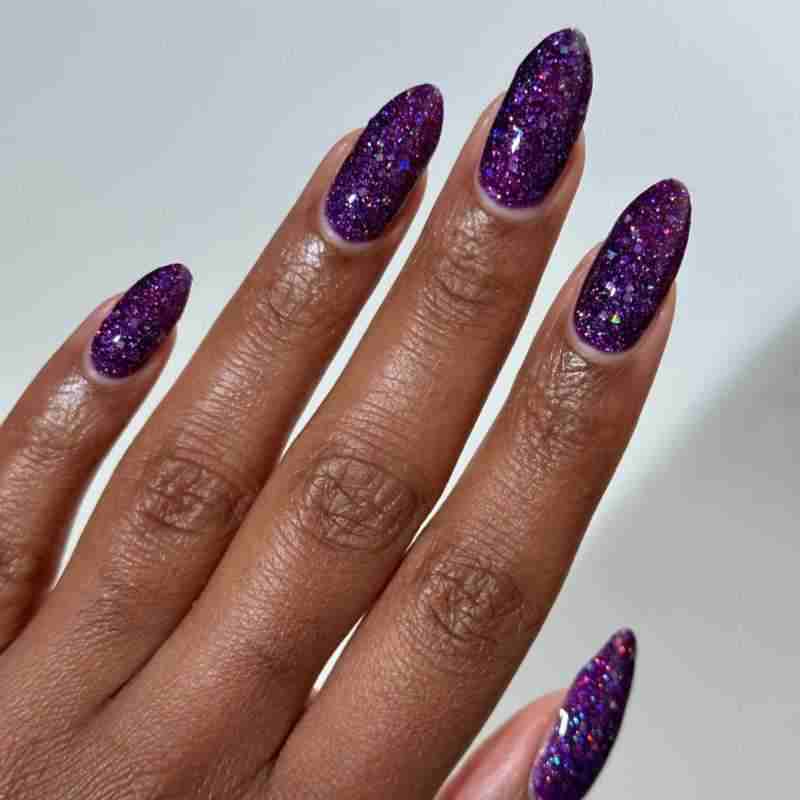
Glittery Purple Nails
For a safe at-home manicure, start with a purple nail polish base and layer it with a glitter top coat in blue or purple. This easy-to-do nail design adds sparkle and shine without needing a trip to the nail salon.
✨ How to Get Sparkly Purple Nails at Home
1️⃣ Start Fresh: Clean and shape your nails, then apply a clear base coat to protect them.
2️⃣ Paint Purple: Cover your nails with a smooth, even layer of purple polish. Let it dry well.
3️⃣ Add Some Sparkle: Apply a glittery top coat with purple or blue shimmer for that eye-catching shine.
4️⃣ Finish Strong: Seal everything with a glossy clear top coat to keep your manicure shiny and chip-free.
💡 Quick Tip: Use light, even coats of glitter polish to avoid thick patches and get a flawless sparkle every time!
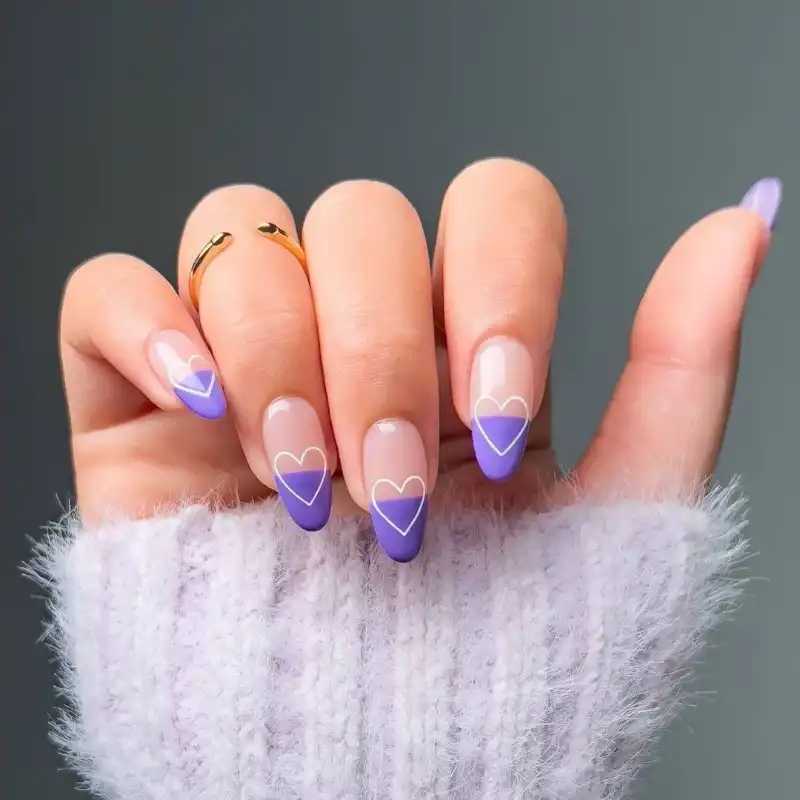
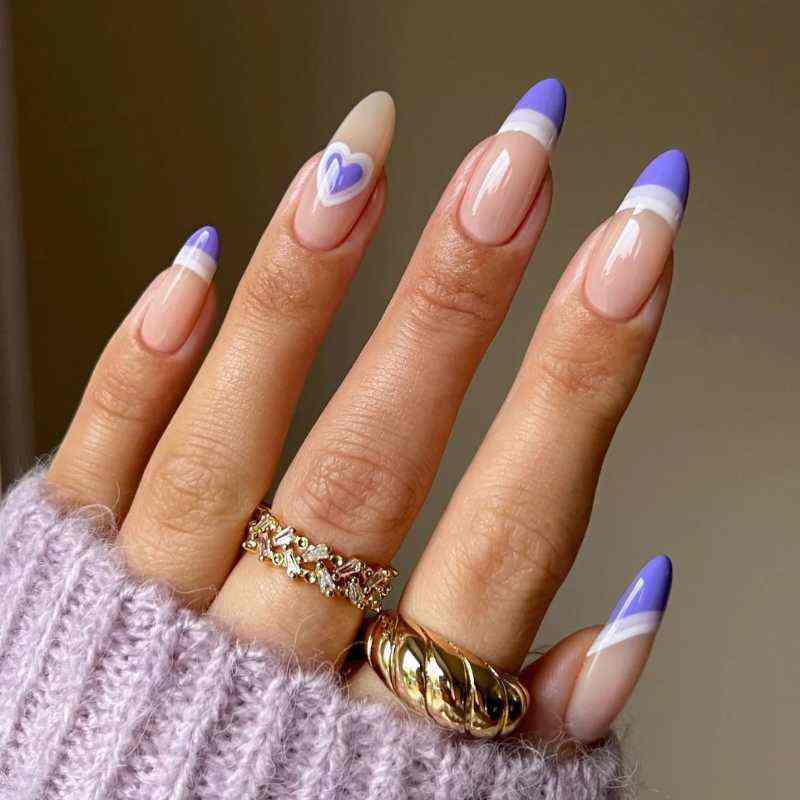
Purple Heart-Shaped French Tips
For a romantic touch, swap traditional French tips for heart-shaped ones. These lilac purple nails give off subtle fun vibes while keeping your manicure playful and stylish.
How to Achieve Purple Heart-Shaped French Tips
1️⃣ Prep Your Nails: Start with clean, shaped nails and apply a clear base coat for protection.
2️⃣ Apply Lilac Base: Paint your nails with a soft lilac polish and let it dry completely.
3️⃣ Create Heart Tips: Using a thin brush or a nail art pen, draw small heart shapes at the tips with a deeper purple shade. Keep the hearts neat but playful!
4️⃣ Seal the Look: Finish with a glossy top coat to protect your design and add shine.
💡 Pro Tip: Practice the heart shape on paper first or use nail stickers if you want an easy, precise look.
This romantic twist on French tips is perfect for those who love playful yet elegant purple nails!
Gold-Lined Hearts
Nothing says elegance like gold-lined hearts on a milky manicure. With purple hearts outlined in gold on a nude-pink base, this nail art is soft yet bold—perfect for those who love dreamy, delicate designs.
How to Achieve Gold-Lined Hearts Nails
1️⃣ Prep Your Nails: Clean and shape your nails, then apply a nude-pink base coat. Let it dry fully.
2️⃣ Paint Purple Hearts: Use a fine brush or nail art pen to draw small purple hearts on each nail. Keep the shapes soft and delicate.
3️⃣ Outline with Gold: Carefully trace the edges of each heart with a thin gold nail art liner or metallic polish for a chic outline.
4️⃣ Top Coat Finish: Seal your design with a clear, glossy top coat to add shine and protect your nails.
💡 Pro Tip: Use a steady hand or nail stickers for perfect heart shapes and gold lines.

Retro Swirls in Shades of Purple
Playful and fun, these retro swirls mix lilac, lavender, and multiple shades of purple in a wavy pattern. The squiggly design adds movement, making your nails look lively and vibrant.
How to Achieve Retro Swirls in Shades of Purple
1️⃣ Start with a Light Base: Apply a soft lilac or lavender polish as your base color and let it dry completely.
2️⃣ Create Swirls: Using a thin nail art brush, paint wavy swirl patterns with different purple shades—mix lavender, plum, and violet for a fun retro vibe.
3️⃣ Layer for Depth: Add a few overlapping swirls to create movement and dimension in your design.
4️⃣ Seal the Look: Finish with a glossy top coat to keep your nails shiny and long-lasting.
💡 Quick Tip: Use a dotting tool or toothpick for easier swirl shapes if you’re new to nail art.

“I’m Fun and Busy” Manicure Design
Can’t pick just one light purple nail design? Why not mix different styles into one fun look? This manicure is all about creativity—play with patterns, swirls, glitter, or French tips while keeping a cohesive theme. It’s a perfect way to show off your personality while staying trendy.
How to Achieve the “I’m Fun and Busy” Manicure Design
1️⃣ Choose Your Shades: Pick a few light purple tones to create variety while keeping the look balanced.
2️⃣ Mix & Match Designs: On each nail, try a different pattern—think swirls, glitter, French tips, or simple dots. Keep the styles playful but connected with your purple theme.
3️⃣ Use Nail Stickers or Stamping: If freehand isn’t your thing, nail stickers or stamping tools can help you add crisp patterns quickly.
4️⃣ Top It Off: Seal everything with a clear, shiny top coat to protect your creative manicure and make it last.
💡 Pro Tip: Start with simpler designs on your thumbs and build complexity on smaller nails to keep it fun but manageable.
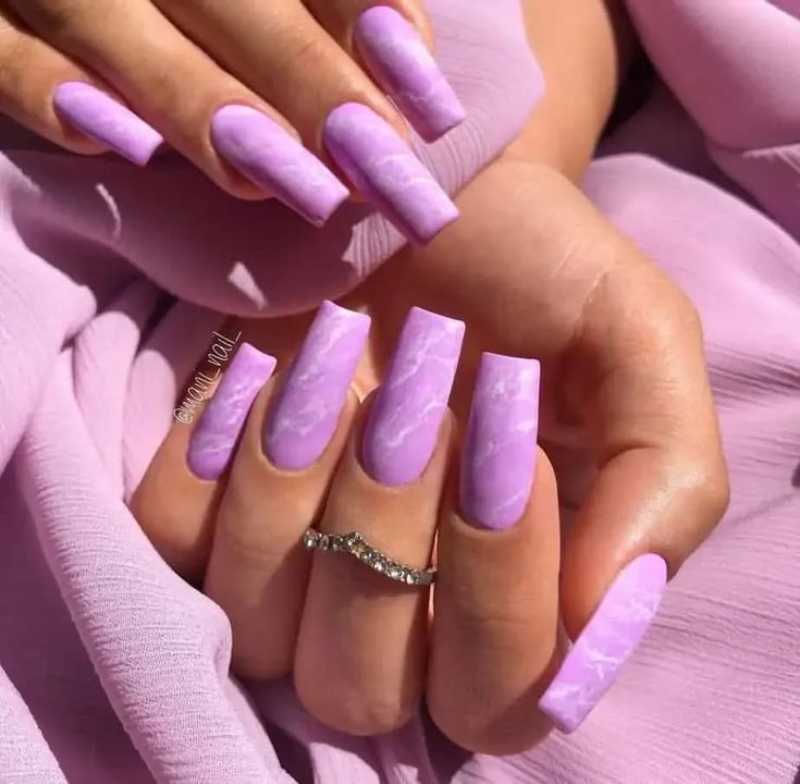
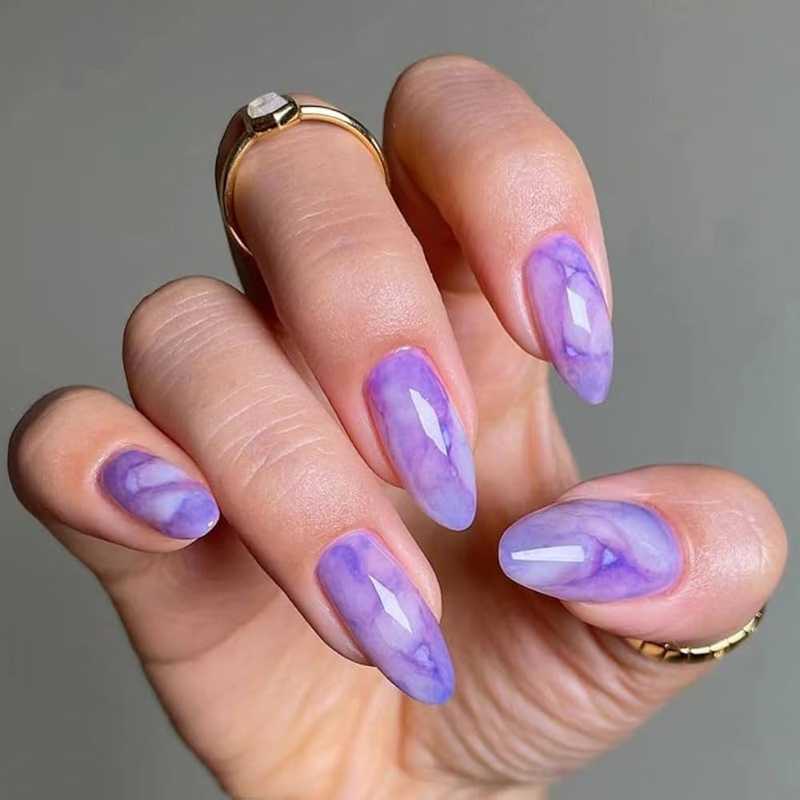
Marble Light Purple Nails Idea
If you want something elegant yet playful, go for a marble light purple nail design. The soft swirls of purple and white create a dreamy effect, making your nails look expensive. Pair this with almond-shaped nails to make the look even more flattering.
How to Achieve Marble Light Purple Nails
1️⃣ Prep Your Nails: Start with clean, shaped nails—almond shape works best for this elegant style.
2️⃣ Create the Marble Base: Apply a white or very light purple base coat and let it dry halfway.
3️⃣ Add Purple Swirls: Using a thin brush or a toothpick, gently swirl different shades of light purple onto the nails while the base is still a bit wet. This creates the soft marble effect.
4️⃣ Blend & Soften: Lightly dab the swirls with a small sponge or brush to blend colors smoothly and keep the look natural.
5️⃣ Seal with Top Coat: Finish with a glossy top coat to lock in your marble design and add shine.
💡 Pro Tip: Work on one nail at a time to keep the marble effect fresh and avoid colors drying too soon.
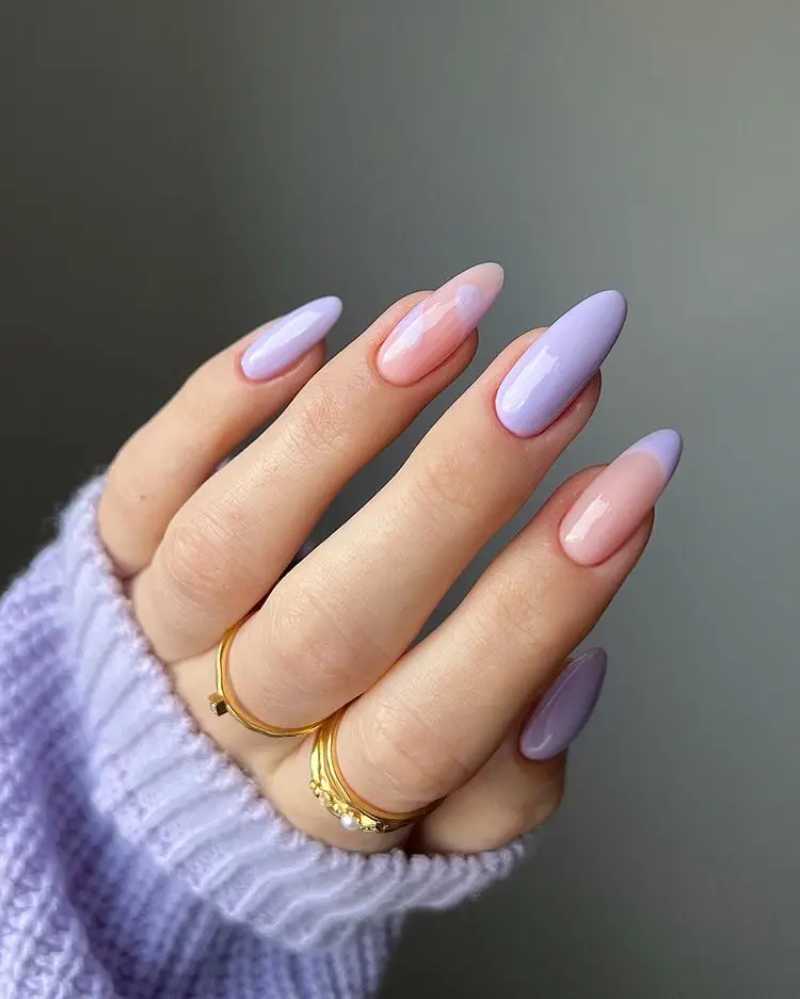
Pink and Light Purple Moment
A purple nail idea with a pink ombre is the ultimate soft and feminine look. Ombre nails have been around for a while, but they always come back in style. The combination of pastel pink and light purple blends beautifully, making it perfect for any season.
How to Achieve Pink and Light Purple Ombre Nails
1️⃣ Prepare Your Nails: Clean, file, and shape your nails to your liking. A rounded or square shape works well for this look.
2️⃣ Apply Base Coat: Start with a clear or light pink base coat to protect your nails.
3️⃣ Create the Ombre: Using a makeup sponge, dab pastel pink on one side and light purple on the other. Gently blend where the two colors meet to create a smooth gradient effect.
4️⃣ Build Layers: Repeat the sponging process 2-3 times for a richer color transition. Let each layer dry before adding the next.
5️⃣ Smooth Finish: Apply a glossy top coat to seal the ombre and give your nails a shiny, professional finish.
💡 Pro Tip: Use a small brush dipped in nail polish remover to clean up around the edges for a neat look.
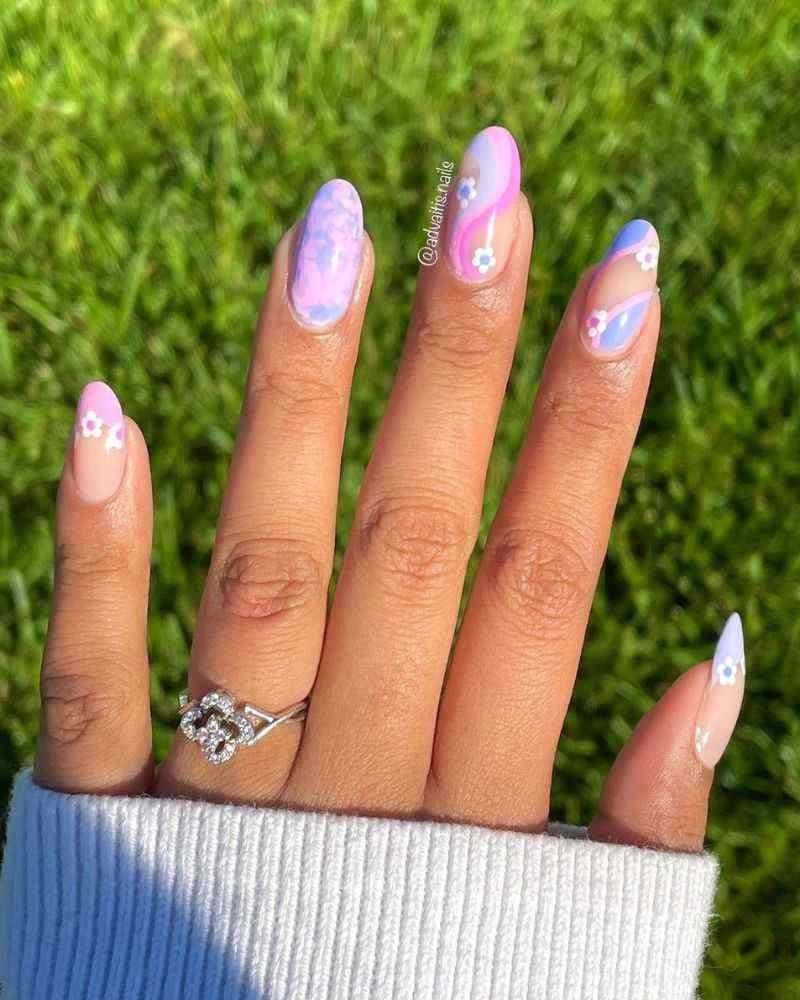
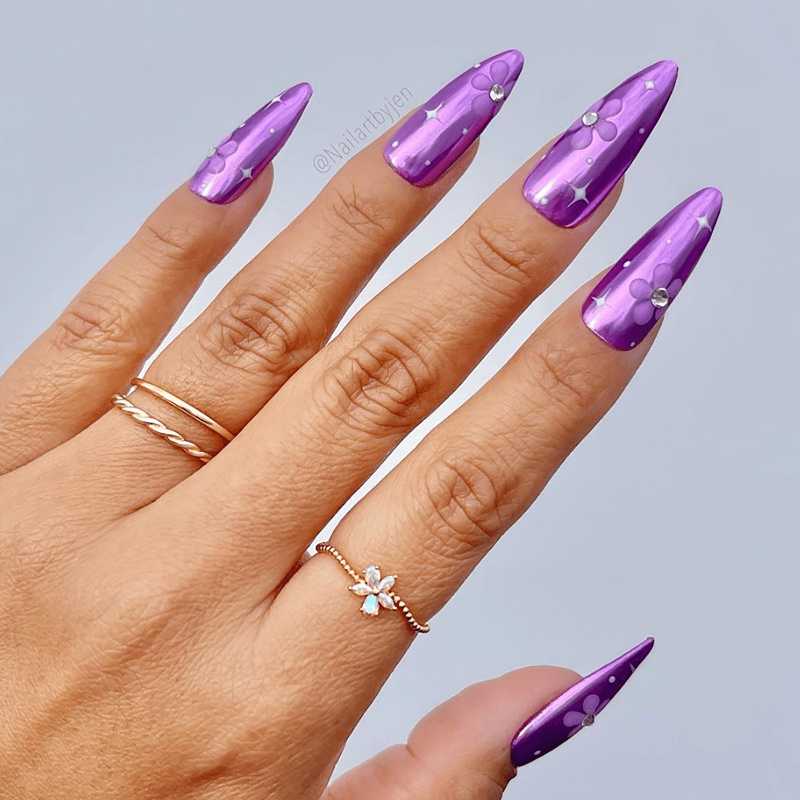
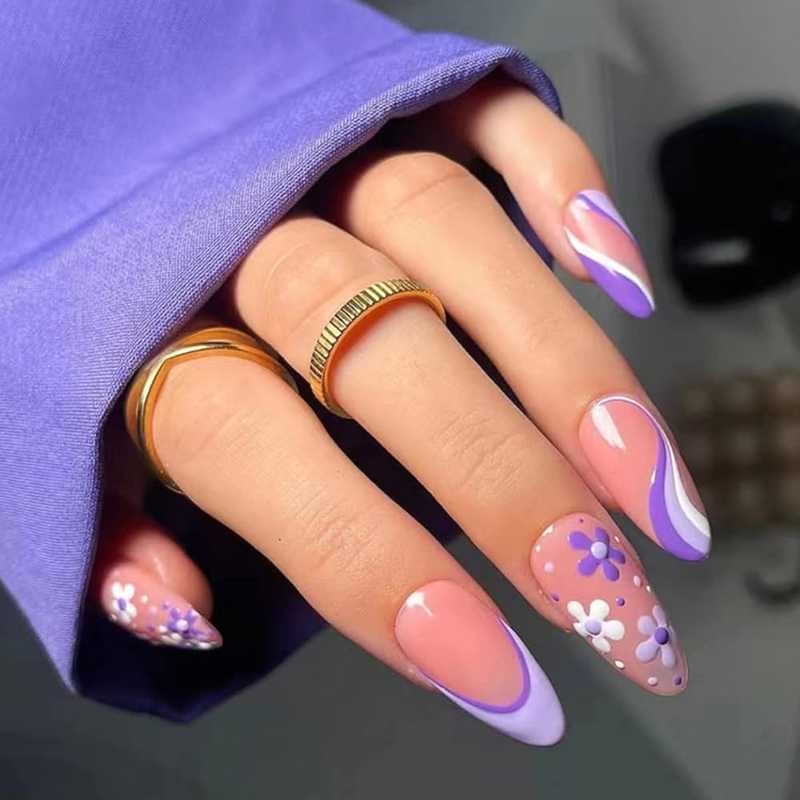
Floral Nails
Nothing says spring like pastel lavender floral nails. Delicate flower accents add a soft and feminine touch to your manicure. Whether you go for hand-painted petals or tiny floral stickers, this design gives your nails a fresh and elegant feel.
How to Achieve Pastel Lavender Floral Nails
1️⃣ Prep Your Nails: Clean, file, and apply a base coat to protect your nails. Choose a soft pastel lavender polish as your base color.
2️⃣ Paint Base Color: Apply two even coats of pastel lavender and let them dry completely.
3️⃣ Add Floral Details: Use a thin nail art brush or dotting tool to paint small white or pink flowers on a few nails. If painting isn’t your thing, apply tiny floral nail stickers for a quick, flawless look.
4️⃣ Highlight with Dots: Add small dots in the flower centers using a contrasting color like yellow or white to make the flowers pop.
5️⃣ Seal Your Design: Finish with a clear top coat to protect your floral art and add shine.
💡 Pro Tip: For longer-lasting nails, avoid water for at least an hour after finishing your manicure.
READ ALSO: How to Get the Perfect Spring Nails in 2025?
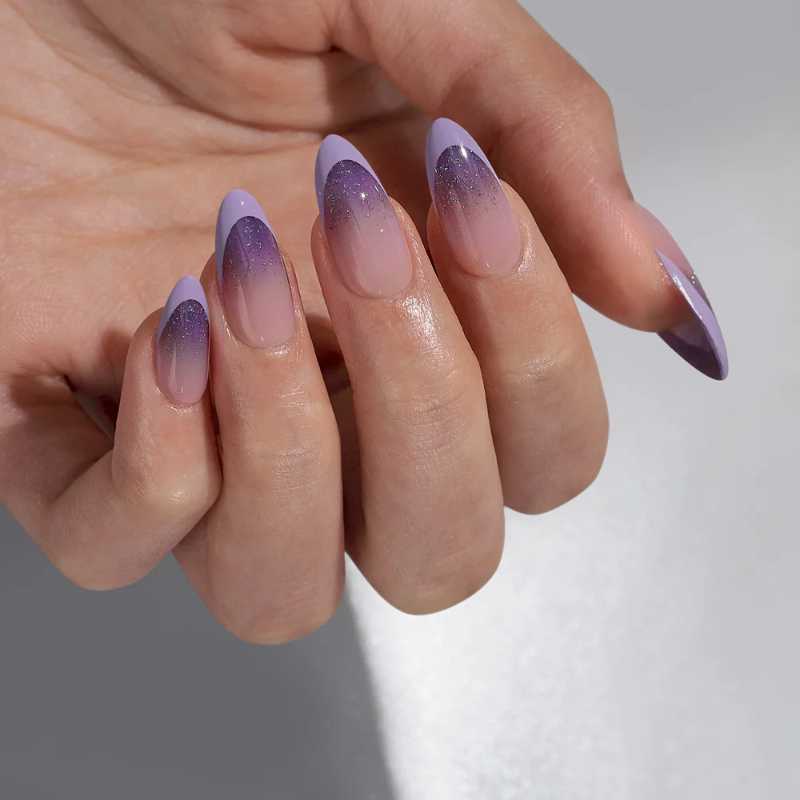
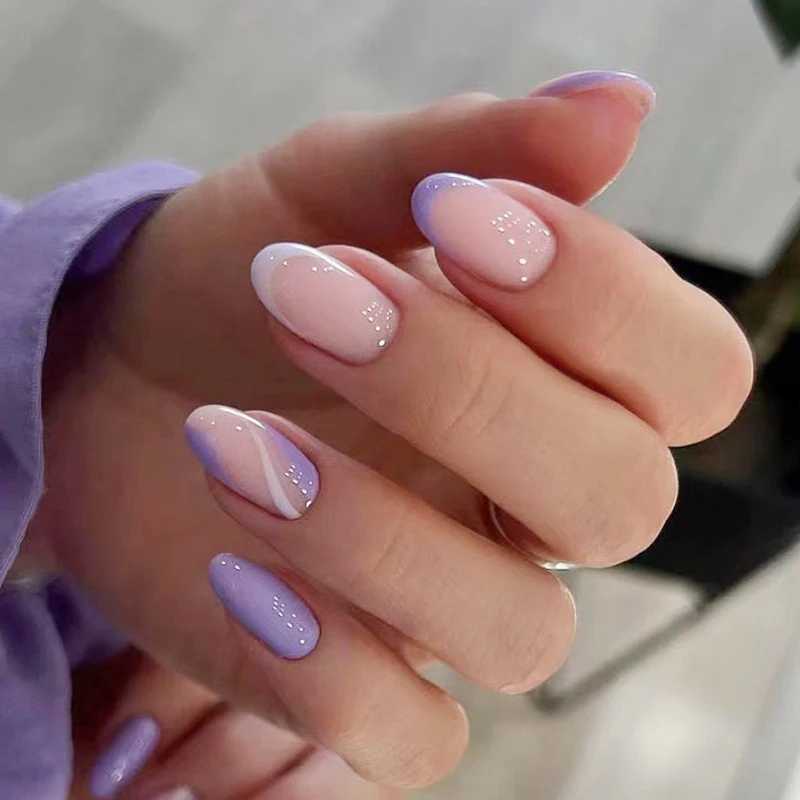
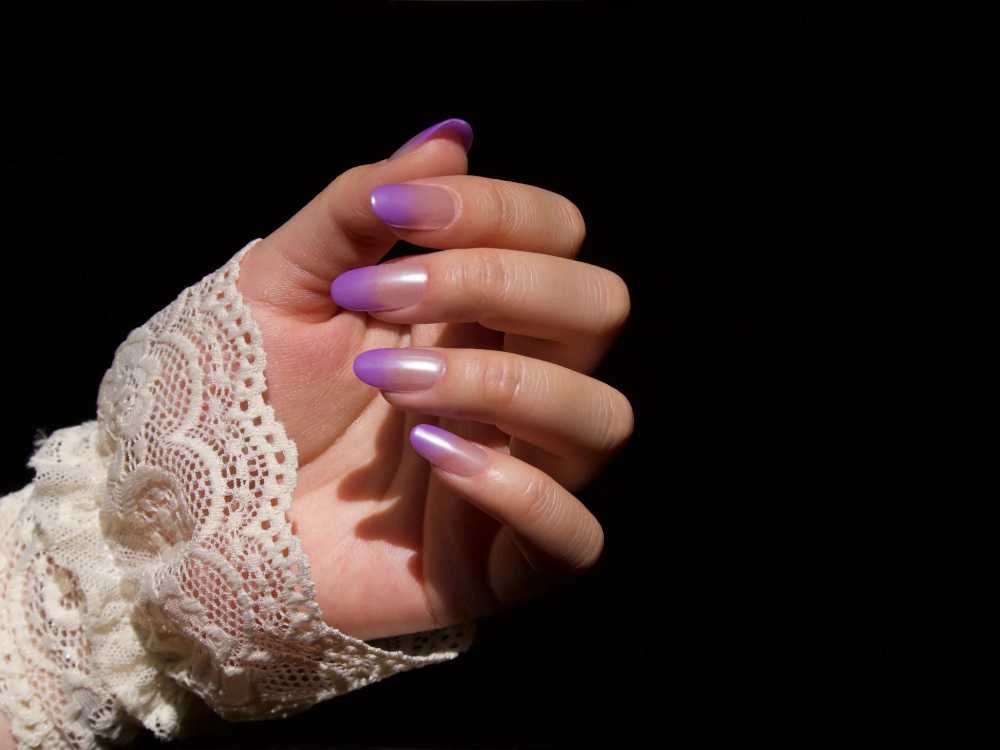
Gradient Tips
Can’t decide on one colour? Try French tips in different colours of the purple gradient. This manicure combines multiple shades of purple in a smooth ombre effect. It’s subtle yet eye-catching and works great for both casual and special occasions.
How to Achieve Gradient Purple French Tips
1️⃣ Prepare Your Nails: Start with clean, shaped nails and apply a clear base coat to protect them.
2️⃣ Choose Your Shades: Pick 3-4 purple shades, from light lilac to deep plum, to create a smooth gradient.
3️⃣ Paint the Tips: Using a small brush or nail art sponge, apply each purple shade on different nail tips in a gradient order—lighter shades on one side, darker on the other.
4️⃣ Blend the Colors: Lightly dab the edges where two colors meet with a sponge to create a seamless ombre effect.
5️⃣ Finish with Top Coat: Seal your design with a glossy top coat to add shine and make it last longer.
💡 Quick Tip: Use nail guides or tape to keep the French tips neat and clean.
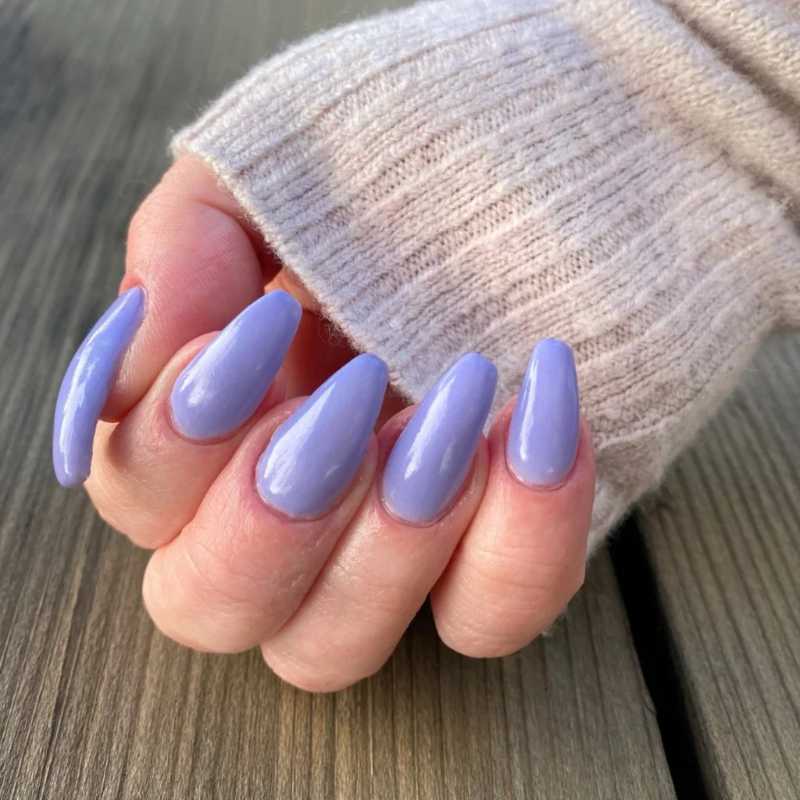
Light Lavender
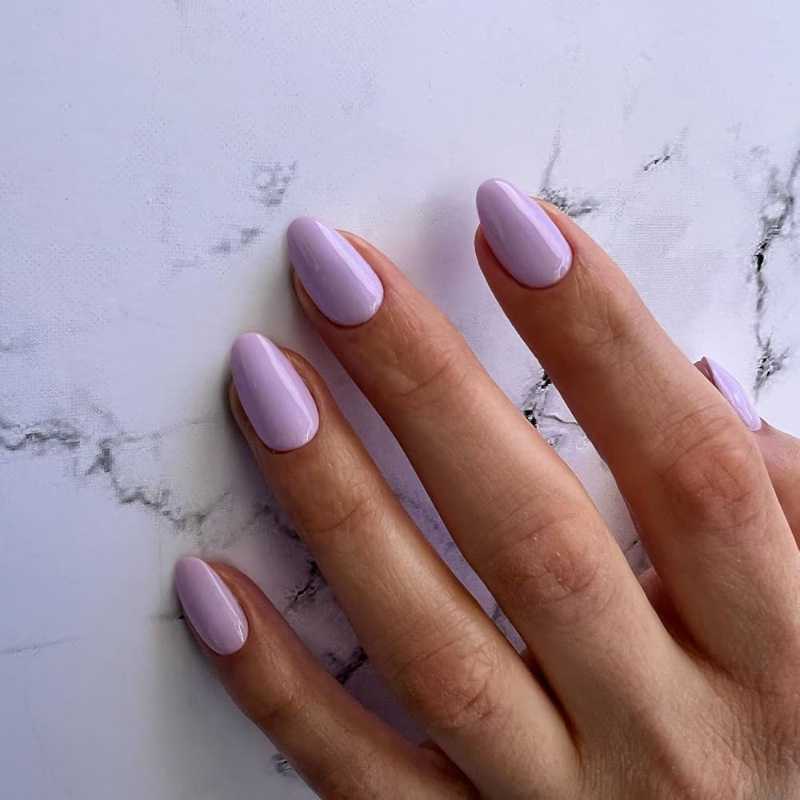
If you love a clean and minimal look, light lavender nails are for you. This shade is soft, subtle, and effortlessly chic. You can wear it on its own for a simple style or add a glossy finish for extra shine.
How to Get the Perfect Light Lavender Nails
1️⃣ Start Fresh: Wash your hands and gently file your nails to your preferred shape. Apply a base coat to keep your nails healthy.
2️⃣ Paint with Care: Use a soft lavender nail polish and apply two smooth coats. Let each coat dry fully for the best color payoff.
3️⃣ Seal the Deal: Add a shiny top coat to lock in color and add a subtle glow.
4️⃣ Neaten Up: Clean any polish outside your nails with a cotton swab dipped in remover for a crisp finish.
💡 Tip: Light lavender nails are perfect for a minimal, everyday look that’s both elegant and easy to maintain.
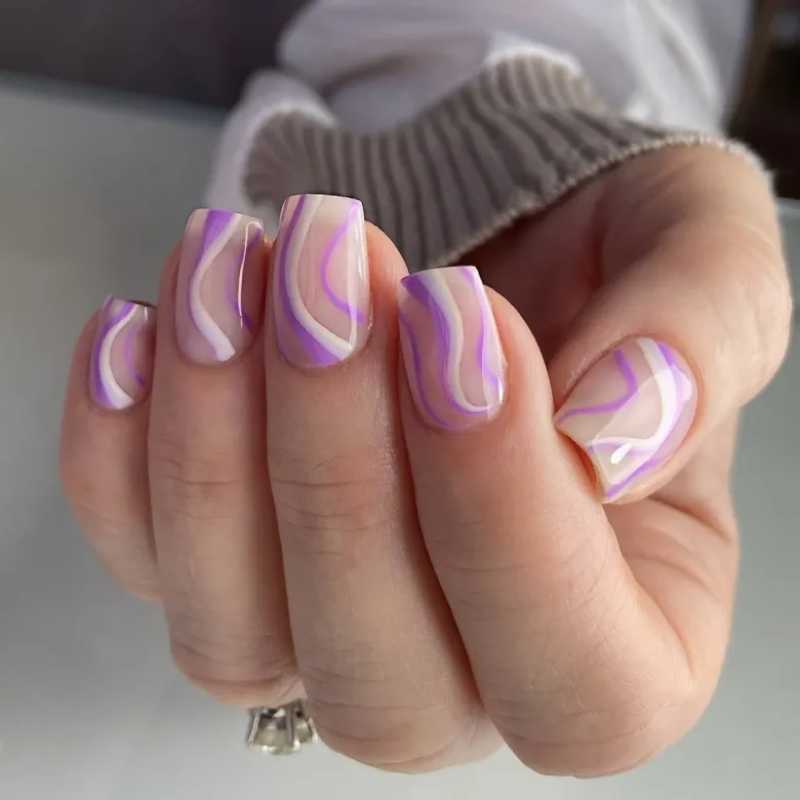
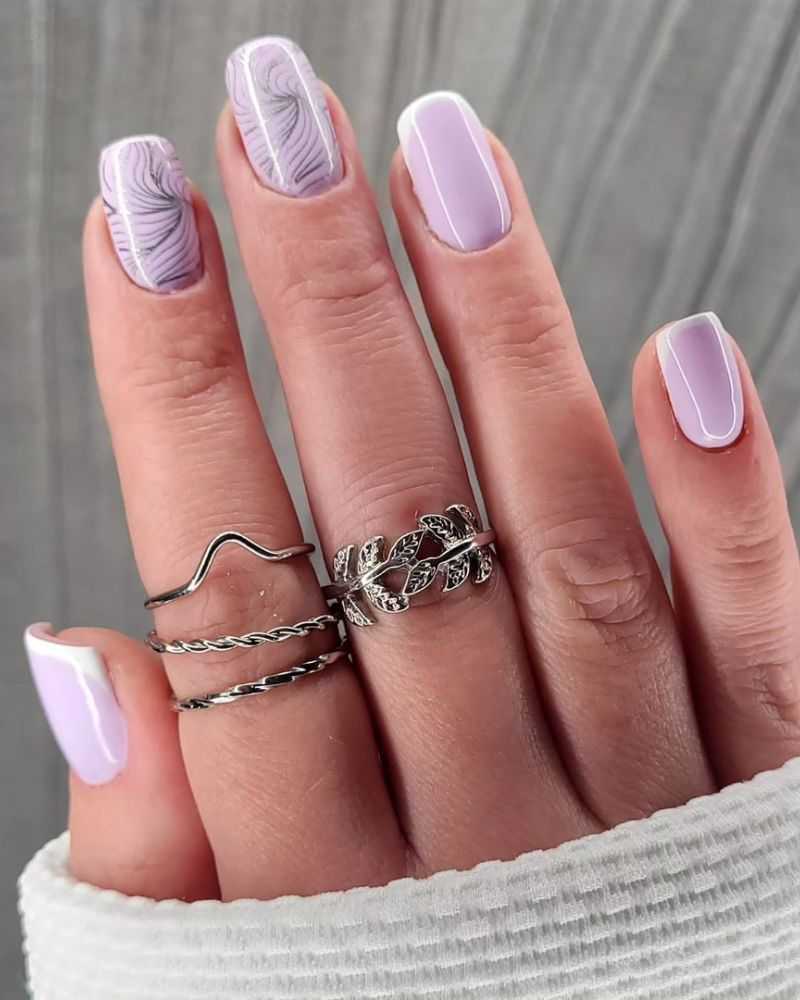
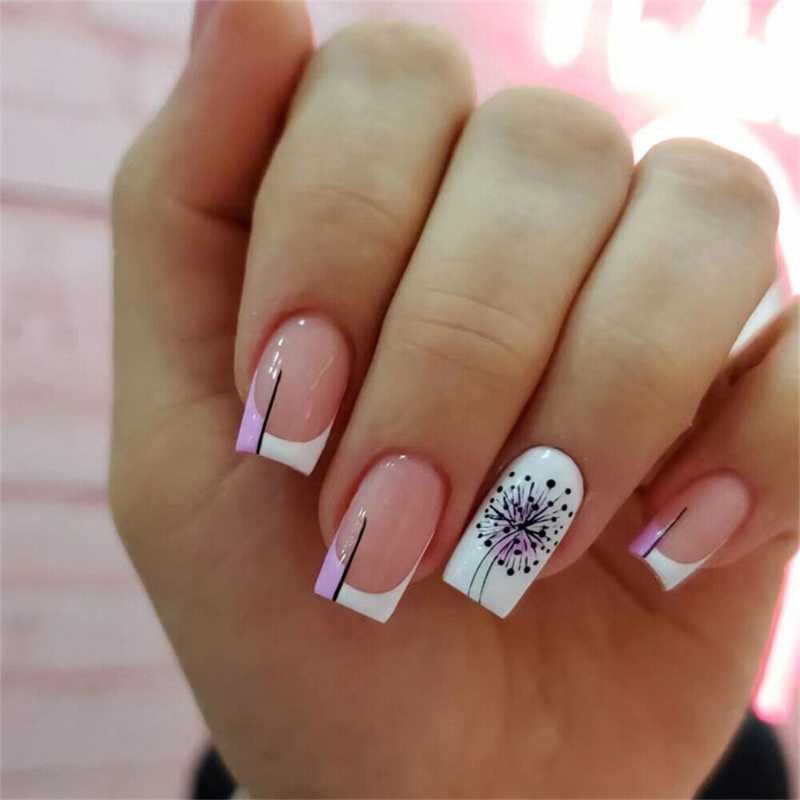
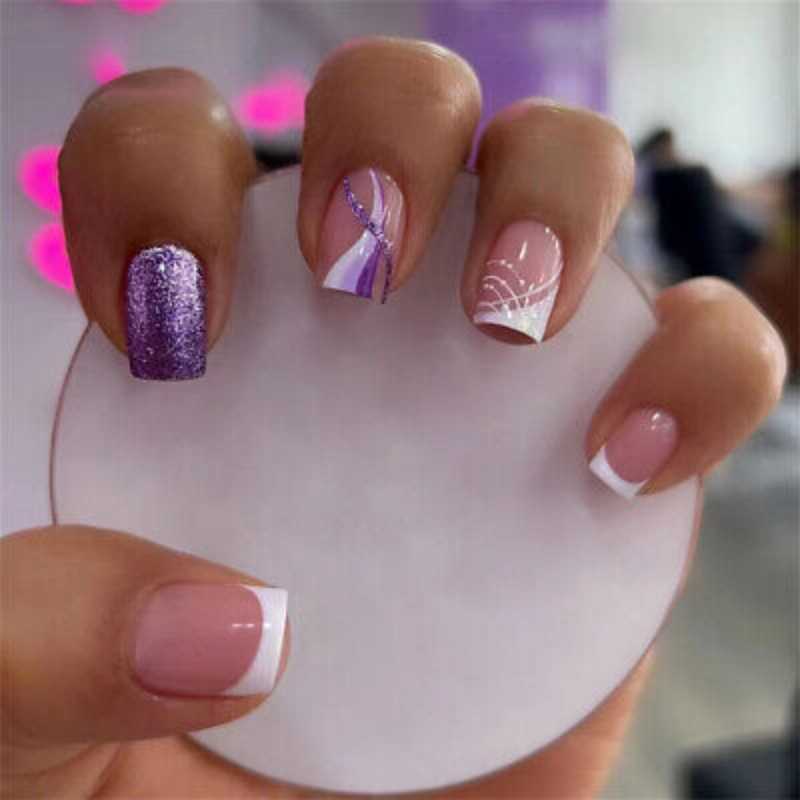
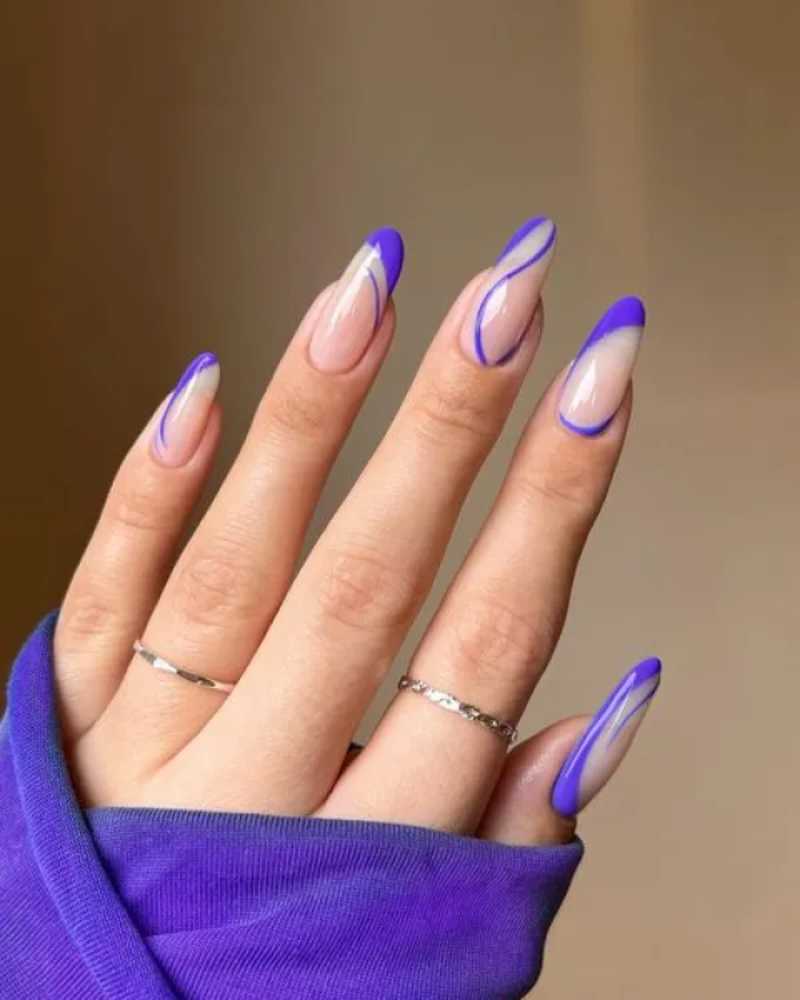
Purple & White
For a stylish twist, try soft purple nails with white lines. The fine abstract lines over a pastel purple base create a modern and sophisticated look. This is a great choice when you want something classy but not too bold.
How to Get the Purple & White Abstract Nail Look
1️⃣ Start Fresh: Clean your nails and shape them nicely. Apply a base coat to keep your nails healthy.
2️⃣ Paint the Base: Use a soft purple shade as your base color. Apply two thin layers and let it dry well.
3️⃣ Create White Details: With a fine brush or nail art pen, draw thin white lines in random, abstract patterns over the purple. Keep it simple but creative!
4️⃣ Seal It In: Apply a clear top coat to protect your design and add a smooth, shiny finish.
✨ Quick Tip: If you’re new to nail art, try using white nail striping tape or stickers for perfect lines every time.
READ ALSO: 30 Best Black and White Nails Designs for 2025
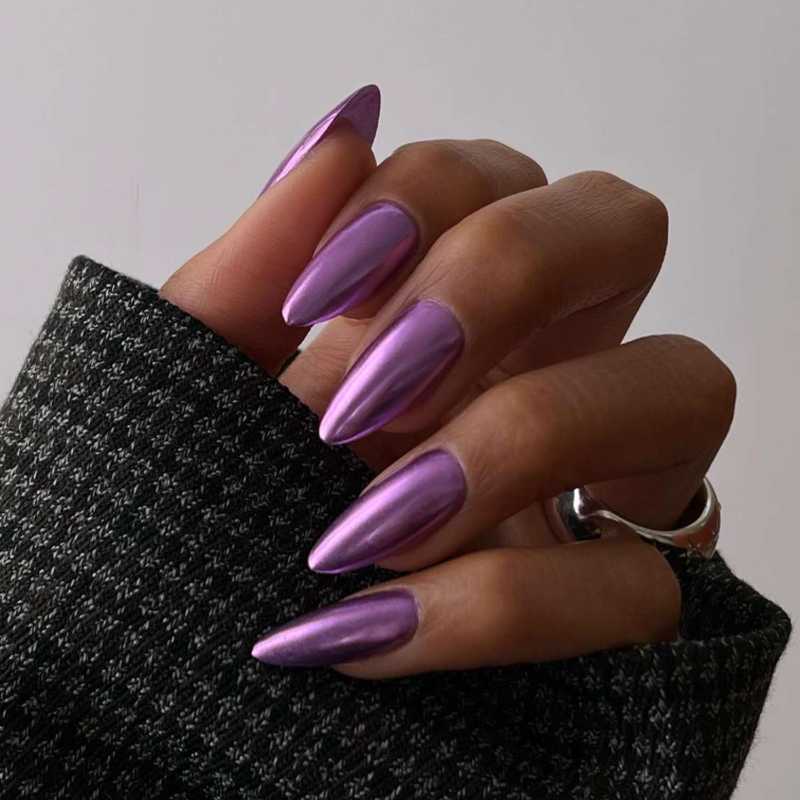
Glazed Lavender Donut
If you love nails that shine from every angle, you need to try light lavender chrome nails. Picture a soft lavender shade that shifts between pinks and purples in the light—sounds dreamy, right? With stiletto tips, this manicure adds an extra edge, making your hands look elegant and stylish.
Next time you visit the nail salon, ask for this glossy finish, or if you’re doing them at home, grab a chrome nail polish to get the same effect. Trust me, you won’t stop staring at your nails!
How to Achieve the Glazed Lavender Donut Nails
1️⃣ Prep Your Nails: Start with clean, shaped nails—stiletto shape works best for this look. Apply a smooth base coat to protect your nails.
2️⃣ Apply Lavender Base: Paint your nails with a light lavender polish. Use two thin coats for full coverage and let it dry completely.
3️⃣ Add Chrome Shine: Use a lavender chrome powder or chrome polish. Gently rub the powder onto your nails or apply the polish as directed to get that dreamy, shiny effect that shifts colors.
4️⃣ Seal with Top Coat: Finish with a glossy, no-wipe top coat to lock in the shine and make your nails last longer.
✨ Pro Tip: For an ultra-smooth finish, buff your nails lightly before applying the chrome powder. This helps the shine really pop!
Glitter Florals
Do you love a little sparkle on your nails? Then you’ll be obsessed with this purple glitter velvet manicure! The mix of floral designs with a dazzling nail colour creates the perfect fashion-forward look.
Imagine walking out of the salon with this stunning set—it’s like carrying a tiny, glittering garden at your fingertips. Whether you’re into beauty trends or just want something fun, this style will have everyone asking, “Where did you get your nails done?”
How to Achieve Glitter Florals Nails
1️⃣ Prepare Your Nails: Start with clean, shaped nails. Apply a base coat to protect your natural nails.
2️⃣ Apply Purple Base: Paint all nails with a deep purple polish. Use two coats for rich colour and let dry.
3️⃣ Add Glitter Effect: While the polish is still tacky, sprinkle fine purple glitter or use a glitter polish on the accent nails to create that velvet sparkle.
4️⃣ Create Floral Art: Using a thin nail art brush or floral stickers, add small flower designs on one or two nails. Keep the flowers simple with white or light purple for contrast.
5️⃣ Seal the Look: Finish with a glossy top coat to lock in your design and add extra shine.
✨ Pro Tip: For a velvet effect, use a matte top coat on the glitter nails before adding a glossy top coat on the floral nails to create contrast and texture.
Minimalist Negative Space
Sometimes, simple is the way to go, and negative space nails are proof of that. This design plays with deep purple shapes against a soft sandy-nude background, creating a look that’s both chic and modern.
If you love nail art ideas that are minimalist yet stylish, this is for you! Try it at your next appointment, and you’ll see how effortlessly it elevates your style. Ready to give your nails a fresh, self-care-approved update?
How to Achieve Minimalist Negative Space Nails
1️⃣ Start Fresh: Clean and shape your nails, then apply a nude or sandy base coat for a soft, natural look.
2️⃣ Plan Your Shapes: Use tape or nail stencils to mark off areas where you want the negative space to stay clear.
3️⃣ Add Deep Purple: Carefully paint deep purple shapes (like half-moons or triangles) on the taped sections. Let it dry before removing tape.
4️⃣ Keep It Clean: Use a small brush dipped in nail polish remover to fix any edges for a sharp, polished finish.
5️⃣ Seal It In: Apply a clear top coat to protect the design and add subtle shine.
✨ Pro Tip: Experiment with different geometric shapes and placements to make this minimalist style truly your own. Perfect for a chic, understated vibe that works anytime!
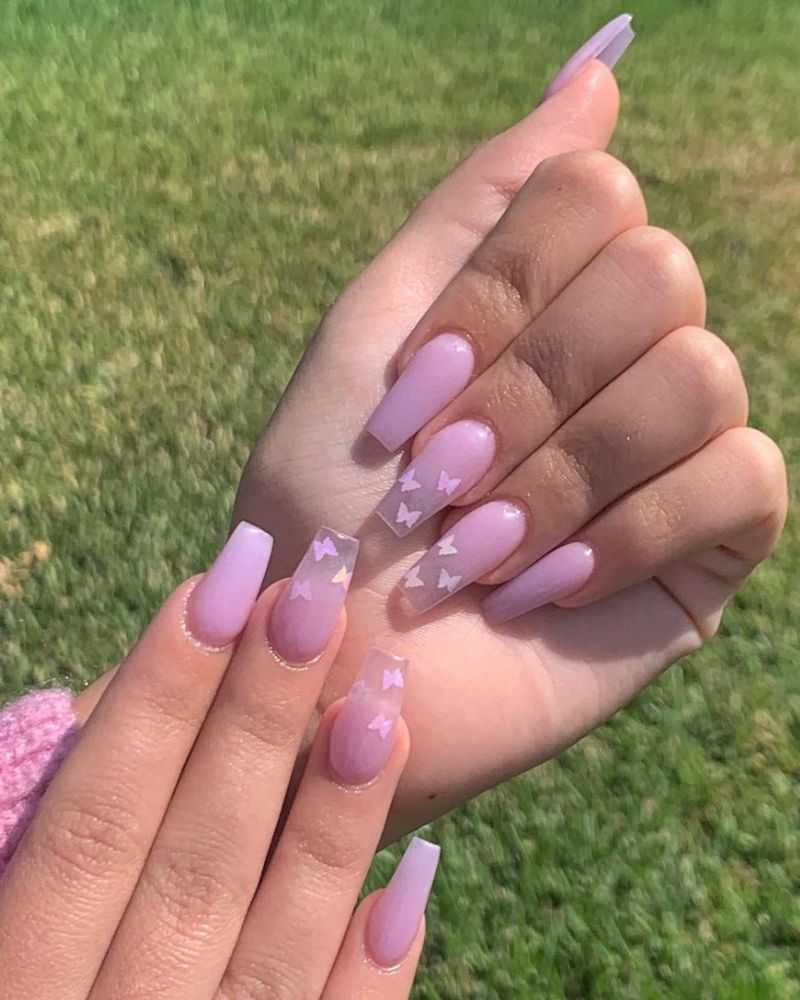
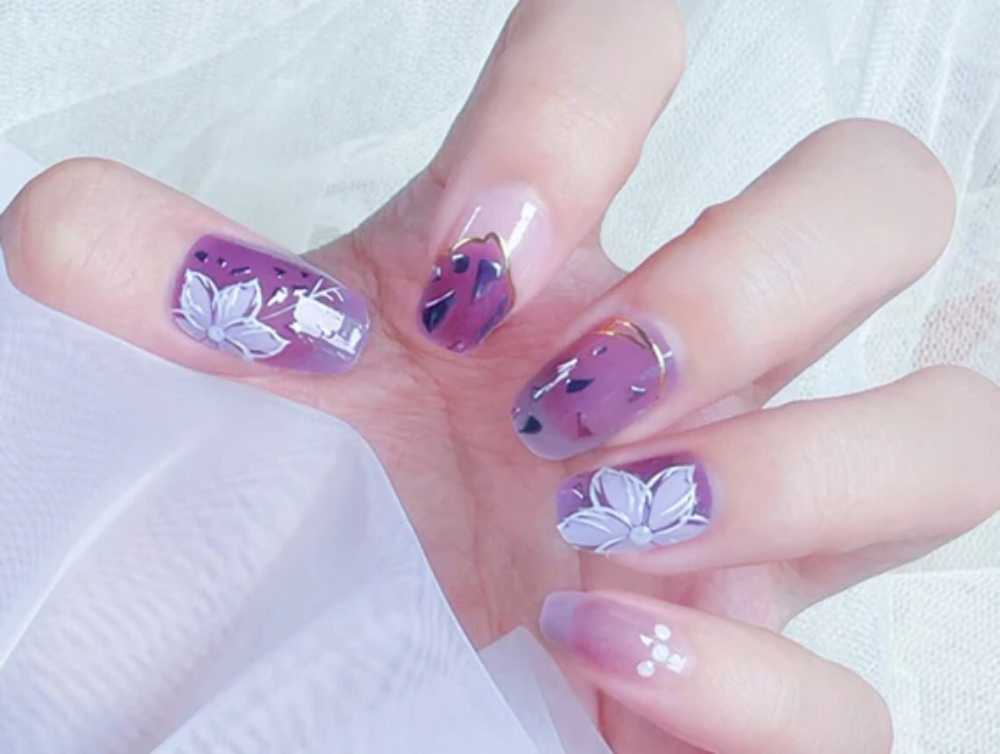
Purple Gel Nails
If you love purple nails with nail art, this design will make your day. The faded light purple base paired with delicate butterfly accessories brings a dreamy and elegant vibe to your nails.
Every time you look down at your hands, you’ll feel the soft beauty of nature wrapped around your fingertips. It’s a perfect choice for anyone who wants a cute yet stylish touch.
How to Achieve Purple Gel Nails with Butterfly Art
1️⃣ Prep Your Nails: Clean, shape, and buff your nails to create a smooth base. Apply a gel base coat and cure under a UV/LED lamp.
2️⃣ Create the Fade: Use a light purple gel polish and a sponge or brush to blend it softly from the cuticle to the tip for a subtle ombré effect. Cure each layer under the lamp.
3️⃣ Add Butterfly Details: Once dry, carefully place small butterfly decals or use nail art stickers on a few nails for that delicate, dreamy touch.
4️⃣ Seal and Shine: Finish with a glossy gel top coat to lock in the design and cure again for a long-lasting, shiny finish.
✨ Pro Tip: Keep your cuticles moisturized to enhance the soft, elegant look of this nature-inspired manicure. Perfect for a fresh, stylish vibe that feels both playful and graceful!
READ ALSO: Looking for Cute Pink Nails? Here Are 2025’s Hottest Styles!
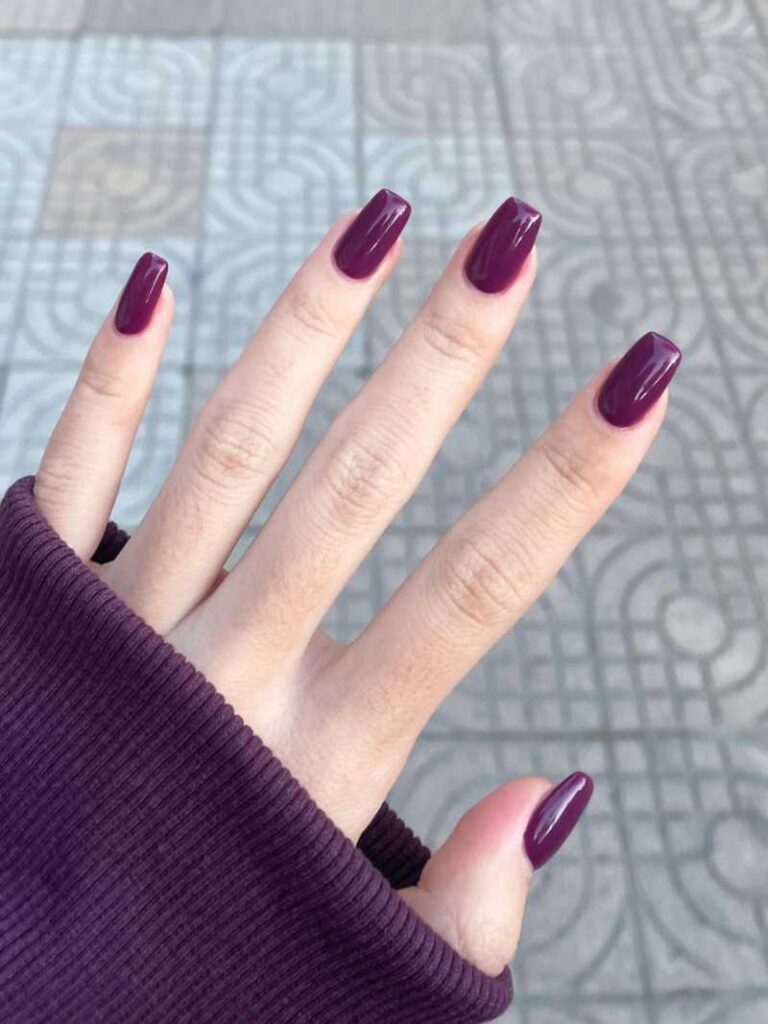
Berry Purple
A bold, solid berry purple shade can transform your nails into a statement piece. The deep, rich colour is perfect for fall and winter, but don’t let that stop you from rocking it at the beach, either! This berry-purple manicure is all about confidence, making it an ideal pick for those who love a pop of colour.
How to Achieve Berry Purple Nails
1️⃣ Start Clean: Begin with clean, shaped nails and gently push back your cuticles for a neat finish.
2️⃣ Apply Base Coat: Protect your nails with a clear base coat to ensure smooth application and long wear.
3️⃣ Paint Berry Purple: Use a rich, deep berry purple polish and apply two even coats. Let each coat dry fully for a bold, vibrant look.
4️⃣ Top It Off: Seal your manicure with a glossy top coat to add shine and extend the wear.
✨ Pro Tip: For an extra touch, add a subtle shimmer or matte finish to make your berry purple nails stand out even more. Perfect for anyone who wants a confident, stylish statement!
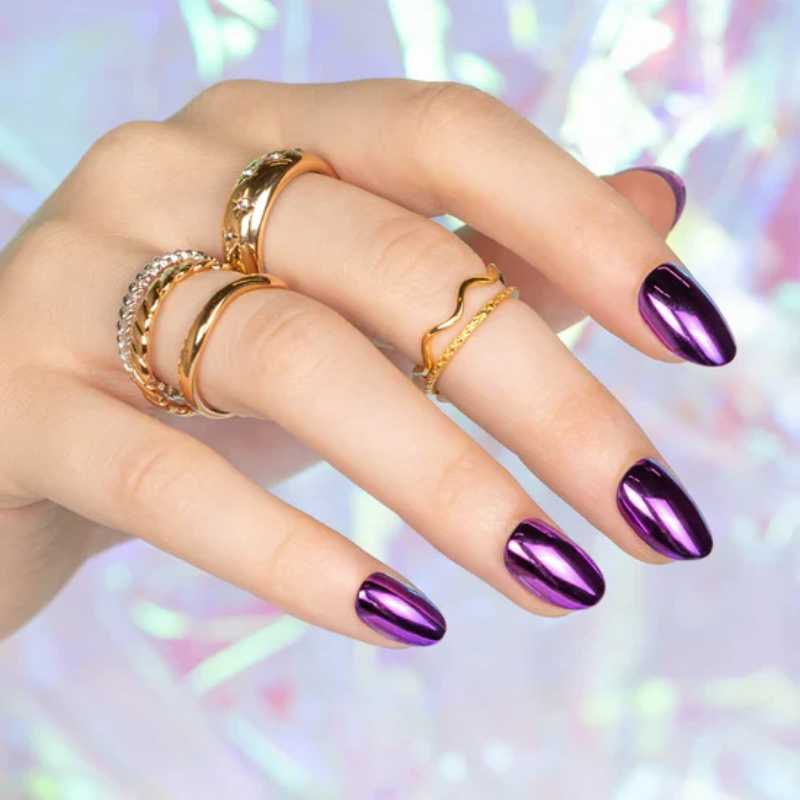
Purple Chrome
The purple chrome nails give a sleek and futuristic look. The shiny, lavender chrome finish reflects the light beautifully, making your nails look effortlessly chic. This design works well for both casual days and glamorous nights out.
How to Achieve Purple Chrome Nails
1️⃣ Start with Smooth Nails: Gently buff and shape your nails. Make sure the surface is even—chrome looks best on a flawless base.
2️⃣ Prime with a Black Base: Apply a black or dark purple polish as a base layer. This makes the chrome effect pop even more.
3️⃣ Apply Chrome Powder: Use a silicone brush or a soft eyeshadow applicator to rub purple chrome powder over the dry base. Go in small, circular motions for a mirror-like effect.
4️⃣ Lock It In: Apply a water-based top coat first (to avoid cracking) and let it dry. Follow up with a gel or glossy top coat for a long-lasting shine.
5️⃣ Clean Edges: Use a fine brush dipped in nail polish remover to clean up any extra powder around your nails.
💡 Pro Tip: For a bolder look, try mixing purple chrome with a hint of silver or pink chrome on a few accent nails.
Amethyst Nails
If you’re into mystical vibes, the purple amethyst manicure is a must-try. Inspired by the natural beauty of amethyst crystals, these swirly patterns give off an enchanting and magical feel. Whether you’re manifesting good energy or just love a stunning design, this manicure is a timeless pick.
How to Achieve Amethyst Nails
1️⃣ Prep Your Base: Start with clean, shaped nails. Apply a clear base coat to protect your natural nails.
2️⃣ Layer Soft Purple: Use a translucent lavender polish as your base to mimic the soft, crystal-like shade of amethyst.
3️⃣ Create the Marble Effect: While the base is still slightly wet, add small drops of a darker purple and a touch of white polish. Use a fine brush or a toothpick to gently swirl the colours, creating a natural, stone-like pattern.
4️⃣ Add Subtle Sparkle: Lightly dab a fine silver or holographic glitter on top for a hint of magical shine—just like a sparkling crystal.
5️⃣ Seal with Shine: Finish with a glossy top coat for a smooth, glass-like surface that captures the gemstone vibe.
💡 Pro Tip: Want extra realism? Use a thin gold liner to add tiny cracks or veins across your amethyst nails for a more authentic, crystal-inspired look.
Abstract Hearts in Pastel Purple
Have you ever wanted a pastel purple manicure that feels both fun and elegant? If so, this abstract heart design is perfect for you! The soft strokes and charming shapes create a unique, playful look that’s easy to wear for any occasion.
Whether you’re going out with friends or just want something cute to admire throughout the day, this design will make you smile every time you look at your nails!
How to Achieve Abstract Hearts in Pastel Purple
1️⃣ Nail Prep First: Start with clean, trimmed nails. Apply a clear base coat to protect your natural nails.
2️⃣ Soft Pastel Base: Choose a light pastel purple polish and apply two thin coats. Let it dry completely for a smooth finish.
3️⃣ Create Abstract Hearts: Use a fine nail art brush or a dotting tool dipped in white or darker purple polish. Draw simple, abstract heart shapes—these don’t have to be perfect! The more artistic, the better.
4️⃣ Add a Playful Touch: If you like, add a few tiny dots or squiggles around the hearts to enhance the abstract vibe.
5️⃣ Seal and Shine: Apply a glossy top coat to keep your design long-lasting and give it a shiny finish.
💡 Pro Tip: If freehand isn’t your thing, use heart-shaped nail stickers as a guide, and then fill them in with your favourite purple shade.
Faded Tips Purple Manicure
Are you someone who loves simple yet stylish nails? Then you should try a purple ombre French manicure! The faded tips give a natural, clean look that’s perfect for everyday wear.
If you want to add a little more personality, why not try a butterfly sticker? Imagine how pretty your nails will look when they catch the light—subtle but with just the right amount of charm.
How to Achieve Faded Tips Purple Manicure
1️⃣ Start with a Clear Base: Begin with clean, filed nails. Apply a clear base coat to protect your nails.
2️⃣ Create the Ombre Effect: Use a makeup sponge for a smooth ombre look. Apply light purple polish at the tip of the sponge and white polish below it. Gently dab it on your nail tips to create a soft, faded effect.
3️⃣ Blend for Perfection: Reapply as needed until you get your desired gradient. Make sure to let each layer dry for a seamless look.
4️⃣ Add the Butterfly Accent: Use a butterfly nail sticker or tiny butterfly decals on one or two nails for a charming touch.
5️⃣ Seal with a Glossy Finish: Complete the look with a high-shine top coat to make your design last longer and look extra glossy.
💡 Pro Tip: If you want a softer ombre, use a sheer purple polish for the tips and build up the colour gradually.
Dreamy Sparkly Nails
Imagine looking down at your hands and feeling like a sea princess! These faded purple nails are pure magic, blending soft hues with a shimmering design that catches the light beautifully.
If you love a dreamy, elegant manicure, this one is perfect for you. Have you ever worn a nail style that made you feel this magical?
How to Achieve Dreamy Sparkly Nails
1️⃣ Prep with a Clean Base: Start with clean, shaped nails and apply a base coat to protect them.
2️⃣ Create the Faded Purple Base: Use a sheer lavender polish, starting from the tips and blending downward for a soft gradient effect. Use a makeup sponge for a smooth, blended look.
3️⃣ Add the Sparkle: While the polish is still slightly wet, lightly tap fine purple or holographic glitter onto the tips. Focus more glitter on the tips for a magical, fading effect.
4️⃣ Seal with Shine: Apply a clear, glossy top coat to lock in the glitter and give your nails a glass-like finish.
💡 Pro Tip: For extra magic, add a touch of iridescent glitter over the entire nail for that sea-princess glow.
Simple Long and Sharp Light Purple Nails
Do you love long, sharp nails but prefer a simple and classy look? This light purple gel manicure gives you that sleek, polished vibe without overdoing it. The colour is elegant and perfect for any occasion. Have you ever tried a subtle yet stunning nail design like this before?
How to Achieve Simple Long and Sharp Light Purple Nails
1️⃣ Shape Your Nails: Start by filing your nails into a sharp, stiletto or almond shape. If you’re using nail extensions, choose a long, tapered design.
2️⃣ Apply Light Purple Base: Choose a soft, pastel purple gel polish. Apply two thin coats, curing each layer under a UV/LED lamp.
3️⃣ Perfect the Shine: Finish with a high-gloss top coat to keep your nails looking sleek and polished. Cure it properly for a smooth finish.
💡 Pro Tip: For a flawless, salon-like look, make sure each layer is thin and even, and don’t forget to cap the edges for lasting wear.
Playful Long Purple Nail Design
Let’s have some fun with long nails! These purple nails with swirling white details bring energy and creativity to your fingertips. The mixed nail art order on each hand adds a unique touch, making every set feel one of a kind. Would you dare to try this fun and artistic manicure?
How to Achieve Playful Long Purple Nail Design
1️⃣ Prep Your Nails: Shape your nails to your desired length—stiletto or coffin shapes work best for a dramatic look.
2️⃣ Base Colour Application: Apply a rich purple gel polish as your base. Cure under a UV/LED lamp.
3️⃣ Create Swirling Details: Use a fine nail brush and white polish to draw swirling patterns on different nails. Get creative—each nail can have a slightly different design.
4️⃣ Seal with Top Coat: Finish with a glossy top coat to protect your design and add shine.
💡 Pro Tip: Don’t worry about making the swirls perfect—organic, free-flowing lines give the design its playful vibe.
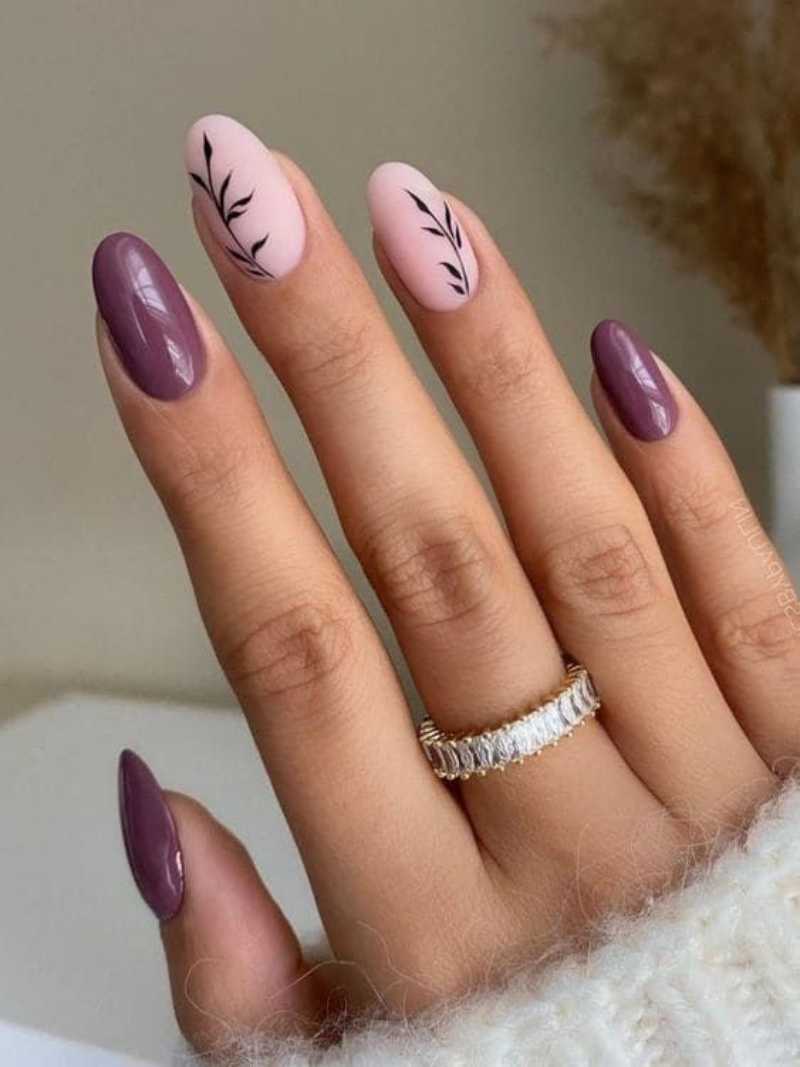
Soft Mauve
Sometimes, less is more. Soft mauve nails are perfect when you want something stylish but low-key. This solid shade gives an effortless, classy look—ideal for any mood or outfit. Do you like understated elegance, or do you prefer something bolder?
How to Achieve Soft Mauve Nails
1️⃣ Prep Your Nails: Begin with clean, filed nails. Push back your cuticles for a neat base.
2️⃣ Apply Base Coat: Start with a clear base coat to protect your nails and make the colour last longer.
3️⃣ Choose Your Mauve Shade: Use a soft mauve nail polish. Apply two thin coats, letting each layer dry for a smooth, even finish.
4️⃣ Seal with Top Coat: Finish with a glossy top coat for a sleek, long-lasting shine.
💡 Pro Tip: For an even classier look, keep your nails short and neatly rounded.
Double Frenchies
Why settle for one shade when you can have both? These double French tips blend light and dark purple, creating a trendy and modern nail design. It’s the perfect mix of classy and fun. Would you go for this bold yet chic manicure?
How to Achieve Double Frenchies
1️⃣ Prep Your Nails: Start with clean, shaped nails. Push back your cuticles for a neat look.
2️⃣ Base Coat First: Apply a clear or nude base coat to protect your nails and enhance the design.
3️⃣ Create the First French Tip: Use a light purple polish to paint a thin, curved tip on each nail. Let it dry.
4️⃣ Add the Second Tip: Just below the first tip, use a darker purple shade for a bold contrast. Keep the lines sharp for a clean look.
5️⃣ Seal the Look: Finish with a glossy top coat to keep your design fresh and shiny.
💡 Pro Tip: For a more elegant touch, add a thin metallic silver line between the two purple shades.
Dark Purple Chrome
If you love a bit of drama, these dark purple chrome nails will steal the show! The royal purple shade shines under the light, making them perfect for fall and winter. Would you wear this shiny, bold design to add a little extra glamour to your look?
How to Achieve Double Frenchies
1️⃣ Prep Your Nails: Start with clean, shaped nails. Push back your cuticles for a neat look.
2️⃣ Base Coat First: Apply a clear or nude base coat to protect your nails and enhance the design.
3️⃣ Create the First French Tip: Use a light purple polish to paint a thin, curved tip on each nail. Let it dry.
4️⃣ Add the Second Tip: Just below the first tip, use a darker purple shade for a bold contrast. Keep the lines sharp for a clean look.
5️⃣ Seal the Look: Finish with a glossy top coat to keep your design fresh and shiny.
💡 Pro Tip: For a more elegant touch, add a thin metallic silver line between the two purple shades.
Periwinkle Nails
Want something fresh and soft? Periwinkle nails with daisy accents are a perfect blend of cute and stylish. They’re light, refreshing, and great for any season. Can you see yourself rocking this adorable manicure design?
How to Achieve Periwinkle Nails
1️⃣ Start with Clean Nails: Shape your nails and gently push back your cuticles. Apply a clear base coat for protection.
2️⃣ Apply Periwinkle Base: Choose a soft periwinkle polish and apply two thin coats for a smooth, even finish. Let it dry.
3️⃣ Add Daisy Accents: Use a thin nail brush or a dotting tool to create simple white daisy petals. Add a tiny yellow dot at the center for a realistic look.
4️⃣ Seal with Top Coat: Apply a clear, glossy top coat to protect your design and give your nails a shiny finish.
💡 Pro Tip: For a more delicate look, keep the daisies on just one or two nails as accent designs.
Electric Purple
Looking for something bold? These electric purple nails are bright, fun, and impossible to ignore. Perfect for summer festivals or just making a statement. Would you dare to wear something this eye-catching?
How to Achieve Electric Purple Nails
1️⃣ Prep Your Nails: Start with clean, filed nails. Push back your cuticles and apply a base coat for protection.
2️⃣ Apply Bold Purple Polish: Choose a bright, electric purple shade. Apply two thin coats, letting each dry properly for a smooth finish.
3️⃣ Add a Glossy Top Coat: For that eye-catching shine, seal your nails with a high-gloss top coat. This will also protect your bold colour from chipping.
💡 Pro Tip: Want an even more striking look? Add a silver accent nail or tiny glitter details for a festival-ready finish.
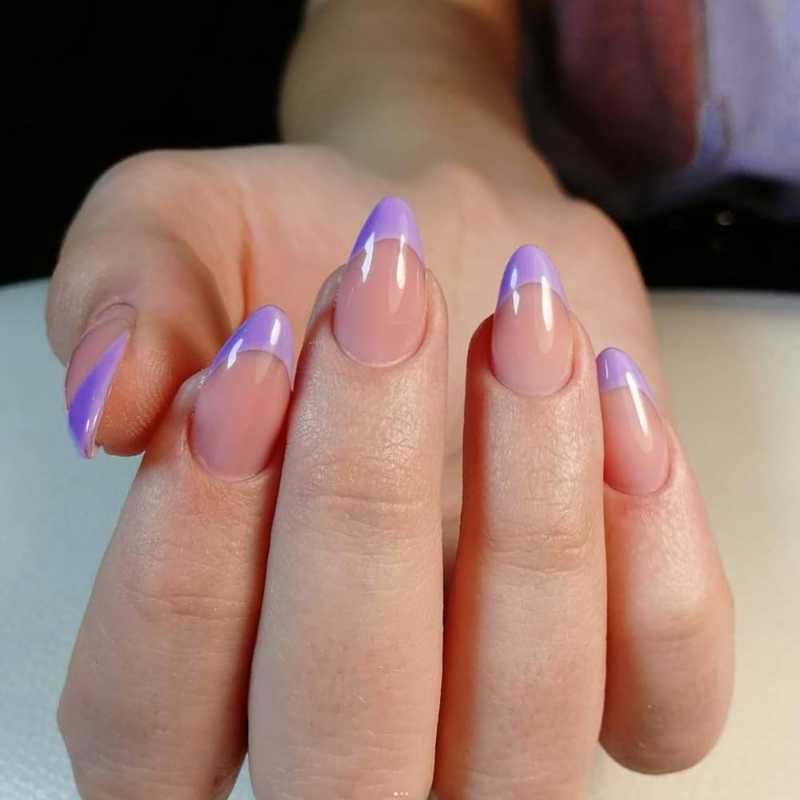
Lilac Frenchies
A fresh twist on classic, lilac French tips brings a soft pastel aesthetic to your nails. This manicure pairs beautifully with floral outfits and spring vibes. Are you a fan of the classic French manicure, or do you prefer something with a twist?
How to Achieve Lilac Frenchies
1️⃣ Prep Your Nails: Clean, file, and shape your nails. Apply a clear base coat for a smooth foundation.
2️⃣ Create Lilac Tips: Use a soft lilac shade for the tips. You can go for classic straight tips, soft curves, or even diagonal for a modern twist.
3️⃣ Perfect the Edges: If you’re not steady with freehand painting, use French tip guides for crisp, clean edges.
4️⃣ Seal with a Top Coat: Apply a high-gloss or matte top coat, depending on your preference, for a long-lasting finish.
💡 Pro Tip: Want to make it extra cute? Add a tiny floral or silver dot at the base of each French tip for a chic touch.
Daisies Nail Art on Purple Nails
If you love purple nails and want something fresh, why not add little daisies for a soft and cute touch? This French design blends delicate nail art with a spring vibe, making your hands look effortlessly stylish.
The white daisy accents on a soft lavender or deep purple base bring out a playful yet elegant feel, making it perfect for any season.
How to Achieve Daisies Nail Art on Purple Nails
1️⃣ Prep Your Nails: Start with clean, shaped nails. Apply a clear base coat for protection.
2️⃣ Choose Your Base Color: Pick a soft lavender or deep purple polish as your base. Apply two coats for a smooth finish.
3️⃣ Create Daisy Designs: Use a fine nail brush or a dotting tool to add small white petals. Place a tiny yellow dot in the center of each daisy for a realistic look.
4️⃣ Seal the Design: Once the flowers dry, apply a glossy top coat to protect your art and give it a beautiful shine.
🌼 Pro Tip: Want a chic look? Add daisies only to a couple of accent nails instead of all, for a fresh, minimal vibe.
Long Light Purple French
A French manicure always stays trendy, but this long light purple French look takes it to another level! Outlined with a soft lavender shade, it creates a classy yet modern style.
If you love long nails but want to keep it minimal, this design is the way to go. Whether for a casual day out or a special event, these nails will make your hands stand out.
How to Achieve Long Light Purple French Nails
1️⃣ Nail Preparation: Clean and shape your nails to your desired length (almond or coffin works best for this look). Apply a clear base coat for protection.
2️⃣ Base Color Application: Use a sheer or nude polish as your base to keep the look clean and elegant.
3️⃣ Create the French Tips: Use a light purple polish to paint the tips. For a crisp edge, use French manicure guides or a fine nail brush. Make sure the tips are long and sharp for that chic effect.
4️⃣ Perfect the Look: Let the polish dry, then finish with a high-shine top coat to seal and protect your design.
🌟 Pro Tip: If you want a more modern touch, add a tiny silver or white outline along the purple tips for a subtle, trendy twist.
OMG Purple Nails Idea
Are you ready for a bold purple French design with a twist? This 3D nail art will make you fall in love with your nails all over again. The shiny purple base, combined with textured elements, adds depth and uniqueness. It’s sexy, edgy, and guaranteed to grab attention every time you move your hands.
How to Achieve OMG Purple Nails
1️⃣ Nail Prep: Start with clean, shaped nails. Choose a long almond or square shape for a bold look. Apply a clear base coat for protection.
2️⃣ Base Application: Use a deep, shiny purple polish as your base. Make sure it has a high-gloss finish for that eye-catching shine.
3️⃣ Add 3D Details: Once the base dries, use clear builder gel to create 3D effects—like textured dots, lines, or small gem placements. Use a fine brush for precision.
4️⃣ Finishing Touches: Seal with a thick, glossy top coat to secure the 3D elements and keep your design flawless.
🌟 Pro Tip: For an extra pop, consider adding a bit of silver or holographic foil to the 3D sections for a touch of luxury.
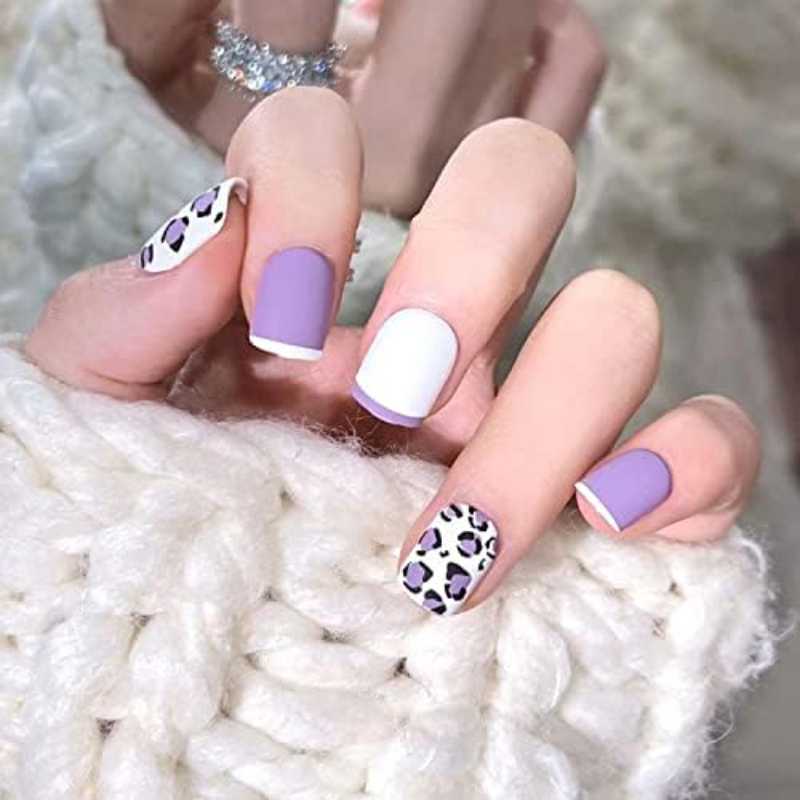
Leopard Print
Ready to add a little wild side to your nails? This purple nail design with leopard print details is bold, fun, and full of personality! Whether you choose lavender spots on a deep purple base or vice versa, this look screams confidence. Perfect for when you want to step out in style and show off your fierce energy.
How to Achieve Leopard Print Purple Nails
1️⃣ Nail Prep: Start with clean, filed nails. Apply a clear base coat to protect your nails and ensure a smooth surface.
2️⃣ Base Colour: Apply a deep purple or soft lavender polish as your base. Choose the shade that matches your mood—dark for bold, light for fun.
3️⃣ Leopard Print: Use a fine nail art brush or dotting tool to create irregular spots with a contrasting purple shade. Outline these spots with black or dark purple for that classic leopard effect.
4️⃣ Seal and Shine: Finish with a glossy top coat to protect the design and add a polished look.
🌟 Pro Tip: Want a twist? Add a touch of gold foil to the leopard spots for a glam touch.
Swirled French
If you love a French tip but want something different, this swirled purple design is just what you need. Instead of classic straight lines, these swirls add an artistic and unique touch to your manicure. The mix of light and dark purple tones blends effortlessly, giving your nails a modern, chic look.
How to Achieve Swirled Purple French Tips
1️⃣ Nail Prep: Start with clean, filed nails. Apply a clear base coat to keep your nails strong and protect against staining.
2️⃣ Base Colour: Choose a soft neutral shade like light pink or nude as your base colour. This makes the purple swirls pop.
3️⃣ Create Swirls: Using a fine nail art brush, paint freehand swirls in light and dark purple tones on the tip of each nail. Don’t worry about making them perfect—organic swirls look best.
4️⃣ Top Coat: Seal your design with a clear, glossy top coat for shine and durability.
🌟 Pro Tip: For an extra chic touch, add a tiny bit of silver glitter to the swirls.
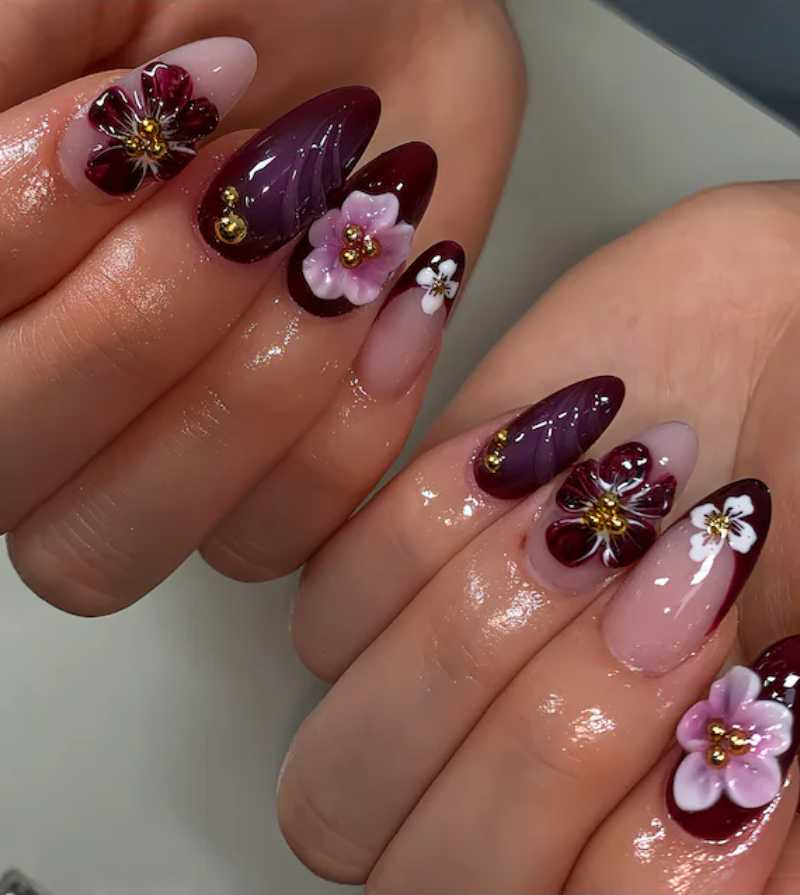
3D Flower Nail Art Idea
If you love a delicate yet stylish touch, these 3D light purple art nails are a must-try. The 3D flowers create a soft and elegant look, while the gemstone centre adds a little sparkle to your manicure.
Whether you’re dressing up for an event or just want a fresh everyday look, these nails bring out a charming and classy vibe.

Busy Nails for Boss Girlies
If you love a little extra glam, this design is perfect for you! These cute nail art elements combined with gemstones create a bold and eye-catching effect. This look is ideal for those who enjoy nails that stand out and show off personality. Whether you’re rocking long or short nails, adding different nail art decorations will take your manicure to the next level.
How to Achieve Busy Nails for Boss Girlies
1️⃣ Start with a Clean Base: Shape your nails to your desired length—whether short and chic or long and fierce. Apply a clear base coat for protection.
2️⃣ Choose Your Colour Palette: Go for a neutral or light base like soft pink, lilac, or nude to make your nail art pop. Let it dry completely.
3️⃣ Add Nail Art Elements: Use a mix of designs—small gemstones, metallic lines, stickers, or tiny charms. Place them creatively across your nails.
4️⃣ Seal with a Top Coat: Apply a thick, clear top coat to lock in your designs and give your nails a glossy finish.
💎 Pro Tip: Keep a balance—don’t overcrowd all nails. Make one or two nails the star of the show with extra designs for a chic, sophisticated look.

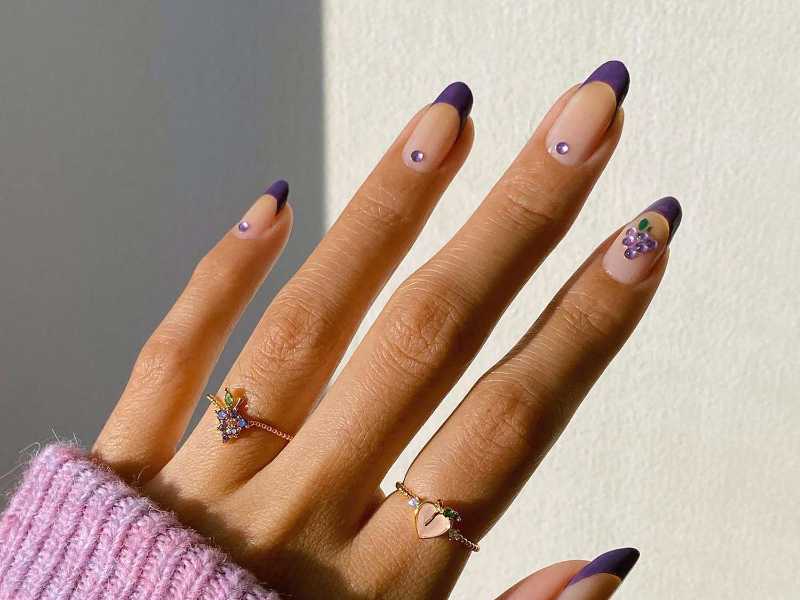
Reverse French
Want to give your nails a stylish twist? Reverse French purple nails are the perfect way to upgrade a classic look. The tips are flipped, making them stand out while still looking fab and modern. Whether you’re heading to a brunch or just enjoying a sunny day, this flaunting style will keep your nails looking effortlessly chic.
How to Achieve Reverse French Purple Nails
1️⃣ Prep Your Nails: Start by cleaning, filing, and shaping your nails to your desired length. Apply a clear base coat for smooth, protected nails.
2️⃣ Pick Your Purple Shades: Choose a light purple or lilac as your base and a darker purple for the reverse French tip. Let the base colour dry completely.
3️⃣ Create the Reverse Tip: Use a thin nail art brush to carefully paint the reverse tip near your cuticles (not the usual top edge). You can make it thick or thin, depending on your style.
4️⃣ Perfect the Design: If your lines aren’t perfectly curved, use a fine brush dipped in nail polish remover to clean up any mistakes.
5️⃣ Seal for Shine: Finish with a glossy top coat to keep your reverse French design shiny and long-lasting.
💡 Pro Tip: For a bolder look, add a little glitter or a metallic outline around the reverse tip for extra style.
Humanize 162 words

Pearl-Studded French
If you love a classy vibe, try pearl-studded purple French tip nails for a sophisticated touch. This mani is a showstopper—perfect for your bestie’s wedding or any event where you want to flex a little luxury. The pearls add a delicate yet glamorous finish, making your nails look elegant anywhere you go.
How to Achieve Pearl-Studded Purple French Tip Nails
1️⃣ Prep Your Nails: Start with clean, shaped nails. Apply a base coat to protect your natural nails.
2️⃣ Choose Your Purple Base: Pick a soft or deep purple shade for your French tips. Use a nail guide or a thin brush to create precise French tips on each nail.
3️⃣ Add the Pearls: While the polish is still slightly tacky, use tweezers to carefully place small pearl studs along the French tip edge. Adjust the pearl size for a custom look.
4️⃣ Secure Your Design: Apply a clear top coat over the entire nail to lock in the pearls and add a glossy finish.
💡 Pro Tip: If you’re worried about the pearls falling off, use nail glue for a stronger hold, especially if you’re attending a long event.
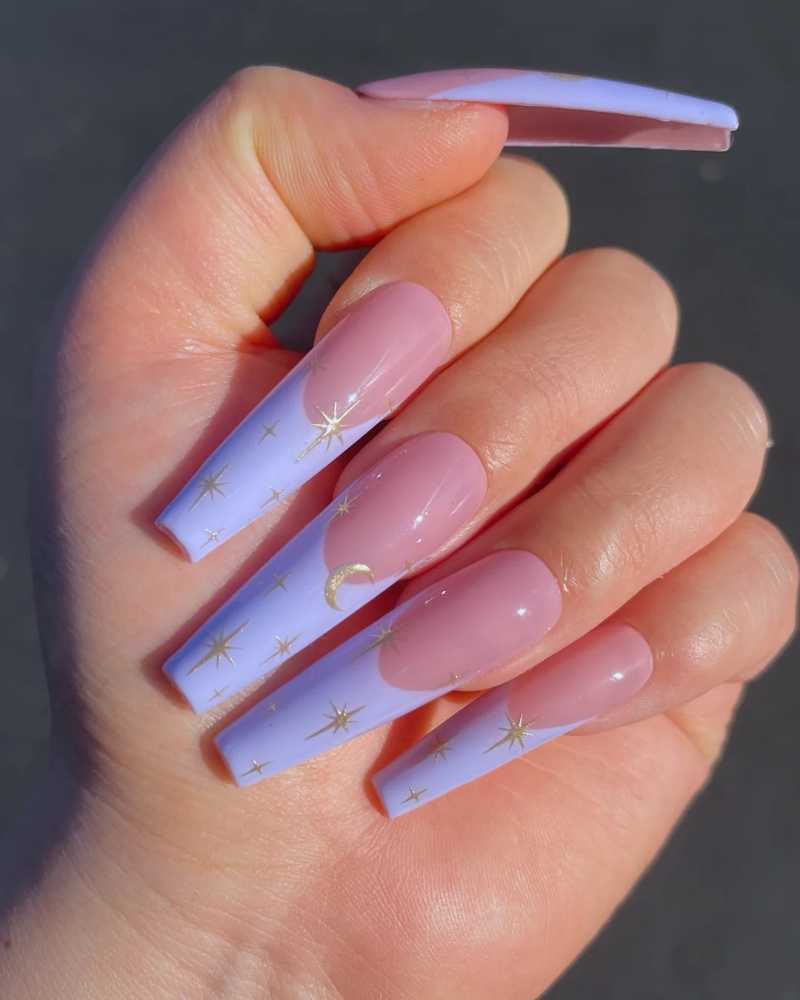
Celestial French
For a dreamy look, go for purple celestial French tip nails that feel both magical and modern. These light purple tones are stunning in summer and spring, while darker shades work perfectly for cooler days. If you love switching your colour to match your mood, this design lets you stay trendy all year round.
How to Achieve Celestial French Nails
1️⃣ Nail Preparation: Clean and shape your nails to your desired length. Apply a clear base coat for protection.
2️⃣ Base Colour: Use a soft, milky nude or light lavender polish for the base to make your design pop.
3️⃣ Create French Tips: Paint a light purple shade as French tips on each nail. For a celestial vibe, use a fine brush to add tiny stars, crescent moons, and sparkles over the tips. White and silver work great for this.
4️⃣ Top Coat: Seal your design with a high-shine top coat to protect the art and give it a glossy finish.
🌟 Pro Tip: Use a tiny dotting tool for the stars to keep them neat and consistent.
Now, I want to hear from you! Which purple nail design caught your eye the most? Do you prefer pastel purple nails for a soft and subtle look, or are you all about bold, trendy purple nail art? Let me know your favorites, and if you try any of these stunning nail designs, don’t forget to share your purple manicure—because nothing beats a little nail inspiration!