
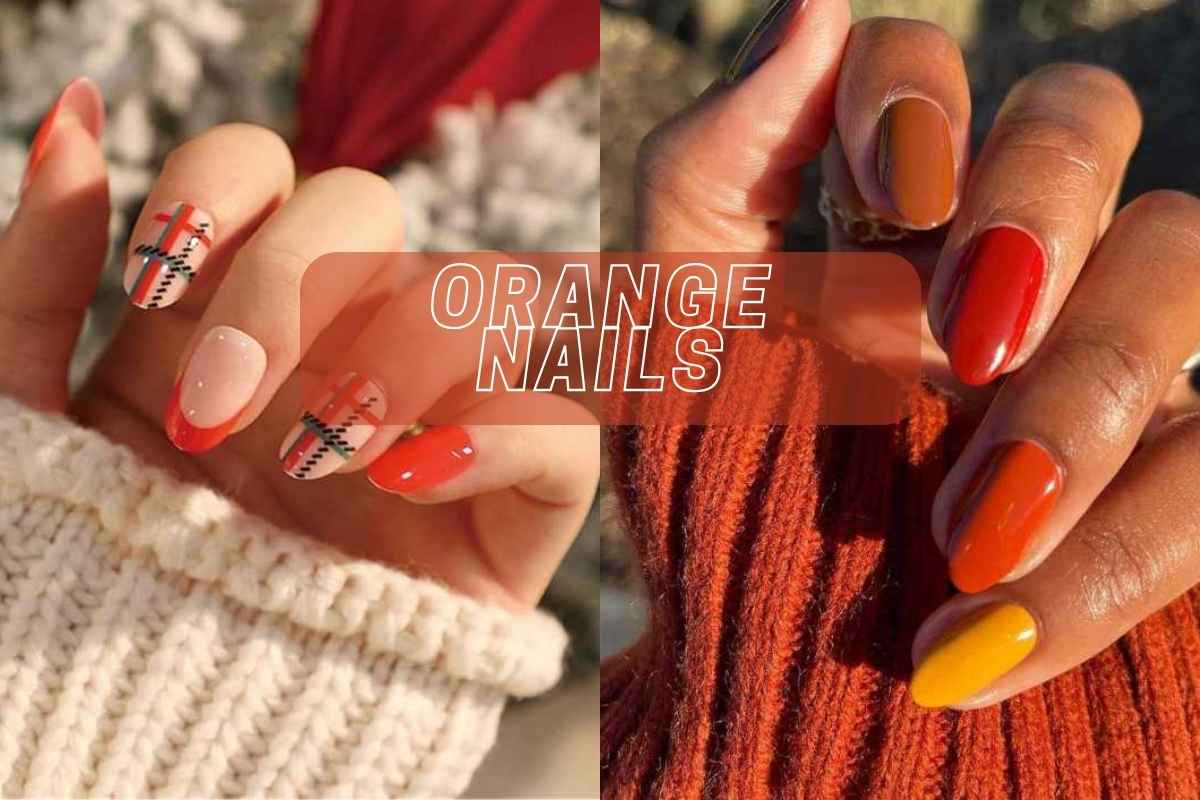
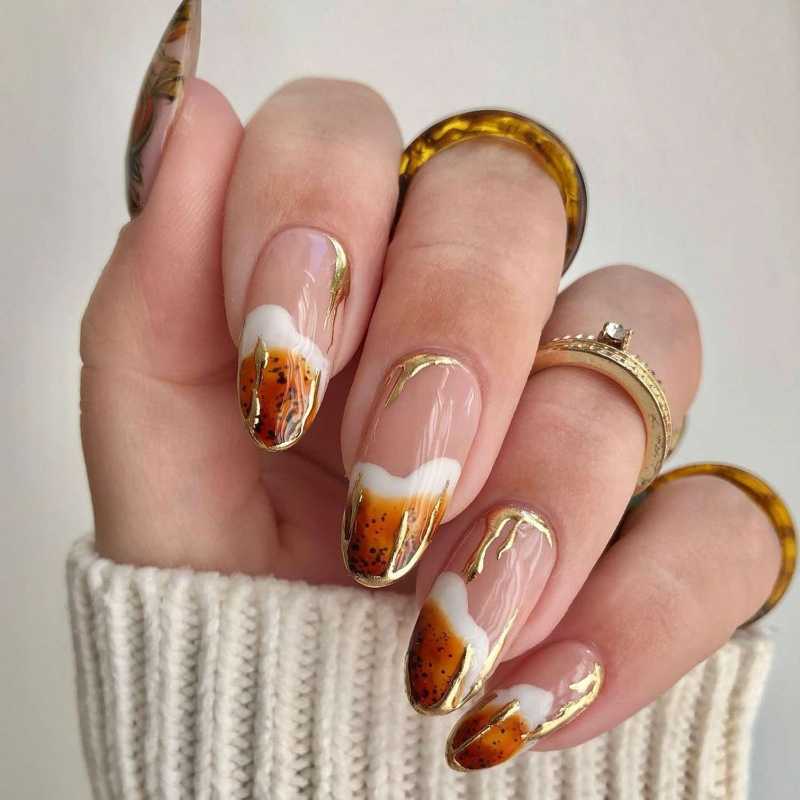
The year’s coziest season is here! With trees bursting in colourful, vibrant shades, it’s time to match the vibe with stunning burnt orange nail designs. Whether you’re wrapping up in warm sweaters or prepping for the holidays, a chic deep orange or terracotta manicure is essential.
It’s like wearing the beauty of fall on your fingertips—just as comforting as a cup of pumpkin spice on a crisp day. Enjoy a unique nail art session that brings your fall vibes to life with stunning designs.
Go for trendy ombre nails, a sleek glossy finish, or elegant Thanksgiving nails with festive colours. Whether you prefer matte nails or subtle warm undertones, the right manicure will complete your fall look effortlessly!
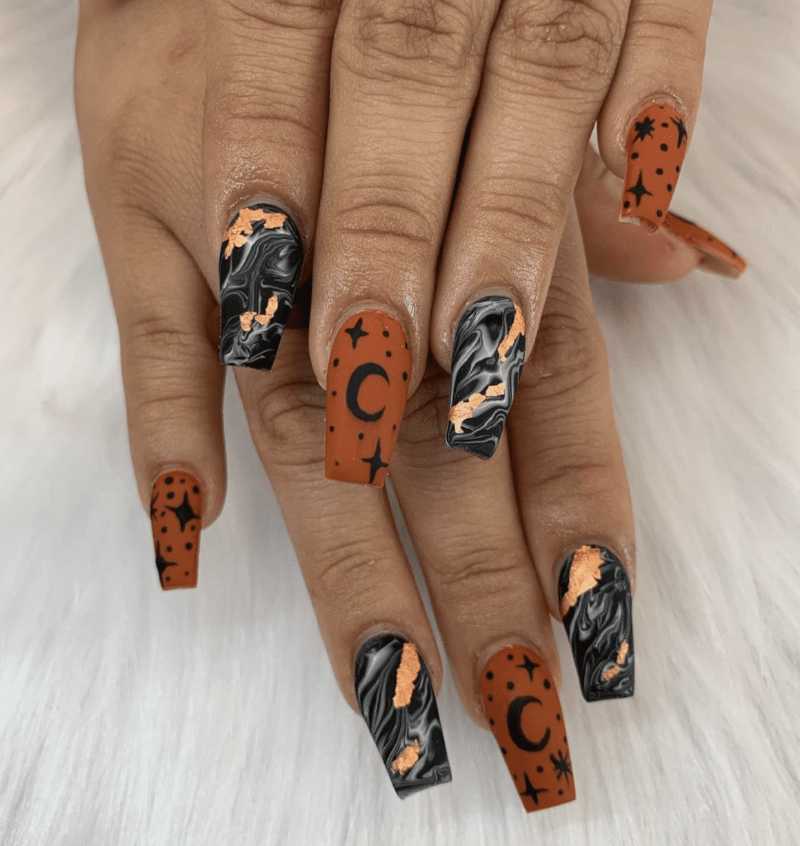
Matte Burnt Orange & Black Nails
Love a bold look? Try a square-length manicure in matte, burnt orange, and black nails this fall! It’s a stunning choice for anyone obsessed with celestial designs and astronomical figures.
The deep contrast, inspired by the stars, makes this a perfect option for an edgy yet stylish vibe. Would you rock this cosmic beauty?
🌸 How to Achieve Dark to Light Pink Gradient Nails
✨ Prep Your Nails:
- Start with clean, shaped nails. Gently push back cuticles for a neat look.
💖 Base Protection:
- Apply a clear base coat to keep your natural nails healthy.
🎨 Perfect Gradient:
- Grab a makeup sponge. Paint a stripe of dark pink at the base and light pink above.
- Dab this on your nail for a flawless fade.
🔄 Build Up the Color:
- Repeat the dabbing 2-3 times for a bold, vibrant gradient.
🌟 Glossy Finish:
- Lock in the design with a glossy top coat for shine and smoothness.
💡 Pro Tip:
Slightly overlap the pink shades on the sponge for a seamless, dreamy blend.
READ ALSO: 30 Best Black and White Nails Designs for 2025
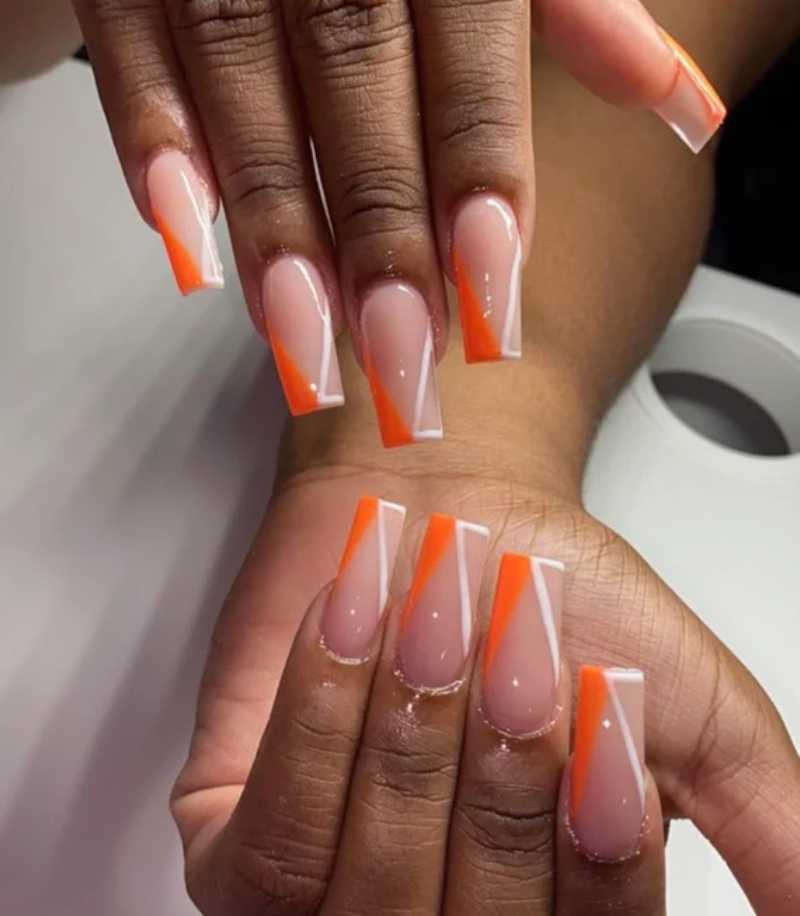
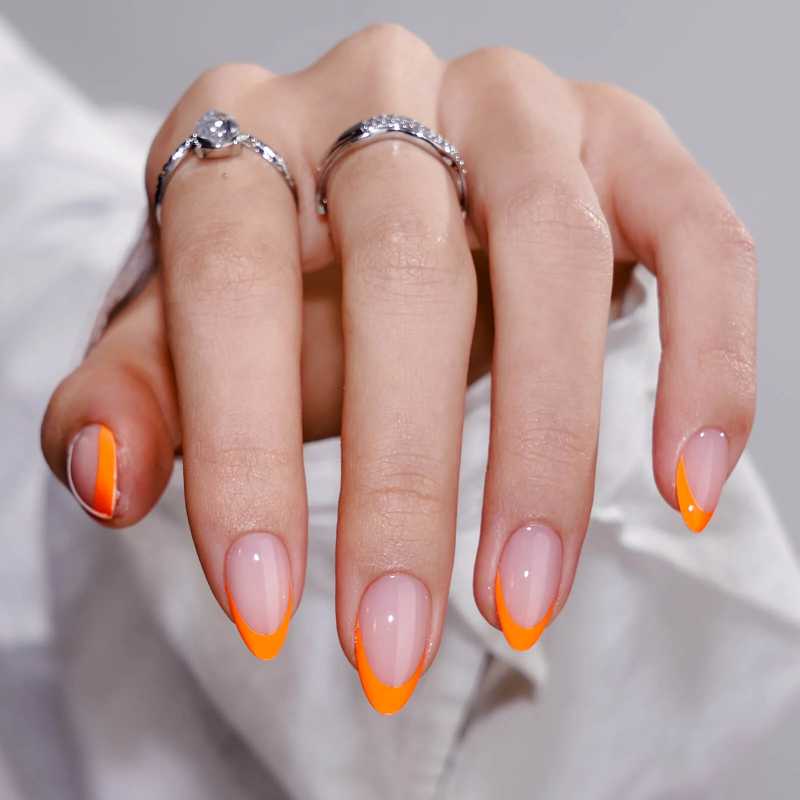
Burnt Orange & White Stripe Nails
Sleek and sophisticated, this almond-shaped manicure in fall burnt orange with a white stripe is a minimalist dream. The crisp white accent adds brightness, while the matte finish keeps it classy. Simple yet attractive, this nail design is perfect for any occasion. Ready to give your nails a chic makeover?
🍂 How to Achieve Burnt Orange & White Stripe Nails
✨ Prep Your Nails:
- Start with clean, shaped almond nails. Gently push back your cuticles.
🍁 Apply Base Coat:
- Use a clear base coat for smooth, long-lasting nails.
🎨 Paint Burnt Orange:
- Apply two coats of matte burnt orange polish. Let each layer dry.
⚪ Create the White Stripe:
- Use a thin nail brush for a clean, vertical white stripe on each nail.
🌟 Finish with Top Coat:
- Seal with a matte top coat for a sophisticated, soft look.
💡 Pro Tip:
For a flawless stripe, use nail tape as a guide for a crisp, straight line.
READ ALSO: 25 Stunning Almond Nail Ideas for a Flawless Look In 2025!
Glossy Burnt Orange Pumpkin Nails
Picture walking through a pumpkin patch—that’s the vibe of this burnt orange manicure with a glossy top coat! The rich orange shade sparkles with glitters and a cute pumpkin tip, adding just the right spice. Love a shiny, festive touch? This one’s for you!
🎃 How to Achieve Glossy Burnt Orange Pumpkin Nails
✨ Prep Your Nails:
- Clean, shape, and gently push back your cuticles.
🍁 Apply Base Coat:
- Use a clear base coat for a smooth surface.
🍊 Paint Burnt Orange:
- Apply two coats of glossy burnt orange polish. Let each layer dry.
🌟 Add Glitter & Pumpkin Detail:
- Use fine glitter on the tips for sparkle. Draw a cute pumpkin tip using a thin brush.
💧 Seal with Glossy Top Coat:
- Finish with a high-shine top coat for a radiant, festive look.
💡 Pro Tip:
For a perfect pumpkin design, use a dotting tool to create a round, cute pumpkin shape.
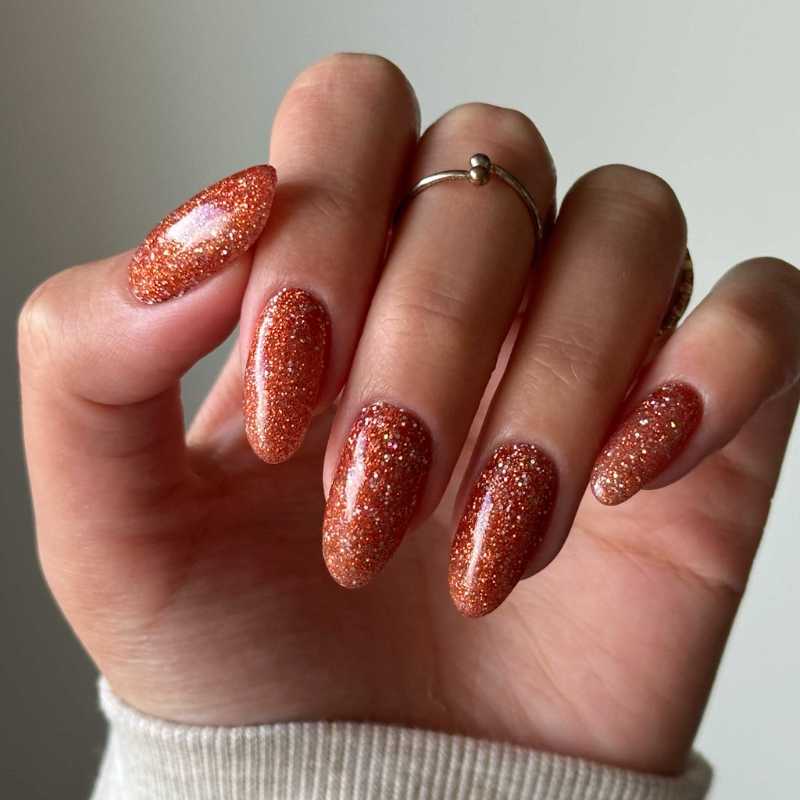
Festive Burnt Orange Glitter Nails
Love colourful nails with details? This playful nail design blends glitters and abstract design for a bold fall look. It’s a perfect choice to match outfits and add extra charm.
Whether you like subtle or standout styles, these burnt orange nails stay perfect. Shine, patterns and warmth make them an eye-catching favourite!
✨ How to Achieve Festive Burnt Orange Glitter Nails
🌟 Prep Your Nails:
- Start with clean, shaped nails. Push back your cuticles.
🍊 Apply Base Color:
- Use a rich burnt orange polish as the base.
🎇 Add Glitter:
- Dab fine glitter polish on the tips or create abstract glitter patterns for a festive touch.
🖌️ Create Abstract Design:
- Use a thin brush to add random lines or swirls over the glitter for a playful look.
💧 Seal with Top Coat:
- Finish with a glossy top coat for shine and durability.
💡 Pro Tip:
Mix chunky and fine glitters for a multi-dimensional, eye-catching look.
Pumpkin Spice Nails with Patterns
This nail art is all about pumpkin spice latte vibes! A mix of line patterns, plain shades, and intricate details creates a cute, lovely, and sophisticated look.
The warm orange mani adds a cozy seasonal touch. Whether showing off your nails or holding a latte, this interesting design is a must-try!
How to Achieve Pumpkin Spice Nails with Patterns
🌿 Prep Your Nails:
- Start with clean, shaped nails. Gently push back your cuticles.
🎨 Apply Base Color:
- Use a warm, burnt orange polish as your base.
✒️ Add Pattern Details:
- Use a thin nail art brush to draw cozy line patterns or swirl designs, like a pumpkin spice latte.
💅 Combine Plain and Patterned Nails:
- Keep some nails plain and others with detailed designs for a balanced look.
💧 Seal with Top Coat:
- Apply a glossy top coat for a long-lasting shine.
💡 Pro Tip:
Use a fine-tipped brush for crisp, clean line patterns.
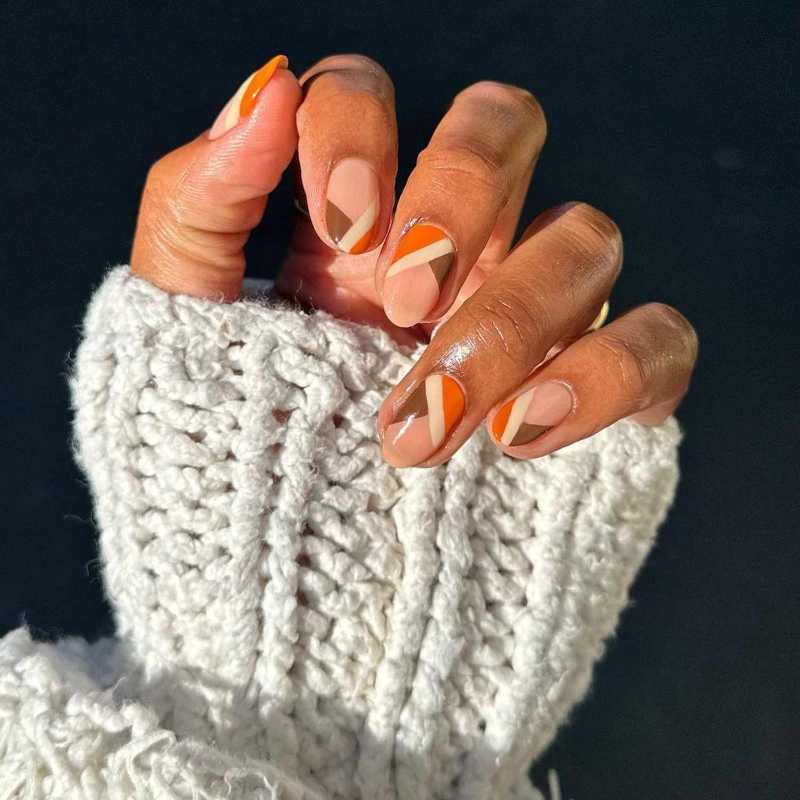
Classy Orange Nails with Beige
For a classy, minimalist feel, this nail art blends beige accents with a fall-themed twist. It’s fashionable, timely, and makes a subtle yet stylish statement.
The creative concept mixes nude nails with orange, creating a versatile, chic look. Want elegance with seasonal charm? This is for you!
How to Achieve Classy Orange Nails with Beige
🌿 Prep Your Nails:
- Start with clean, shaped nails. Gently push back your cuticles.
🎨 Apply Base Colors:
- Use a soft beige polish for most nails.
- Choose a warm burnt orange for a few accent nails.
✨ Keep It Minimal:
- Maintain a sleek look by leaving some beige nails plain.
💧 Seal with Top Coat:
- Use a glossy top coat for a smooth, polished finish.
💡 Pro Tip:
Switch the beige and orange placement for a fresh twist.
Watercolor Orange & Beige Nails
Are you looking to try something unique? The watercolour effect on your nails, with bright neon oranges and a beige base coat, gives off a beautiful, artistic vibe.
The swirling effect adds a cool, watery feel, and if you love blending colours creatively, this design will definitely make you stand out. Imagine how amazing these would look with your favourite fall outfits!
How to Achieve Watercolor Orange & Beige Nails
🌿 Prep Your Nails:
- Start with clean, shaped nails. Push back your cuticles gently.
🎨 Apply Base Colors:
- Use a soft beige polish as your base.
- On a makeup sponge, layer bright neon orange and a touch of beige.
🎨 Create Watercolor Effect:
- Gently dab the sponge onto your nails for a blended, watercolor look.
- Repeat for more intensity.
💧 Seal with Top Coat:
- Finish with a glossy top coat for a smooth, artistic finish.
💡 Pro Tip:
For a true watercolor effect, use a tiny brush with a drop of acetone to blur the colors further.
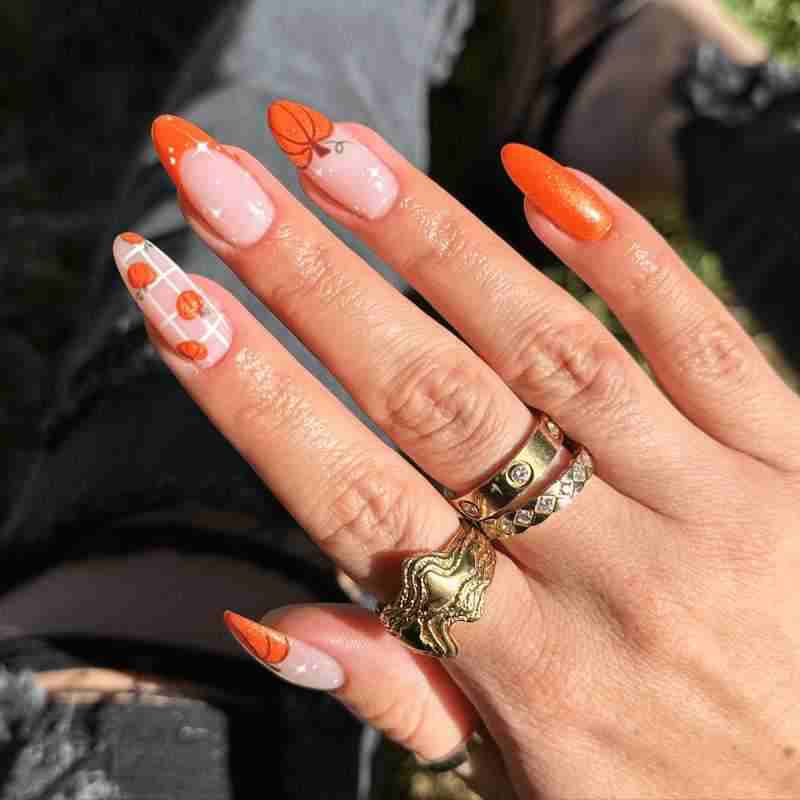
Orange, Glitters & Pumpkin Line Art
How about giving your nails a fall-inspired twist? Picture pumpkin line art on fall burnt orange nails, with added glitters for that perfect seasonal sparkle.
The glitters and plain mani create a lovely balance, while the intricate line art adds a fun touch. Don’t you think this would be a great choice for your next mani to capture the festive vibe?
How to Achieve Orange, Glitters & Pumpkin Line Art Nails
🌿 Prep Your Nails:
- Start with clean, shaped nails. Push back your cuticles gently.
🎨 Apply Base Color:
- Use a rich burnt orange polish as your base. Let it dry.
✨ Add Glitter:
- Apply a fine glitter polish on one or two accent nails for a sparkling touch.
🖌️ Create Pumpkin Line Art:
- Use a thin nail art brush and white or gold polish to draw simple pumpkin outlines.
💧 Seal with Top Coat:
- Finish with a glossy top coat for a smooth, lasting shine.
💡 Pro Tip:
For perfect pumpkin shapes, use a dotting tool for the round base and connect with curved lines.
Classy Glossy Orange Nails
If you want something classy with a bit of edge, try a glossy finish with animal print details. The burnt orange shade, paired with a glossy topcoat, will definitely match your favourite silver jewellery and dark-toned outfits. It’s perfect for those who want to stay fashionable while keeping things chic. Ready to rock this stylish look for your next event?
💅 How to Achieve Classy Glossy Orange Nails with Animal Print
✨ Prep Your Nails:
- Clean and shape your nails. Push back cuticles for a neat base.
🎨 Apply Base Color:
- Paint your nails with a rich burnt orange polish. Let it dry completely.
🐆 Add Animal Print Details:
- Using a thin nail art brush or nail stickers, create subtle black or dark brown leopard spots on one or two nails for a chic accent.
💎 Finish with Glossy Top Coat:
- Seal your design with a glossy top coat to add shine and protect your manicure.
💡 Pro Tip:
Match this look with silver jewelry and dark outfits for an effortlessly stylish fall vibe.
Orange & Dark Purple
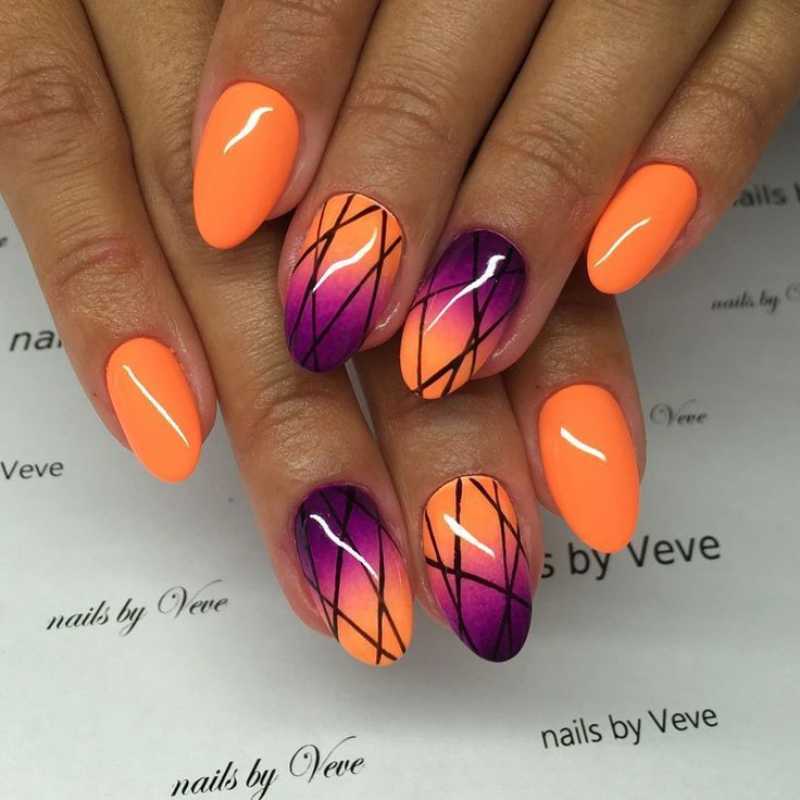
A bold, two-tone mix of burnt orange and dark purple nails gives a fall colour clash that just works. The rich hues balance cozy warmth with cool drama, making it an unexpected yet stunning combination.
If you love striking colours, this mix brings depth and contrast to your nails.
How to Achieve Orange & Dark Purple Two-Tone Nails
✨ Prep Your Nails:
- Start with clean, shaped nails and push back cuticles gently.
🎨 Apply Base Colors:
- Paint half your nails with burnt orange polish and the other half with dark purple. You can alternate nails or do a half-and-half design on each nail.
🔄 Create Clean Lines:
- Use nail striping tape or a thin brush to keep the color edges sharp and neat.
💎 Seal with Top Coat:
- Finish with a glossy top coat to blend the colors smoothly and add shine.
💡 Pro Tip:
Use this bold combo to make a statement—perfect for fall when you want warmth and drama on your fingertips!
READ ALSO: 50+ Stunning Light Purple Nails Ideas for 2025
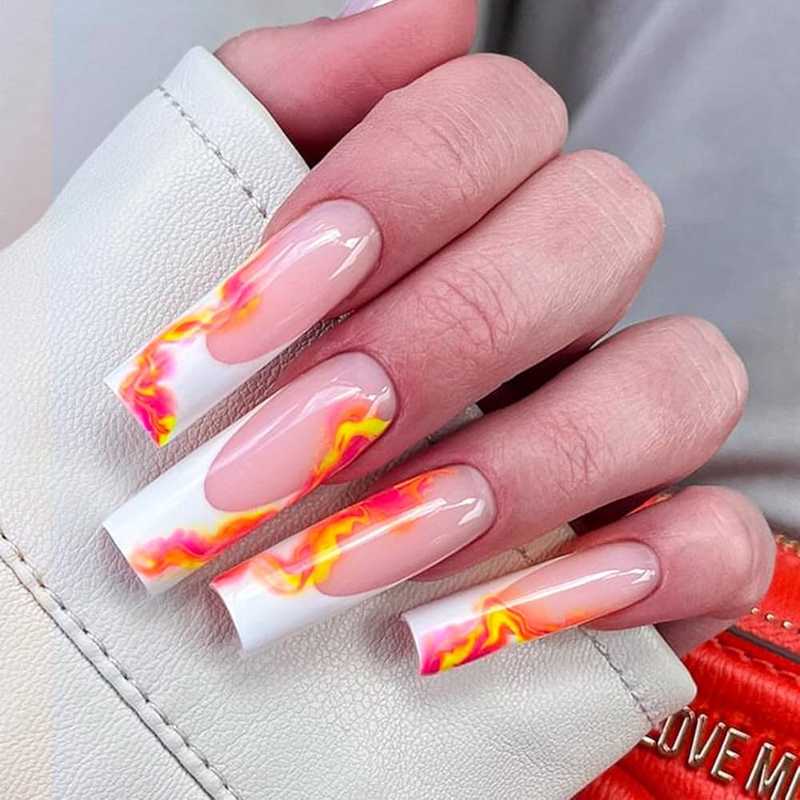
Marble Effect Nails
Love a unique, artsy manicure? Burnt orange nails with a marble effect create a swirly, smoky vibe that adds beautiful depth. This autumn palette is a must-have for those who enjoy stylish and creative nail art.
💅 How to Achieve Marble Effect Burnt Orange Nails
✨ Prep Your Nails:
- Clean, shape, and push back your cuticles for a neat base.
🎨 Base Coat:
- Apply a burnt orange polish as your base color and let it dry completely.
🖌️ Create Marble Effect:
- On a palette, mix a little white and black polish with burnt orange.
- Use a thin brush or a toothpick to swirl the colors gently.
- Dab or drag the swirled polish onto your nails for a smoky marble look.
💎 Finish with Top Coat:
- Seal your design with a glossy top coat for shine and durability.
💡 Pro Tip:
Work quickly when creating the swirls to keep the marble effect smooth and natural-looking. Perfect for a stylish, artsy fall manicure!

Floral Burnt Orange Nails
Nothing says fall like floral patterns! A burnt orange base with gold-lined blooms adds a delicate yet bold touch. Perfect for an Insta-cute look, these nails are ideal for your next pumpkin patch selfie.
💅 How to Achieve Floral Burnt Orange Nails
✨ Prep Your Nails:
- Start with clean, shaped nails and gently push back cuticles.
🎨 Apply Base Color:
- Paint your nails with a rich burnt orange polish. Let it dry completely.
🌸 Add Floral Details:
- Use a thin nail art brush or a dotting tool to draw simple flower shapes with gold polish or gold nail art pen.
- Keep the design delicate for a classy fall look.
💎 Seal the Design:
- Finish with a clear glossy top coat to protect your art and add shine.
💡 Pro Tip:
Practice drawing flowers on paper first for steady lines, then transfer the design to your nails for that perfect pumpkin patch-ready mani!
Orange & White Nail Combo
A mix of burnt orange and crisp white nails with a touch of glitter at the cuticles creates a fresh yet balanced look. This design keeps the fall vibes strong while adding a clean, polished finish.
How to Achieve Orange & White Nail Combo
✨ Prep Your Nails:
- Clean, file, and shape your nails. Push back cuticles for a neat look.
🎨 Apply Base Colors:
- Paint half your nails with burnt orange and the other half with crisp white. Let them dry.
🌟 Add Glitter Accent:
- Use a fine brush to apply glitter at the cuticles for a subtle sparkle.
💎 Finish with Top Coat:
- Seal with a glossy top coat for shine and long-lasting wear.
💡 Pro Tip:
For a clean color split, use nail tape as a guide.
French Tips
If you love a minimalistic look but still want that autumn vibe, a burnt orange French tip manicure is the way to go. It keeps the simplicity of a classic French style while adding a seasonal style twist. Whether you prefer sharp lines or a softer fade, this look is elegant yet trendy for fall.
A burnt orange tip gives just enough colour without overpowering the nails. It pairs beautifully with neutral tones and makes your hands look stylish and polished. If you’re after a chic yet subtle nail look, this is a must-try.
How to Achieve Burnt Orange French Tips
✨ Prep Your Nails:
- Clean, file, and shape your nails. Opt for a rounded or almond shape for a chic look.
🎨 Apply Base Color:
- Use a neutral or sheer nude polish for a clean, elegant base. Let it dry completely.
🖌️ Create French Tips:
- Use a fine brush or French tip stickers. Paint the tips with burnt orange for a perfect autumn touch.
💎 Finish with Top Coat:
- Seal with a glossy top coat for shine and long-lasting wear.
💡 Pro Tip:
For a softer, gradient look, use a makeup sponge to blend the orange tip.
READ ALSO: French Tip Nail Ideas Perfect for Fall
Pearls & Flowers
A mix of burnt orange and burgundy nails creates a dreamy, sweater-weather manicure. Add pearls and dainty flower accents for that soft, vintage glam finish. This design is ideal for anyone who loves elegant nails with a cozy fall feel.
The deep burgundy shade balances the warmth of burnt orange, making it perfect for colder months. The delicate shimmer of pearls and flowers elevates the look, giving it a timeless charm.
🌺 How to Achieve Pearls & Flowers Nail Art
✨ Prep Your Nails:
- Clean, file, and shape your nails. Almond or oval shapes work best for a vintage look.
🎨 Apply Base Colors:
- Use burnt orange on some nails and deep burgundy on others. Let it dry.
🌸 Add Floral Accents:
- Use a thin brush or nail stickers for delicate flower designs.
💎 Apply Pearls:
- Secure tiny pearls on one or two accent nails using nail glue.
🌟 Finish with Top Coat:
- Seal everything with a glossy top coat for shine and protection.
💡 Pro Tip:
For extra elegance, place the pearls along the cuticle for a chic, jewelry-like effect.

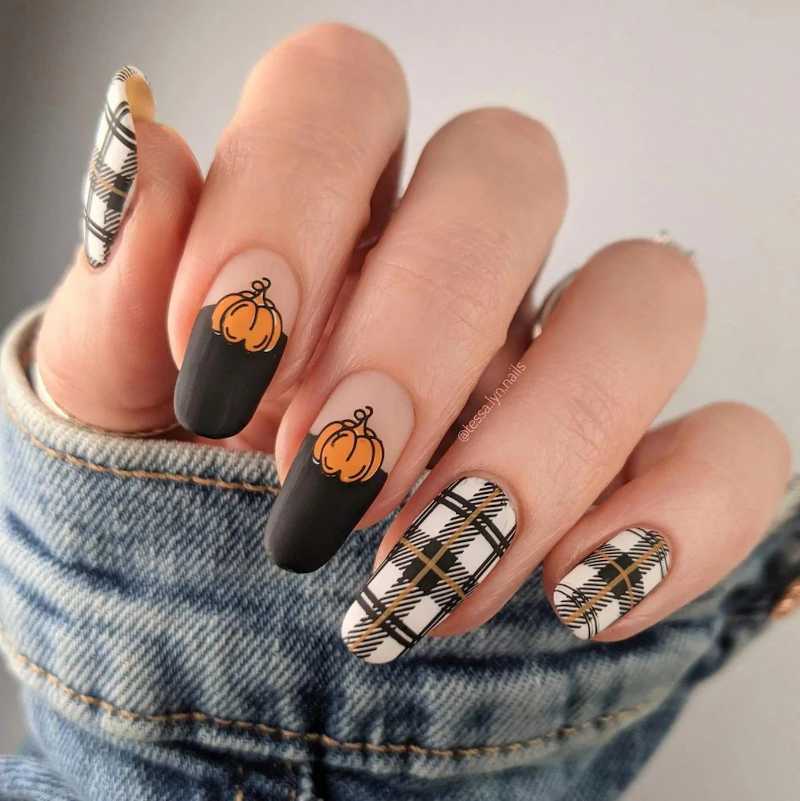
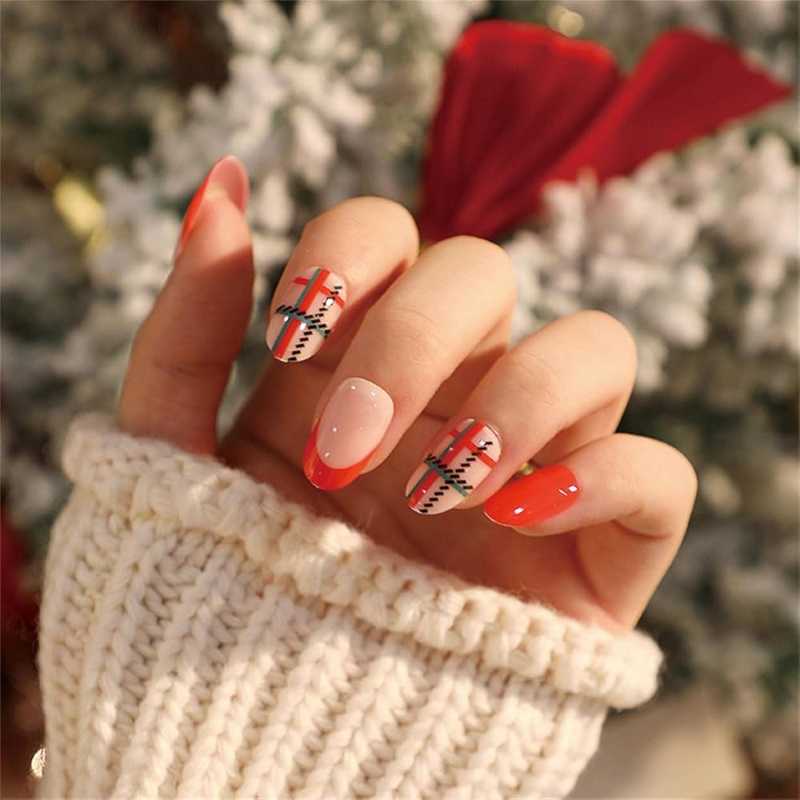
Plaid Design
What’s more fall-friendly than a plaid nail design? Pairing burnt orange with checks and flannel-inspired patterns brings out the ultimate cozy autumn aesthetic. It’s like wearing your favourite flannel but on your nails.
If you love nail art with seasonal charm, this design is a stylish way to embrace autumn without going over the top. It’s subtle, warm, and effortlessly cute.
How to Achieve Plaid Nail Art
✨ Prep Your Nails:
- Start with clean, shaped nails. Almond or square shapes work great.
🎨 Base Coat & Color:
- Apply a burnt orange base coat and let it dry completely.
🖌️ Create Plaid Pattern:
- Use a thin nail art brush with white, black, or gold polish to draw intersecting lines, creating a plaid pattern.
✅ Seal with Top Coat:
- Apply a glossy or matte top coat for a smooth, long-lasting finish.
💡 Pro Tip:
For perfect lines, use striping tape for a clean, professional look.
Jelly Nails
A sheer, see-through finish with marble swirls? Yes, please! Burnt orange jelly nails with a glossy effect bring a classy fall look while adding depth. This trend is lightweight, fresh, and easy to wear for any occasion.
The sheer texture makes your nails look delicate, while the glossy surface keeps them modern and chic. If you love depth in your manicure without heavy designs, this is a perfect choice.
How to Achieve Jelly Nails
✨ Prep Your Nails:
- Start with clean, shaped nails. Almond or square shapes look stunning.
🎨 Apply Sheer Burnt Orange Base:
- Use a sheer burnt orange polish. Apply 2-3 thin coats for a see-through effect.
🌪️ Add Marble Swirls:
- Use a thin brush with white or light beige polish to create soft, swirling marble patterns on each nail.
✅ Seal with Glossy Top Coat:
- Apply a high-shine top coat for a glossy, glass-like finish.
💡 Pro Tip:
Use a dotting tool for easy marble swirls without overblending.
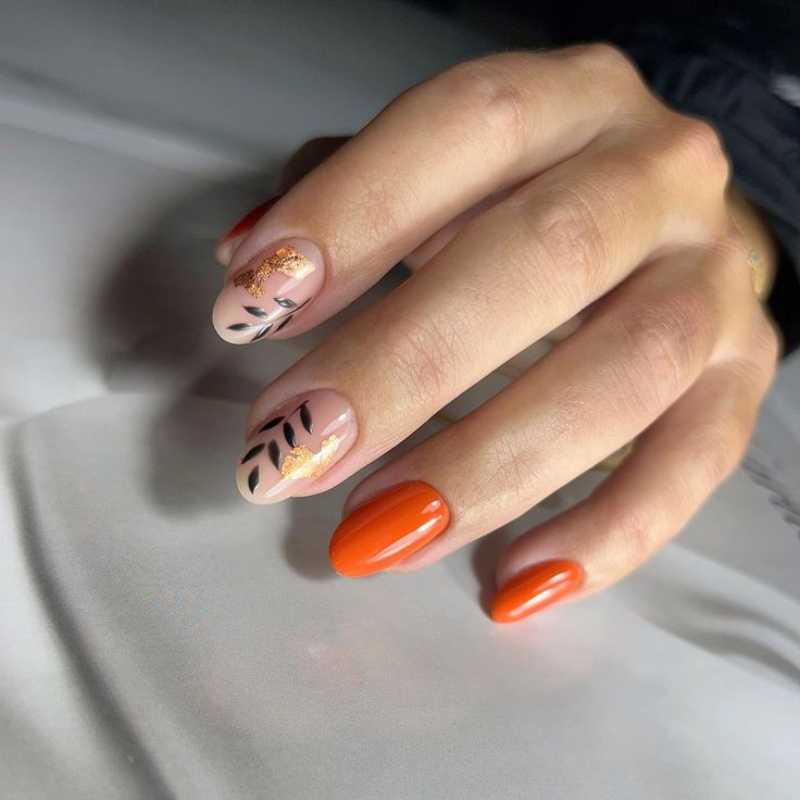
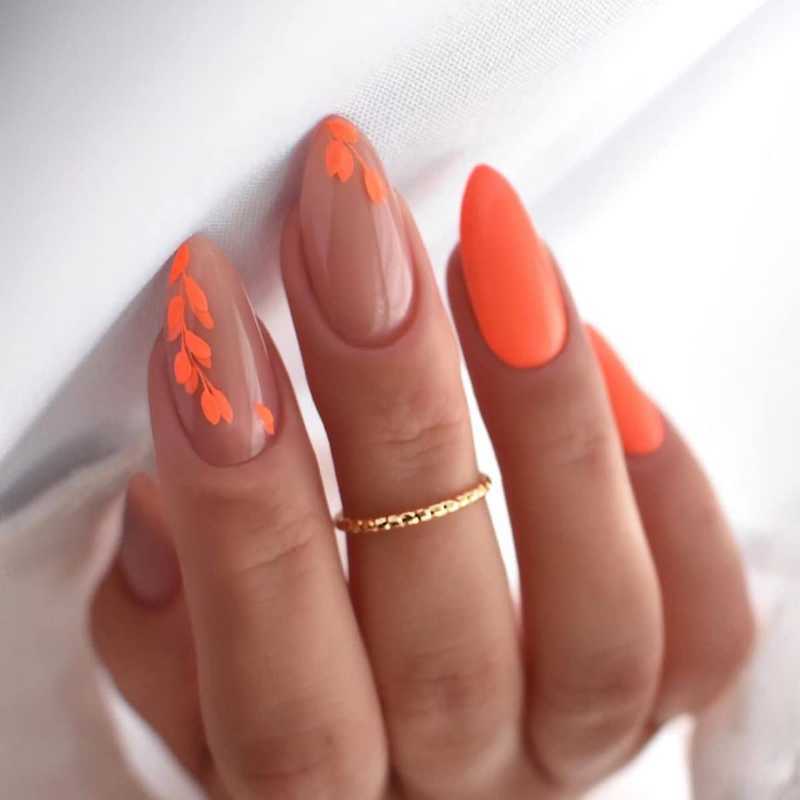
Leaf Accents
A burnt orange base with delicate leaf details and gold foil accents? It’s an elegant way to bring a touch of nature to your manicure. The metallic accents add a hint of shine while keeping the overall look minimal and eye-catching.
The best part? This design is earthy yet sophisticated, making it versatile for any fall outfit. If you love simple nails with a refined touch, this one’s for you.
How to Achieve Leaf Accents Nails
✨ Prep Your Nails:
- Clean, shape, and buff your nails. A rounded or almond shape works best.
🎨 Apply Burnt Orange Base:
- Paint your nails with a burnt orange polish. Let it dry completely.
🍃 Add Leaf Details:
- Use a thin nail art brush to draw delicate leaf shapes with a metallic gold polish.
✨ Add Gold Foil Accents:
- Gently press gold foil pieces on random parts for a luxe touch.
✅ Seal with Top Coat:
- Apply a glossy top coat for shine and protection.
💡 Pro Tip:
Use a fine-tip brush for precise leaf details without smudging.
Coquette Mani
The cute-girl aesthetic takes over fall with a burnt orange coquette manicure! Hand-drawn bows on a Korean-inspired base create a playful, adorable, and fall-ready look.
This dainty design keeps things sweet and cozy, perfect for those who love soft, elegant nail art. It’s subtle but makes a stylish statement.
🍂 How to Achieve Coquette Mani Nails
✨ Prep Your Nails:
- Clean and shape your nails. A rounded or almond shape enhances the cute look.
🎨 Apply Soft Burnt Orange Base:
- Use a soft, muted burnt orange polish for a cozy, fall feel.
🎀 Add Hand-Drawn Bows:
- With a thin nail brush, draw small, delicate bows on one or two nails using white or gold polish.
✅ Seal with Top Coat:
- Use a glossy top coat for a smooth, shiny finish.
💡 Pro Tip:
For perfect bows, use a dotting tool for neat, round edges.
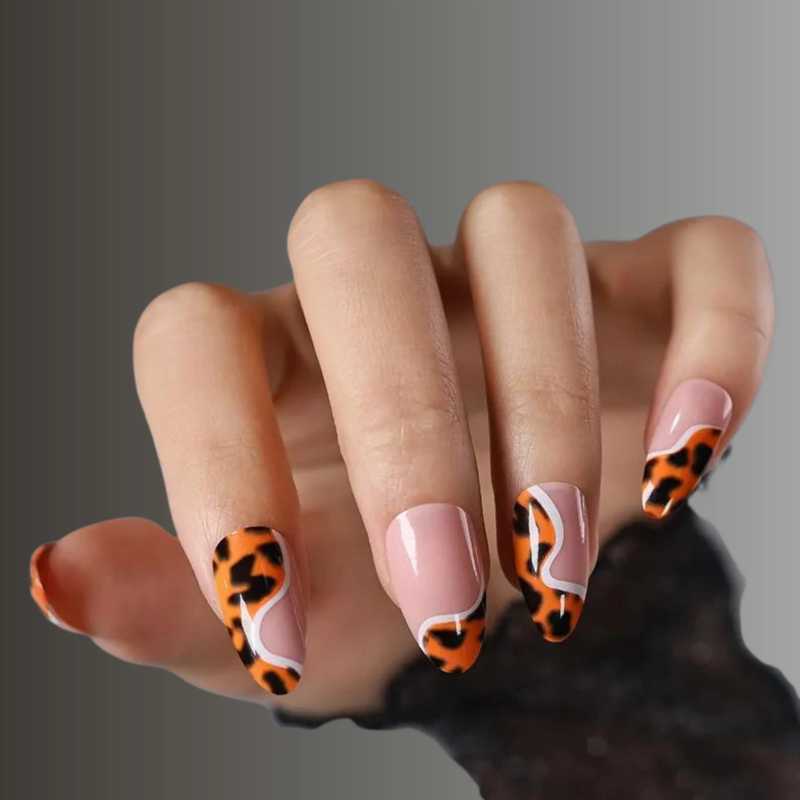
Leopard Print
Go bold with burnt orange leopard print! This fierce design brings texture and attitude, making your nails pop with fall-approved confidence.
The animal print adds a trendy touch, while the colour scheme keeps it balanced. It’s a perfect mix of edgy and chic!
🐆 How to Achieve Burnt Orange Leopard Print Nails
✨ Prep Your Nails:
- Clean, shape, and buff your nails. Go for a square or almond shape for a chic look.
🎨 Apply Burnt Orange Base:
- Use a rich burnt orange polish as your base. Allow it to dry completely.
🖌️ Add Leopard Print:
- With a thin nail brush, create irregular black spots and outline them with gold or brown for a classic leopard look.
✅ Seal with Top Coat:
- Use a glossy top coat to make the design pop and last longer.
💡 Pro Tip:
For a balanced look, add leopard print to just a few accent nails.
Ombre Nails
A seamless fade of burnt orange creates the ultimate gradient effect. It’s like a PSL in nail form, giving warm vibes while making the colour pop.
This soft transition is effortlessly stylish and perfect for those who love subtle nail art with impact.
🌅 How to Achieve Burnt Orange Ombre Nails
✨ Prep Your Nails:
- Start with clean, shaped nails. Buff the surface for a smooth base.
🌄 Create the Ombre Effect:
- Use a makeup sponge. Paint a stripe of burnt orange at the tip and a lighter nude shade below.
- Dab gently on your nails for a smooth gradient.
🔁 Build Up Color:
- Repeat dabbing 2-3 times for a stronger gradient. Let it dry between layers.
✅ Finish with Top Coat:
- Apply a glossy top coat for a smooth, blended finish.
💡 Pro Tip:
For a flawless fade, slightly overlap the two shades on the sponge.

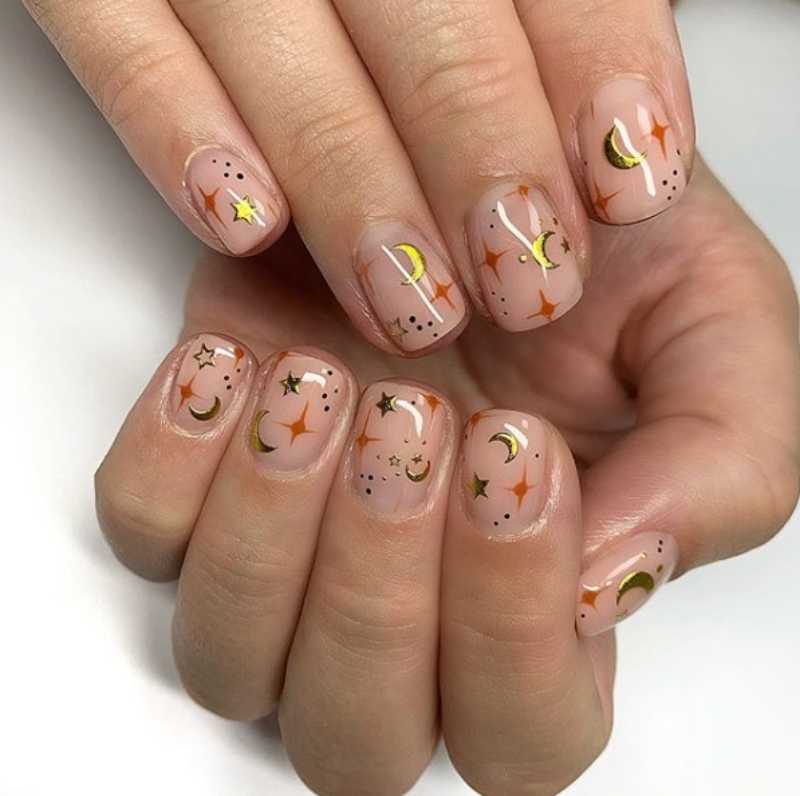
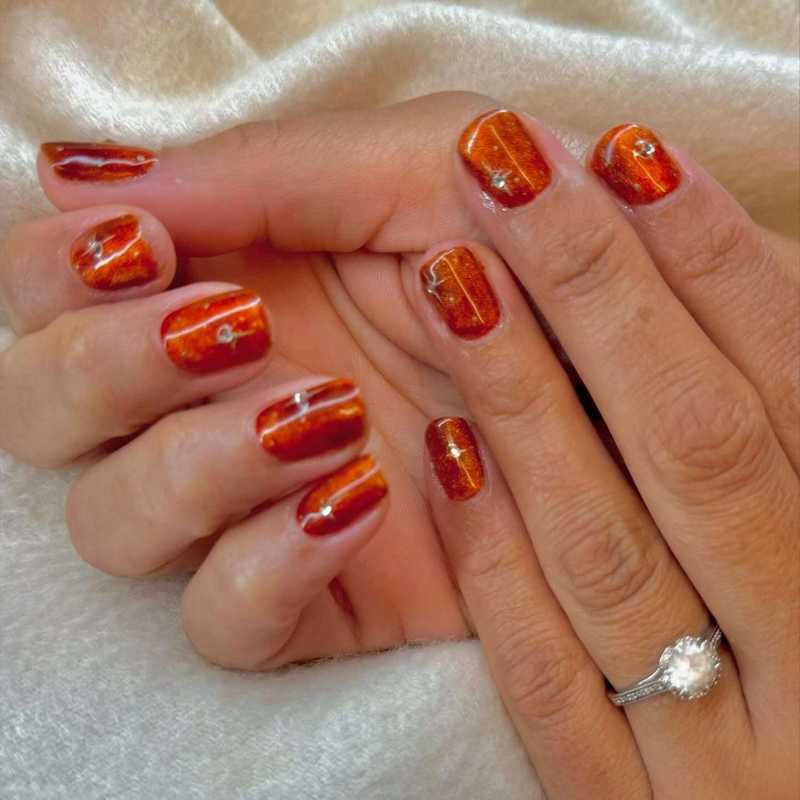
Celestial Nails
Nothing shines like chrome stars on a burnt orange base! This design adds a subtle glam touch while keeping the warmth of the colour. It’s an understated but stunning option for Thanksgiving nails.
The earthy base keeps it sophisticated, while the stars bring a little extra sparkle.
🌟 How to Achieve Burnt Orange Nails with Chrome Stars
✨ Prep Your Nails:
- Start with clean, shaped nails. Buff for a smooth base.
🌠 Apply Burnt Orange Base:
- Use a deep burnt orange polish. Apply two thin coats for a rich, even color.
⭐ Add Chrome Stars:
- Use a fine brush or star stickers with chrome polish. Place them randomly for a subtle, scattered look.
✅ Seal with Top Coat:
- Apply a glossy top coat to lock in the design and add shine.
💡 Pro Tip:
For a clean star look, use nail tweezers for precise placement.
Gradient Nails
A burnt orange and vanilla gradient creates a soft yet stunning effect. This blend tones down the intensity of burnt orange, giving a smooth, warm autumn vibe finish.
It’s the perfect way to get a fall-inspired mani without going too bold.
🍂 How to Achieve Burnt Orange & Vanilla Gradient Nails
🧼 Prep Your Nails:
- Start with clean, shaped nails. Push back cuticles gently.
🎨 Create the Gradient:
- On a makeup sponge, paint a stripe of burnt orange and a stripe of vanilla (off-white) next to each other, slightly overlapping.
- Dab the sponge gently on your nails, blending the colors.
🔄 Repeat for Depth:
- Reapply the polish on the sponge and dab 2-3 times for a smooth, rich gradient effect.
💎 Finish with Top Coat:
- Seal the design with a glossy top coat for a flawless, shiny finish.
💡 Pro Tip:
Overlap colors slightly on the sponge for a seamless blend that looks professional.
READ ALSO: How Can Red Nails Instantly Elevate Your Look?
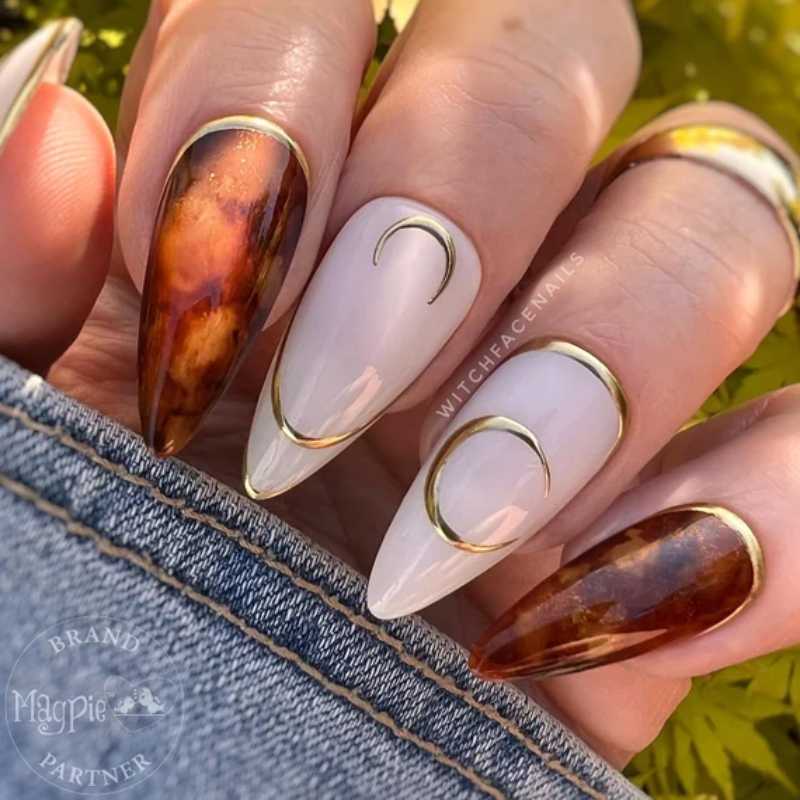
Tortoise Shell
Pairing a burnt orange mani with tortoise shell accents? It’s a whole fall mood! The glossy effect gives a luxurious feel while the solid, warm base keeps it balanced.
🍁 How to Achieve Tortoise Shell Burnt Orange Nails
🧼 Prep Your Nails:
- Clean and shape your nails. Push back cuticles gently.
🎨 Apply Base Color:
- Paint all nails with a glossy burnt orange polish. Let it dry completely.
🖌️ Create Tortoise Shell Accent:
- On 1-2 accent nails, use dark brown and black polish to draw random spots and shapes.
- Blend edges slightly with a small brush or sponge for that authentic tortoise shell look.
💎 Finish with Top Coat:
- Seal with a shiny top coat to add depth and a luxurious finish.
💡 Pro Tip:
Keep the tortoise shell design uneven and organic for the best natural look.

PERSONAL FAVOURITE ORANGE NAIL DESIGNS:
Burnt Orange Nails With Celestial Designs
Have you ever wanted your nail art to feel magical? A matte finish with delicate stars and a soft moon detail can give your nails that dreamy effect. Pair it with your favourite gold jewellery, and you’ll have a manicure that feels both elegant and enchanting. This celestial look is perfect for adding a little sparkle to your everyday style—would you try it?
✨ How to Achieve Burnt Orange Nails with Celestial Designs
🧼 Prep Your Nails:
- Clean, file, and gently push back cuticles for a neat base.
🎨 Apply Matte Burnt Orange Base:
- Use a matte burnt orange polish on all nails. Let it dry fully.
🌙 Add Celestial Details:
- With a fine nail art brush or dotting tool, paint small stars and a soft moon using white or gold polish.
- Keep designs delicate and spaced for an elegant look.
💅 Seal with Matte Top Coat:
- Apply a matte top coat to protect your design and maintain the dreamy finish.
💡 Pro Tip:
Pair your nails with gold rings or bracelets to enhance the celestial vibe.
This simple yet magical mani is perfect for fall and adds a subtle sparkle to your everyday style!
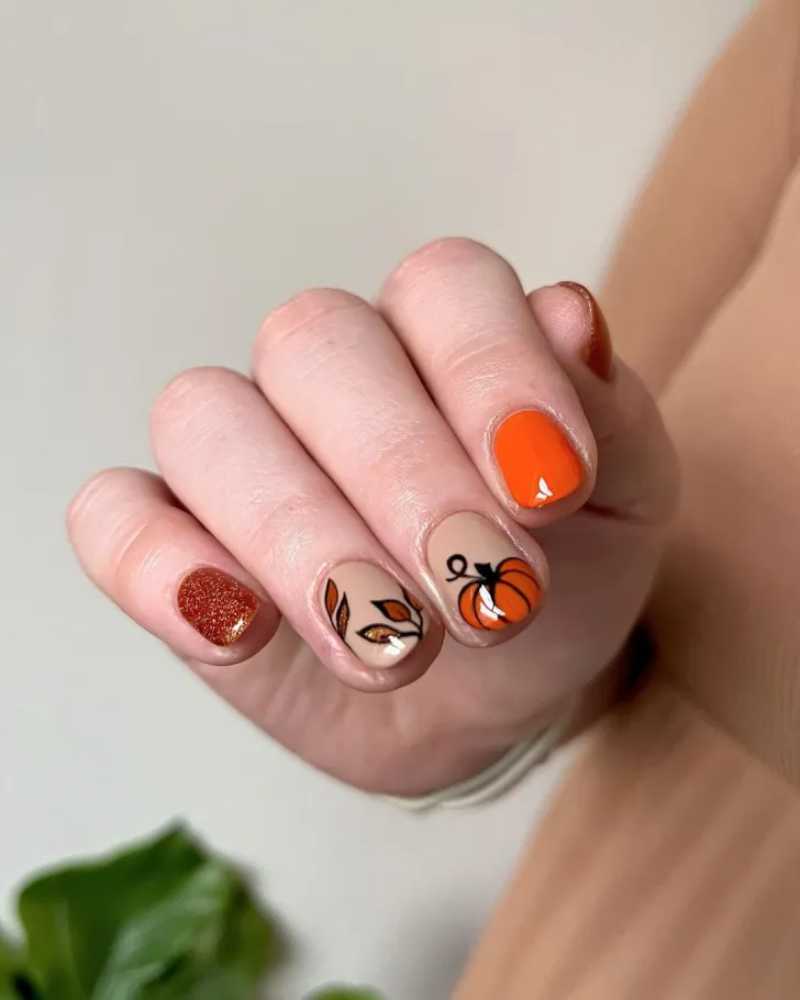
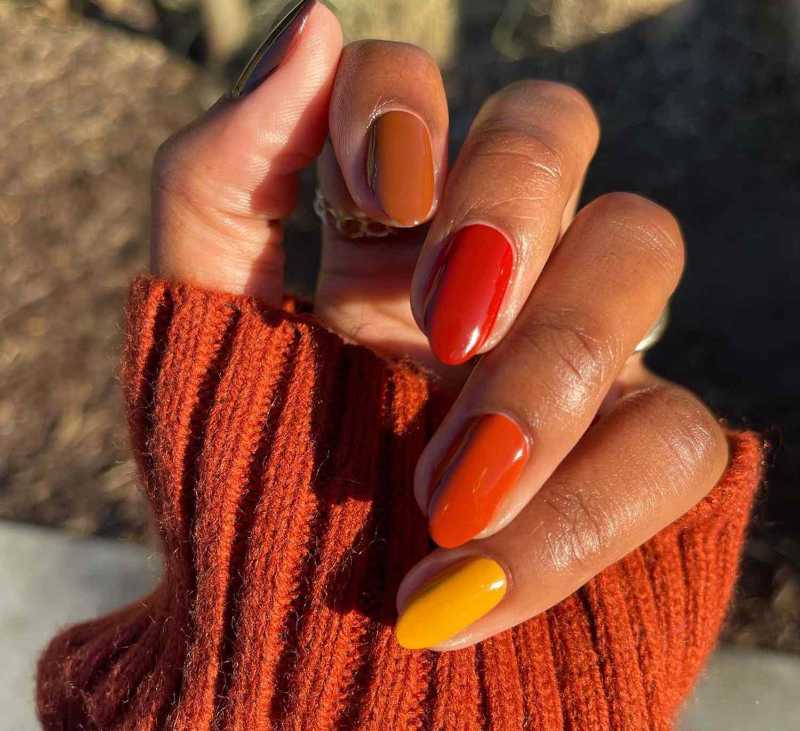
Fall Foliage-Themed Festive Nail Design
If you love the cozy feel of autumn, you’ll adore this fall foliage-inspired nail art. The mix of warm hues captures the beauty of falling leaves, instantly reminding you of crisp air and pumpkin spice.
This festive design brings the joy of the season right to your fingertips. Does this remind you of your favourite autumn moment?
How to Achieve Fall Foliage-Themed Festive Nail Design
🧼 Prep Your Nails:
- Start with clean, shaped nails and gently push back your cuticles for a smooth base.
🎨 Apply Warm Base Colors:
- Use a mix of warm autumn shades like burnt orange, deep red, and mustard yellow on different nails for a cozy fall feel.
🍂 Paint Leaf Details:
- With a thin nail art brush, create simple leaf shapes using darker or lighter shades of the base colors. Add small veins for extra detail.
✨ Add Festive Accents:
- Finish with subtle gold foil or glitter on a few nails to give a festive sparkle.
💅 Seal with Top Coat:
- Apply a glossy top coat to protect your art and enhance the warm colors.
💡 Pro Tip:
Use a nail art pen or fine brush for easier leaf designs, especially if you’re new to nail art.
This design perfectly captures the spirit of fall and brings a little seasonal magic to your hands!
Glossy Solid Orange with Flowy Accent in Square Tips
Looking for a sleek yet effortless manicure? A glossy finish with a flowy accent on square tips gives you that perfect balance between bold and delicate.
The solid orange colour is vibrant yet dainty, making it a great option for long nails. Would this chic and polished style be your go-to fall look?
How to Achieve Glossy Solid Orange with Flowy Accent on Square Tips
🧼 Prep Your Nails:
Clean, shape your nails into a square tip and gently push back cuticles for a smooth canvas.
🎨 Apply Solid Orange Base:
Paint all nails with a bright, glossy burnt orange polish. Let it dry completely.
💫 Create Flowy Accent:
On one or two nails, use a thin brush to add soft, curved flowy lines or swirls in a slightly lighter or translucent orange shade for a delicate contrast.
💅 Finish with Glossy Top Coat:
Seal your look with a shiny top coat for extra gloss and long-lasting wear.
💡 Pro Tip:
Use thin, gentle strokes for flowy accents to keep the design elegant and effortless.
This simple yet polished manicure blends bold colour with delicate details—perfect for an everyday fall statement!
Fashionable Almond Orange Fall Nail Design
For those who love an elegant touch, a fashionable almond shape with burnt orange and silver flakes is pure sophistication. The balance between rich tones and shimmering accents creates an exquisite nail design that’s both modern and timeless. If you’re looking for a fall manicure that feels luxurious, this one is calling your name!
✨ How to Achieve Glossy Solid Orange with Flowy Accent on Square Tips
🧼 Prep Your Nails:
Start by cleaning and shaping your nails into sharp square tips. Gently push back your cuticles for a neat and smooth base.
🎨 Apply Solid Orange Base:
Paint all nails with a vibrant, glossy burnt orange polish. Allow it to dry completely for the best finish.
💫 Add Flowy Accent:
Using a thin brush, create soft, curved swirls or flowy lines on one or two nails with a lighter or translucent orange shade. This adds a delicate and elegant contrast.
💅 Seal with Glossy Top Coat:
Finish your manicure by applying a shiny top coat to lock in the color and give your nails a long-lasting, polished shine.
💡 Pro Tip:
Use gentle, thin strokes for your flowy accents to keep the design graceful and effortless.
Marble and Celestial Accent Fall Nail Polish
Imagine the swirling beauty of the galaxies on your nails! A mix of marble accents and celestial details brings a unique, artistic twist to your fall nail polish.
The soft swirling effect adds mesmerizing depth, making this manicure truly out of this world. Do you think this would be your next fall nail obsession?
How to Achieve Marble and Celestial Accent Fall Nails
🧼 Prep Your Nails:
Clean and shape your nails. Push back cuticles gently for a smooth base.
🎨 Create Marble Base:
Use white and burnt orange polish to make a marble effect. Apply drops of both colors on a nail and swirl gently with a thin brush or toothpick for that natural, swirly galaxy look.
🌟 Add Celestial Accents:
Once dry, use a fine nail art brush or nail stickers to add small stars, moons, or dots in gold or white for a magical touch.
💅 Seal with Matte or Glossy Top Coat:
Finish with your preferred top coat—matte for a soft vibe or glossy for extra shine and depth.
💡 Pro Tip:
Work on one nail at a time for the marble effect to avoid drying too fast, and keep celestial details delicate for an elegant finish.
Velvet Nails
If you want a luxe manicure, burnt orange and white velvet-effect nails are the way to go. The textured finish adds dimension, making the nails glow beautifully under light.
This look is perfect for October and November, bringing warmth and elegance to your seasonal style.
How to Achieve Luxe Velvet Burnt Orange & White Nails
🧼 Prep Your Nails:
Start with clean, shaped nails. Push back cuticles gently for a neat base.
🎨 Apply Base Colors:
Paint half of your nails with a deep burnt orange polish and the other half with a crisp white polish. Let them dry completely.
🌟 Add Velvet Effect:
Use a velvet powder (available at beauty stores) that matches your polish colors. While your polish is still slightly tacky, sprinkle the velvet powder over each nail, pressing it gently for full coverage.
💅 Seal with Top Coat (Optional):
For a true velvet look, skip the top coat. If you want a glossy twist, carefully seal the edges without covering the velvet texture.
💡 Pro Tip:
Use a small brush to clean off any excess velvet powder around your nails for a clean, flawless finish.
Bold Two-Tone Drama
Pairing burnt orange with dark purple creates a two-tone contrast that’s both bold and balanced. This fall colour clash blends cozy warmth with a bit of cool drama, making it a unique and eye-catching style.
Whether you prefer a subtle touch or a more striking effect, this combination brings out the rich hues of autumn in a fresh and trendy way.
✨ How to Achieve Bold Two-Tone Drama Nails
🧼 Prep Your Nails:
Start with clean, shaped nails. Gently push back your cuticles for a neat base.
🎨 Apply Base Colors:
On one half of your nails, use a rich burnt orange polish. On the other half, go for a deep, dark purple. You can split the colours vertically, diagonally, or even in a wave pattern—get creative!
🔄 Perfect the Line:
Use nail striping tape for a crisp, clean divide between the two colours. Remove the tape carefully while the polish is still wet.
💅 Seal with Glossy Top Coat:
Finish with a high-shine top coat for a polished, long-lasting look.
💡 Pro Tip:
For extra drama, add a thin silver or gold strip along the colour division for a sleek, metallic touch.
This eye-catching two-tone design captures the essence of fall with a blend of cozy warmth and cool sophistication!
Burnt orange nails are the ultimate fall manicure trend for 2025, offering warmth, elegance, and versatility. Whether you love celestial designs, glossy finishes, or cozy matte textures, there’s a burnt orange nail style for everyone.
From festive pumpkin accents to sophisticated ombre effects, these seasonal nail ideas bring autumn’