
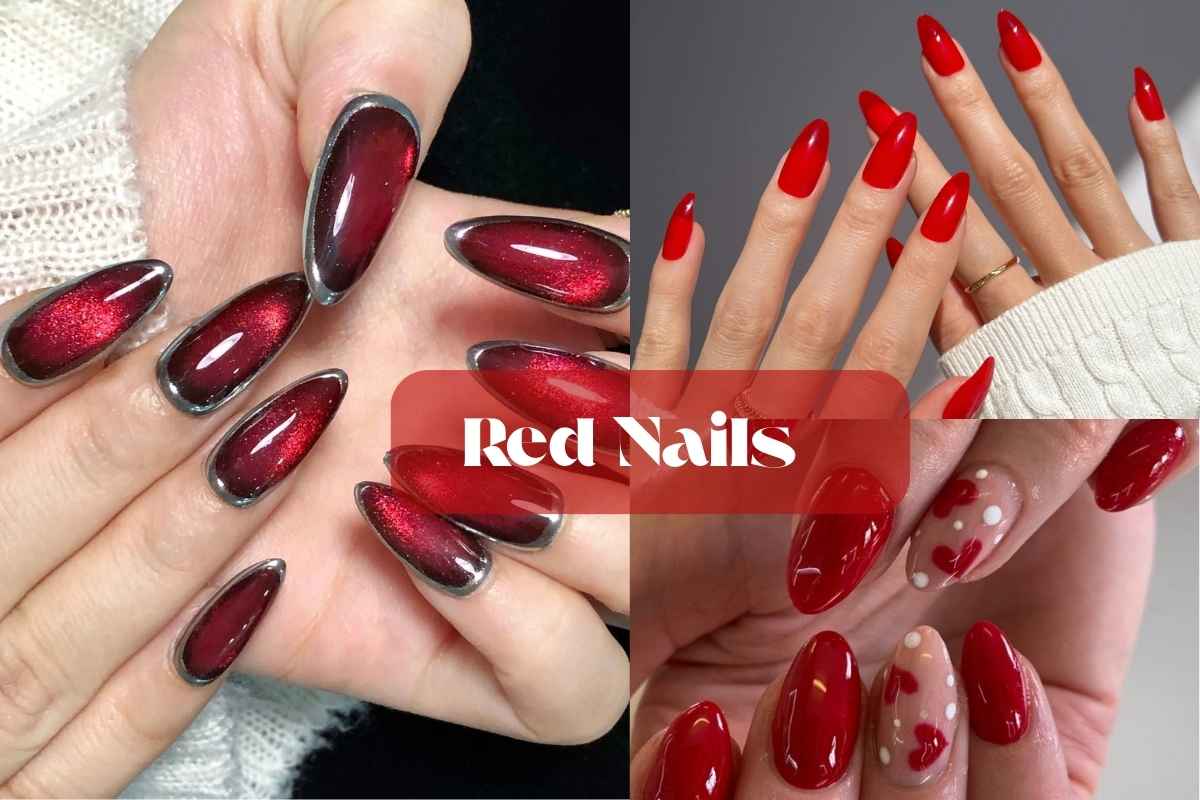
March is here, and staying cute while transitioning from winter to spring can be tricky. With unpredictable weather, lingering layers of outerwear, and the occasional battle with static from your hat, keeping your look fresh isn’t always easy. But one thing that never fails? A stunning set of red nails. Whether you’re embracing the season change or looking for a bold statement to elevate your outfit, the right shade of polish is the perfect pick-me-up.
If you love a classic glossy lacquer or prefer a trendy design, there’s endless nail inspiration for this time of year. A deep red adds a timeless and elegant touch, while a vibrant color pop matches your mood for a fresh start.
Whether it’s subtle shine for everyday wear or bold accents for a special date, this staple look will have you feeling sexy, confident, and ready to take on spring in style!
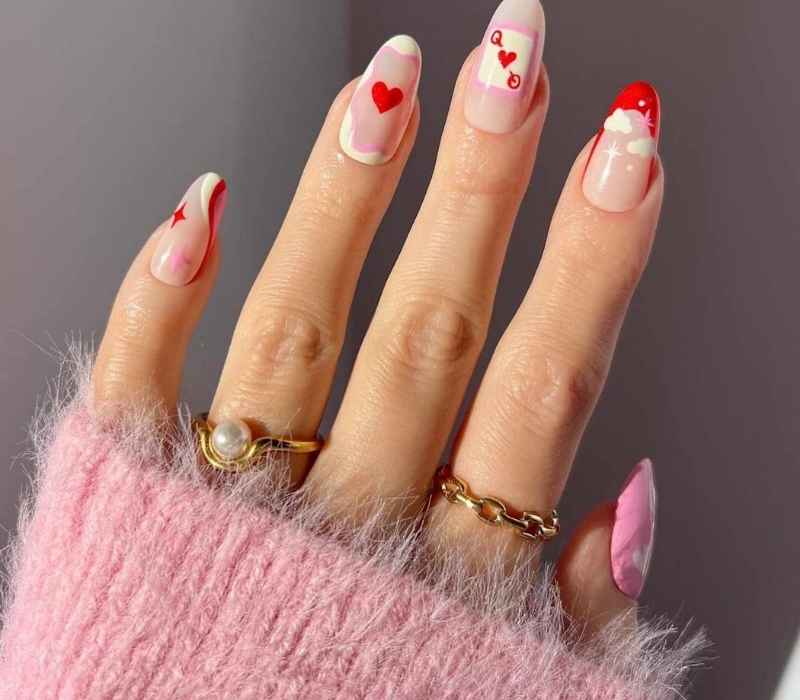
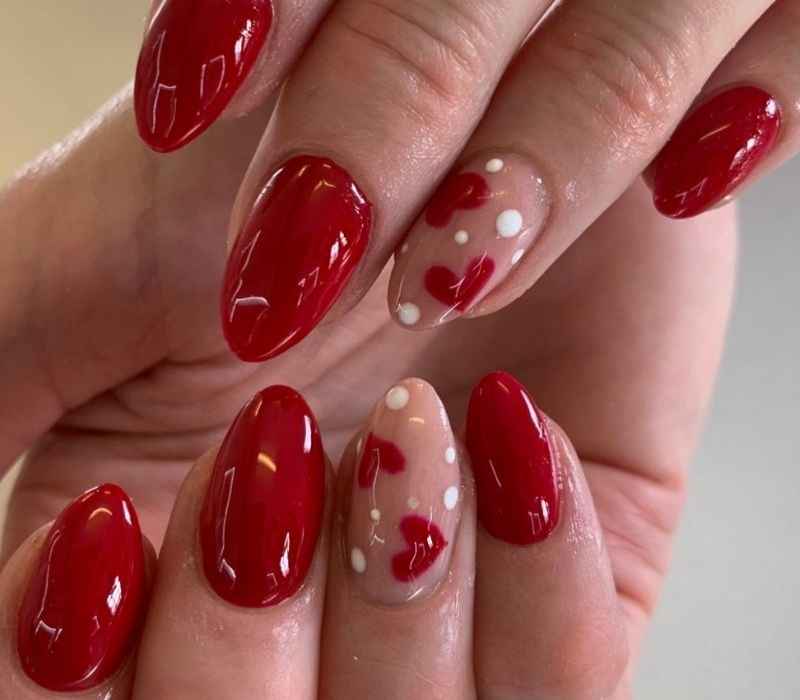
Red French Manicure With Heart Accents
A red French manicure is always a timeless choice, but why not add some heart accents for extra charm? A ring fingernail with a cute daisy or tiny flowers can take your look from simple to adorable.
Love a romantic yet chic vibe? Try a glossy polish finish or a soft shimmer for that perfect fashion statement. This stylish look is all about creativity, so make it yours!
How to Achieve Red French Manicure with Heart Accents
1️⃣ Prep Your Nails: Clean, shape, and apply a clear base coat for a smooth surface.
2️⃣ Create the Red French Tips: Use a thin nail brush or French tip stickers to add bold red tips. Let them dry.
3️⃣ Add Heart Accents: On the ring fingernail, carefully draw tiny hearts using a dotting tool. You can also add a cute daisy or tiny flowers for extra flair.
4️⃣ Seal with Top Coat: Use a glossy top coat for a radiant shine and longer-lasting manicure.
Quick tip: If freehand drawing is tricky, use nail stickers for perfect heart shapes.
READ ALSO: Upgrade Your Fall Nails with These 25 Stunning Ideas

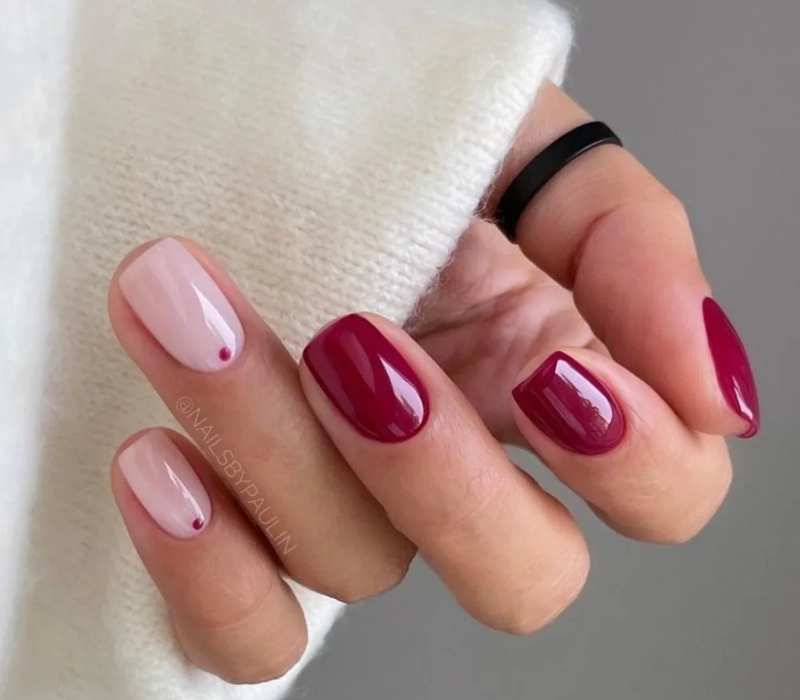
Pink and Red Mismatch
Let’s be real—pink and red make the ultimate color combo for any season, not just Valentine’s Day! If you love a playful, chic vibe, try a mismatched mani with these vibrant shades. Whether you go for a bold contrast or a soft hue blend, this trendy look is pure fashion and beauty inspo.
Want to make it even more fun? Add glossy polish or a unique design for extra flair. However you wear it, this fresh, stylish twist will keep your nails looking classic yet creative all year round!
How to Achieve Pink and Red Mismatch Nails
1️⃣ Prep Your Nails: Clean, shape, and apply a clear base coat for a smooth surface.
2️⃣ Choose Your Shades: Pick two pink and red shades—one bright and one soft for a chic contrast.
3️⃣ Apply Polish: Alternate the pink and red on your nails. You can choose a half-and-half style, vertical split, or keep it simple with solid mismatched colors.
4️⃣ Optional Design: Add fun accents like tiny hearts, glitter, or even a matte top coat for a unique finish.
5️⃣ Seal with Top Coat: Use a glossy top coat for a radiant shine and longer-lasting manicure.
Quick tip: Use a thin nail brush for clean edges between colors when trying a split design.
Dot Accents
Want a subtle way to rock red? Nude nails with tiny dots are the perfect mix of elegant, chic, and modern. This trendy look is soft, fresh, and great for winter without going full Santa mode.
Add a pop of polish to keep it playful yet classic. It’s the perfect inspiration for those who love a simple but standout manicure!
How to Achieve Dot Accents Nails
1️⃣ Prep Your Nails: Clean, shape, and apply a clear base coat for a smooth start.
2️⃣ Apply Nude Base: Choose a soft, neutral nude polish and apply two coats for full coverage.
3️⃣ Add Dot Accents: Use a dotting tool (or a toothpick) to gently place tiny red dots on each nail. You can go for a single dot on each or create a subtle pattern.
4️⃣ Top Coat: Seal your design with a glossy top coat for a polished, long-lasting finish.
Quick tip: Practice dotting on a plastic sheet first to keep the size and spacing even.
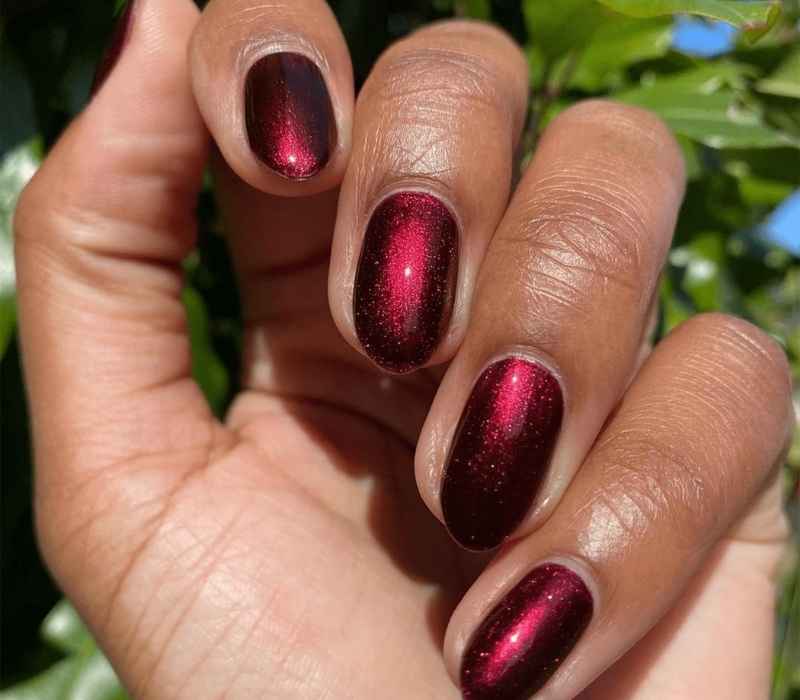
Wine-berry Red
Obsessed with wineberry red? Same! This bold, moody color is a winter staple that’s been living rent-free in our feeds. It’s classy, trendy, and totally fashion-approved!
For extra drama, go for a deep, glossy lacquer finish. Whether you’re keeping it elegant or making a statement, this shade is a must-have!
How to Achieve Wine-Berry Red Nails
1️⃣ Prep Your Nails: Start with clean, shaped nails. Apply a clear base coat for a smooth, chip-resistant base.
2️⃣ Apply Wine-Berry Red Polish: Choose a rich, berry-toned red polish. Apply two coats for full, even coverage.
3️⃣ Add Glossy Shine: For that luxurious finish, seal your look with a high-shine top coat. Want an extra touch? Try a matte top coat for a velvety twist.
4️⃣ Clean Edges: Use a tiny brush dipped in nail polish remover to clean any smudges for a flawless look.
Quick tip: For a bolder statement, try a subtle glitter accent nail in the same color family.
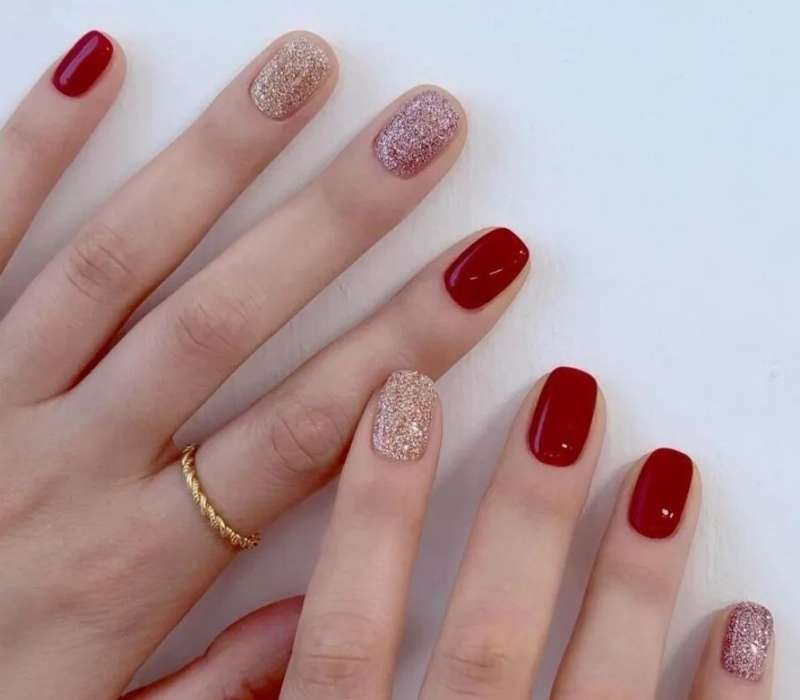
Glitter Accent
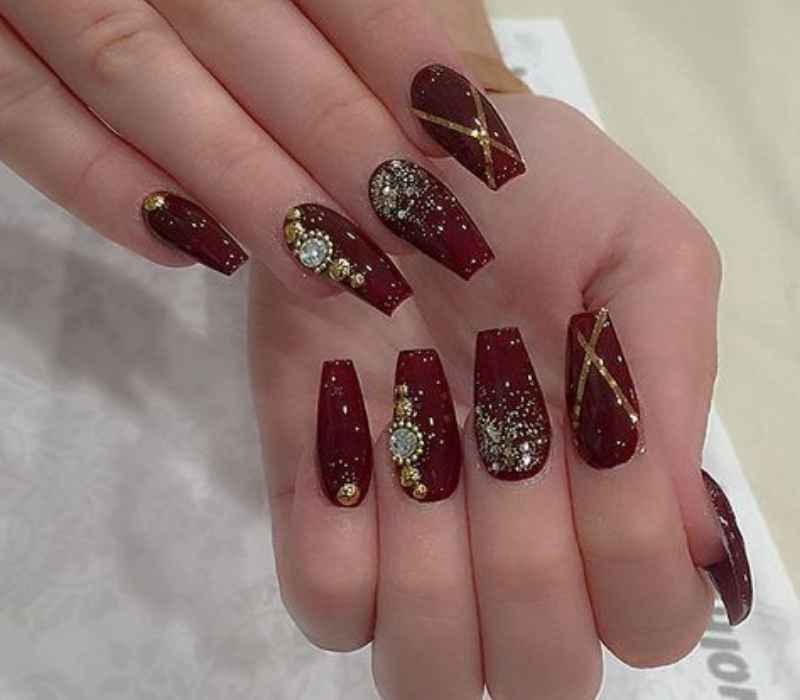
A deep red manicure with gold glitter? Yes, please! This festive, chic look gives off all the holiday vibes. The sparkle adds instant beauty, making it the perfect December mani.
Want to go all out? Layer on extra shine for a stylish, bold finish. It’s time to glow!
How to Achieve Glitter Accent Nails
1️⃣ Prep Your Nails: Start with clean, shaped nails. Apply a base coat to protect your nails and ensure longer-lasting polish.
2️⃣ Apply Deep Red Polish: Choose a rich, deep red shade and apply two coats for an even finish. Let it dry between coats.
3️⃣ Add Gold Glitter: Use a thin nail brush or a glitter polish to add gold glitter accents. You can apply it to the tips, create a gradient, or add a single accent nail.
4️⃣ Seal with Top Coat: Lock in the sparkle with a glossy top coat for a smooth, shiny finish.
Quick tip: Use a makeup sponge to dab glitter for a more concentrated, sparkling look.
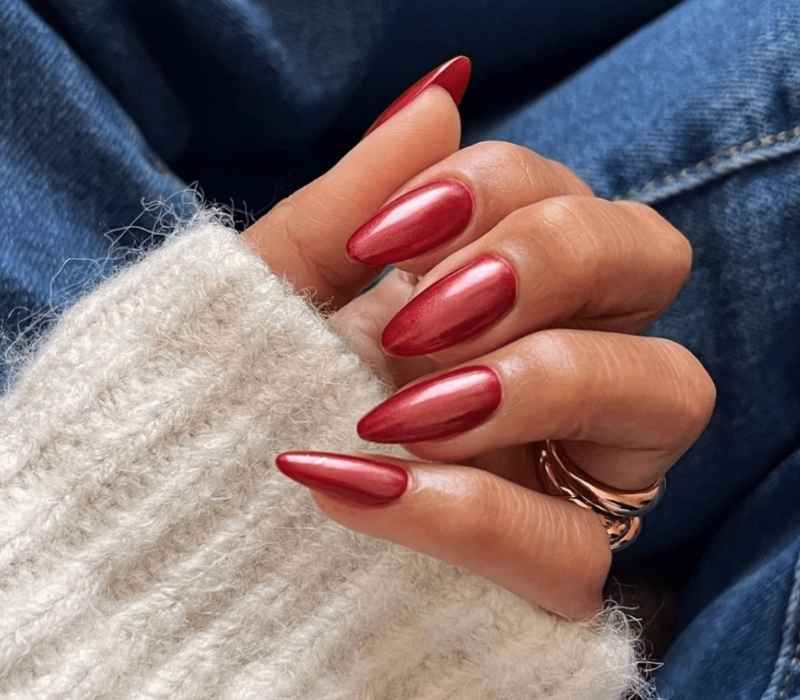
Cherry Chrome
The cherry red chrome trend is still going strong, and honestly, we love that for us. This modern, glossy look is a total statement—it’s practically neutral at this point!
If you want your nails to pop, this trendy, fashion-forward shade is a must. It’s chic, vibrant, and pure inspiration!
How to Achieve Cherry Chrome Nails
1️⃣ Prep Your Nails: Begin with clean, shaped nails. Apply a base coat to protect your natural nails and create a smooth surface.
2️⃣ Apply Cherry Red Base: Choose a rich cherry red polish and apply two coats, letting each layer dry completely.
3️⃣ Add Chrome Powder: Once the red polish is dry, gently rub chrome powder onto each nail using a makeup sponge or applicator until you achieve a mirror-like finish.
4️⃣ Seal with a Top Coat: Use a no-wipe gel top coat for a glossy, long-lasting shine. Cure under a UV lamp for the best results.
Quick tip: Use a silicone brush for precise chrome powder application without any mess.
Cherry Mocha
Dark cherry red with a hand-drawn white bow? Obsessed. This mocha-girl aesthetic is trendy, chic, and just the right amount of bold.
Add a glossy lacquer finish for that elegant, creative touch. Whether you love fashion and beauty or just want a unique look, this seasonal style is everything!
How to Achieve Cherry Mocha Nails
1️⃣ Prep Your Nails: Start with clean, filed nails. Apply a base coat to protect your natural nails.
2️⃣ Apply Cherry Mocha Base: Choose a deep cherry red polish with a slight mocha undertone. Apply two coats for a rich, even finish.
3️⃣ Draw the White Bow: Use a thin nail art brush and white nail polish to carefully draw a small, dainty bow on an accent nail. Keep it delicate for a chic look.
4️⃣ Finish with a Glossy Top Coat: Seal your design with a high-shine top coat for that perfect glossy finish and long-lasting wear.
Quick tip: Use a dotting tool to perfect the bow’s center for a flawless design.
Scarlet Red
If you want nails that turn heads, scarlet red is the way to go! Why pick between solids and French tips when you can have both? This combo is perfect for the winter formal season, giving you a bold, glossy finish that screams fashion and elegance.
Let your nails do the talking with this chic, classic shade. Whether you go for polish or lacquer, this timeless color brings beauty, contrast, and vibrance to any look. Ready to make a statement? Try this stunning aesthetic now!
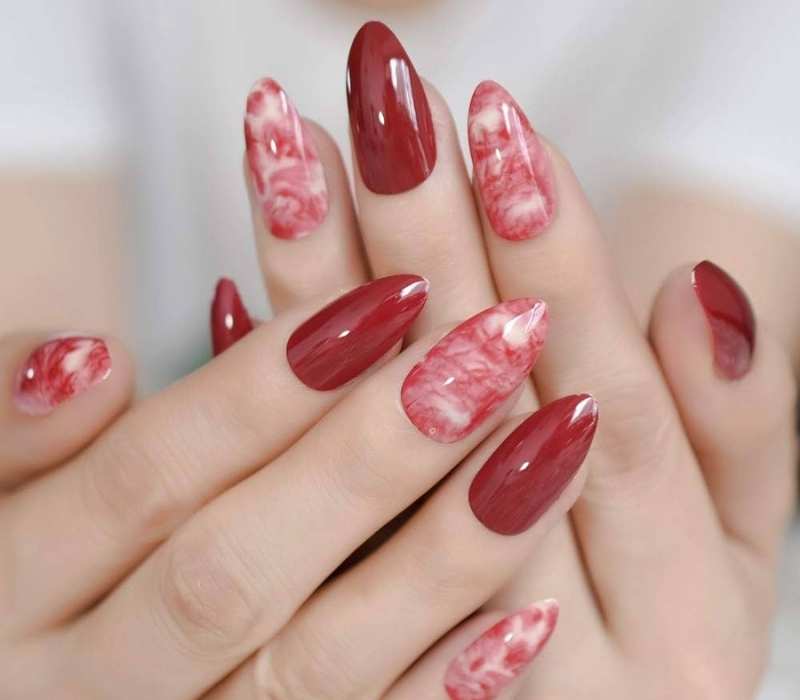
Marble Effect
Want to stand out? The red marble effect is here to upgrade your nails! A nail tech can create a negative-space design that feels both modern and sophisticated. It’s the perfect mix of artistic and fashion-forward.
If you love bold, trendy nails, this glossy look is for you. The creative, chic finish works for any occasion, from casual days to big events. Let your nails be the ultimate statement piece!
How to Achieve Marble Effect Nails
1️⃣ Prep Your Nails: Begin with clean, trimmed nails and apply a clear base coat for protection.
2️⃣ Choose Your Base: Use a nude or clear base to make the marble effect stand out.
3️⃣ Create the Marble Design:
- Use a fine brush to apply red polish in random, thin, swirling lines.
- Add a tiny bit of white or black polish for contrast.
- Use a small, clean brush dipped in acetone to soften and blur the lines, creating a natural marble look.
4️⃣ Seal with Top Coat: Finish with a high-shine top coat to enhance the glossy, marble finish.
Quick tip: If you’re a beginner, try using a plastic wrap method—dab crumpled plastic wrap dipped in polish onto your nails for a marble-like effect.
Red Chrome Nails
Red chrome nails are the ultimate bold, festive, and reflective look—so bright they might be visible from the ISS! Whether you love a metallic shine or a non-holo finish, this gorgeous manicure is pure fashion and beauty. If you struggle to grow your nails, no worries—just cop the exact shape with Almond Medium Tips.
This trendy, glossy polish and lacquer create a stylish, elegant finish, perfect for any seasonal or holiday event. Think of this as your caps lock moment for a modern, creative nail design—a statement look you need! Let this be your reminder that vibrant, inspiration-filled nails are always in style!
How to Achieve Scarlet Red Nails
1️⃣ Prep Your Nails: Start with clean, filed nails and a clear base coat to protect your natural nails.
2️⃣ Apply Scarlet Red Polish: Choose a rich, vibrant scarlet red shade. For a striking look, you can alternate between full red nails and classic scarlet French tips.
3️⃣ Perfect Your French Tips: Use nail guides for a crisp, even French line, or freehand with a fine brush for a more personalized look.
4️⃣ Seal with a Glossy Top Coat: Add a high-shine top coat for a long-lasting, flawless finish that makes the red pop.
Quick tip: For an even bolder look, add a touch of fine gold glitter to one accent nail.
If you are interested in dark shades do read this article:
Fall in Love with These Stunning Burgundy Nail Ideas

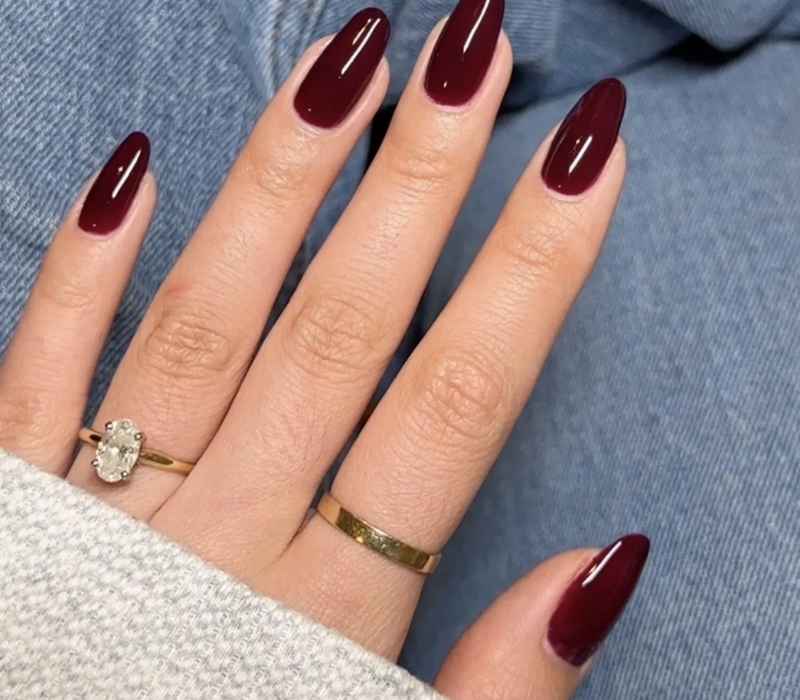
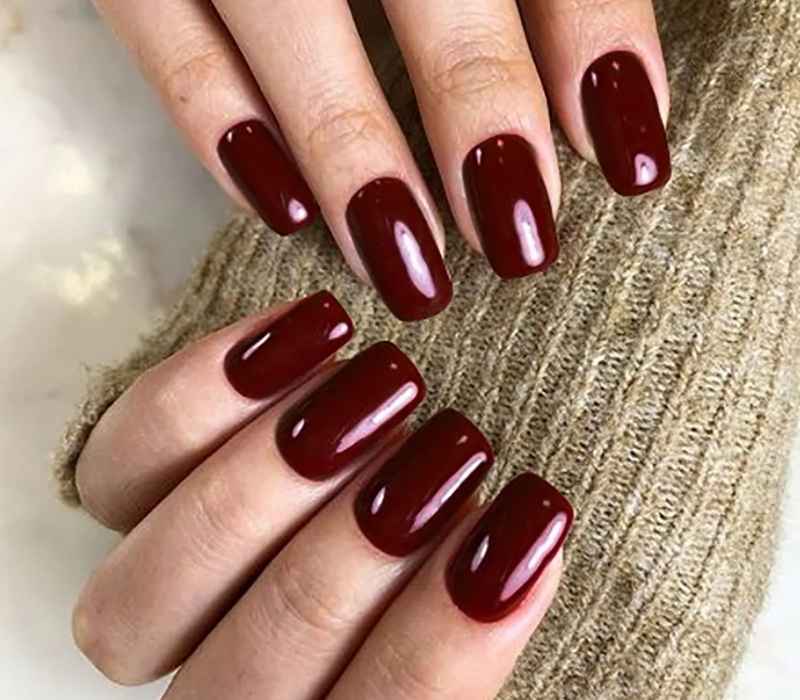
Dark Red Nails
If you love dark red nails, this is your sign to try a bold and stunning look! A deeper shade like burgundy is perfect for fall and winter, but let’s be real—it’s a statement all year round. Whether you go for a glossy lacquer or a matte finish, this color adds an effortlessly elegant touch.
Want to switch it up? Try mixing a bright cherry tone with a darker shade or add subtle nail art for a trendy, eye-catching design. Your manicure deserves to be as creative and vibrant as you!
How to Achieve Dark Red Nails
1️⃣ Prep Your Nails: Start with clean, trimmed nails and a base coat to protect them.
2️⃣ Choose Your Shade: Opt for a rich burgundy, wine red, or deep cherry polish.
3️⃣ Apply Evenly: Use thin layers of polish for a smooth, flawless finish. Apply two coats for full coverage.
4️⃣ Top It Off: Finish with a high-shine top coat for a glossy look or a matte top coat for a modern, velvety finish.
Quick tip: For an even richer look, apply a black base coat before your dark red polish to enhance the depth of the color.
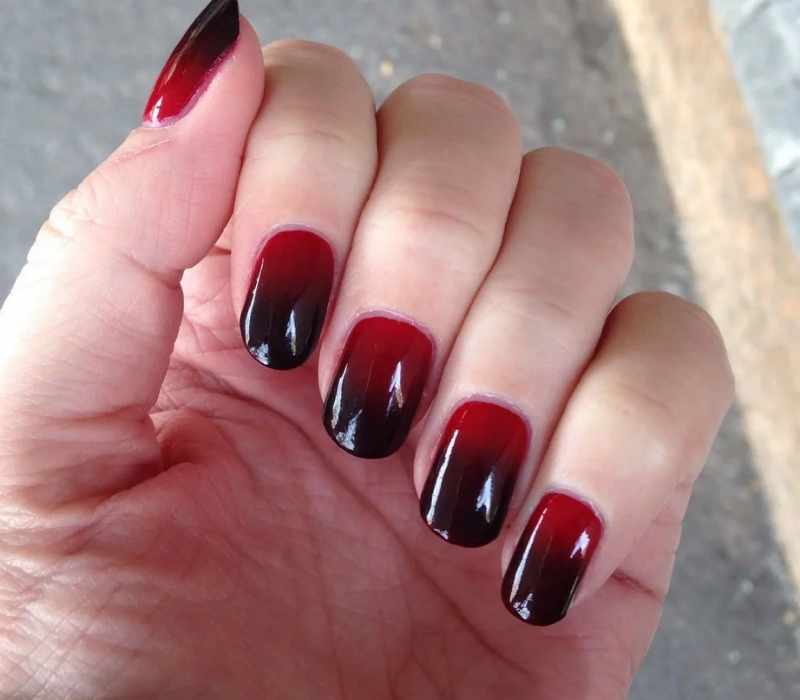
Black and Red Nails: Bold & Mysterious
Love nail art that stands out? Black and red nails are the perfect mix of dramatic, fashion-forward, and mysterious. Whether you go for ombré, French tips, or a glossy lacquer, this trend is always a statement.
Inspired by Wednesday Addams, this aesthetic gives off iconic vibes, just like Disney villains and Halloween movie characters.
If you want a feel-good manicure with an edgy twist, this design is for you! Scroll through this article for the best witchy manicure ideas, or create your seasonal look
How to Achieve Black and Red Nails
1️⃣ Prep Your Nails: Clean and file your nails, then apply a base coat to protect your natural nails.
2️⃣ Pick Your Design: Choose a style—solid black nails with red accents, red ombré fading into black, or red French tips outlined in black for extra edge.
3️⃣ Apply Colors: Paint thin layers, starting with the red polish first if doing ombré, then blend with black using a sponge or brush for smooth transition.
4️⃣ Add Details: Use a thin nail art brush for precise French tips or create small black and red patterns to customize your look.
5️⃣ Seal the Look: Finish with a glossy top coat for shine or a matte finish for a moody effect.
Quick tip: Practice blending red and black on a plastic sheet before applying it to your nails for seamless ombré nails.
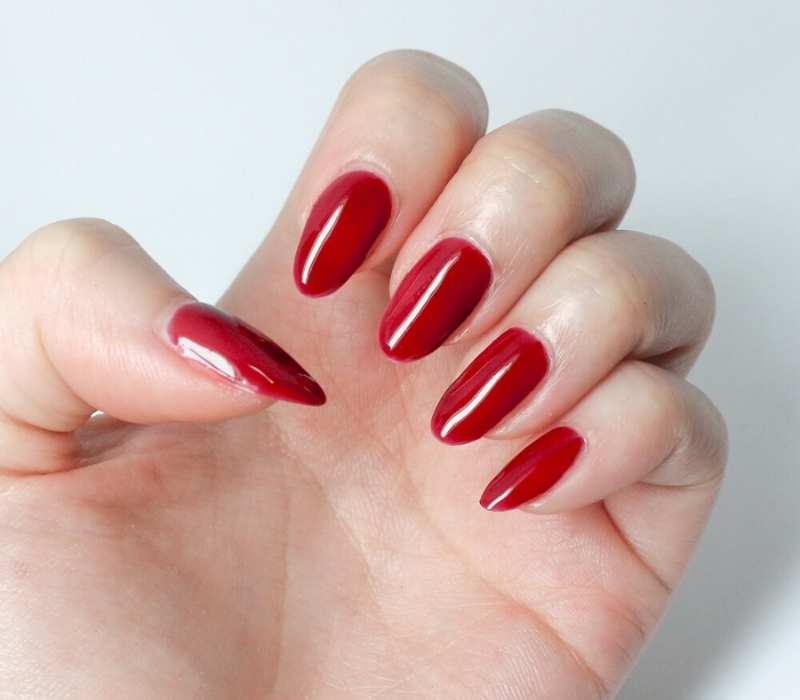
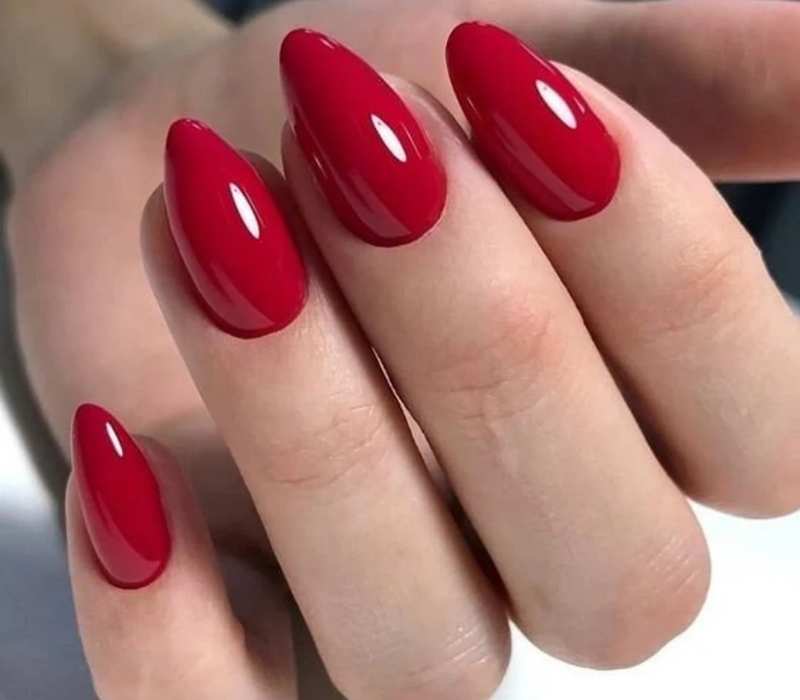
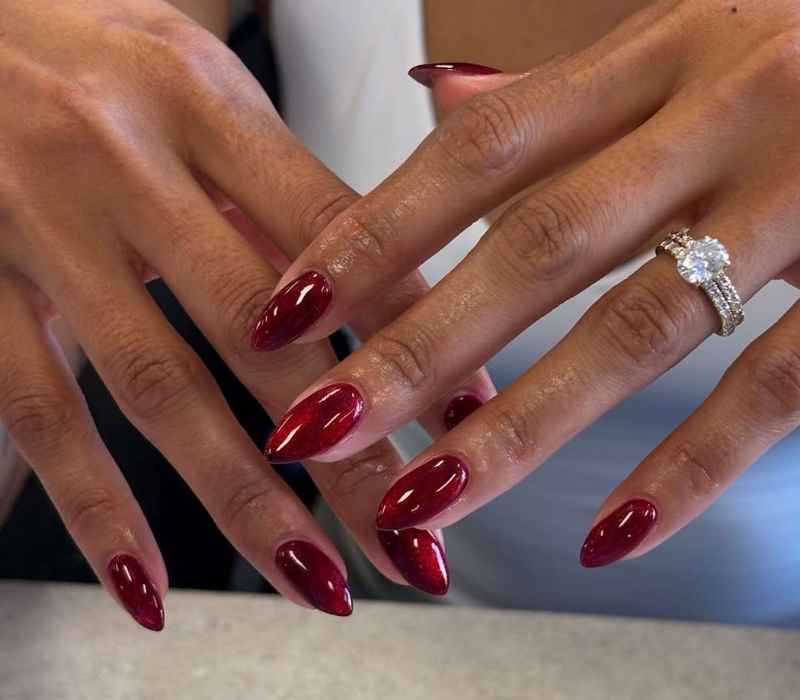
Red Almond Nails
Red almond nails are the perfect mix of classic and bold, making them a go-to for any occasion. Their almond-shaped design adds an elegant touch, while the solid red color keeps things timeless and stylish.
Whether you love a glossy finish or a matte look, this manicure is always a statement. Perfect for both everyday wear and special events, these nails give off a confident and chic vibe that never goes out of fashion.
How to Achieve Red Almond Nails
1️⃣ Shape Your Nails: File your nails into a soft almond shape—rounded tips that taper gently for a sleek finish.
2️⃣ Prep and Base Coat: Clean your nails and apply a clear base coat to protect and smooth the surface.
3️⃣ Apply Red Polish: Choose a rich red shade and paint your nails with thin, even layers. Two coats usually give the best opacity.
4️⃣ Finish with Your Preferred Look: Seal with a glossy top coat for shine or matte top coat for a modern twist.
Quick tip: Use a nail brush to clean edges for a polished, salon-quality finish.
Red and Gold Nails
Red and gold nails are a classic choice, perfect for any seasonal event. This stylish combo adds a luxurious and elegant touch, making your manicure look bold and fashion-forward. Whether you go for glossy lacquer, French tips, or a trendy ombré design, this mix never fails to make a statement. It’s a go-to look for the holidays, but honestly, it’s stunning all year round!
How to Achieve Red and Gold Nails
1️⃣ Prep Your Nails: Start with clean, dry nails. Shape them to your desired length and style (almond, square, or oval).
2️⃣ Base Coat: Apply a clear base coat for a smooth, protective layer.
3️⃣ Apply Red Polish: Choose a vibrant red shade and paint your nails, leaving one or two accent nails for the gold design.
4️⃣ Add Gold Accents: Use gold glitter polish, foil, or metallic strips for a luxe touch. Try a gold French tip, ombré fade, or a full gold accent nail.
5️⃣ Top Coat: Seal the design with a glossy top coat for shine and durability.
Quick tip: Use a small detailing brush for precise gold accents without any mess.
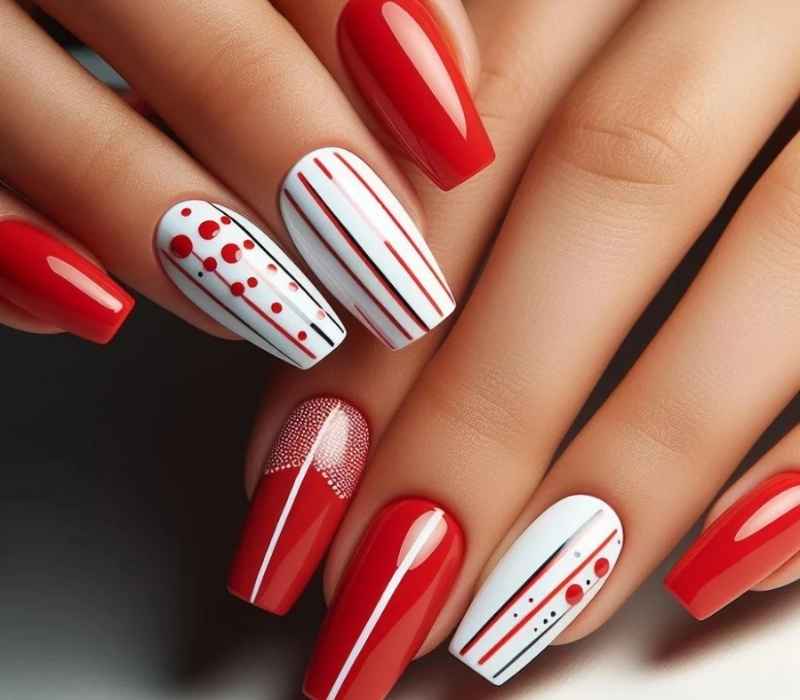
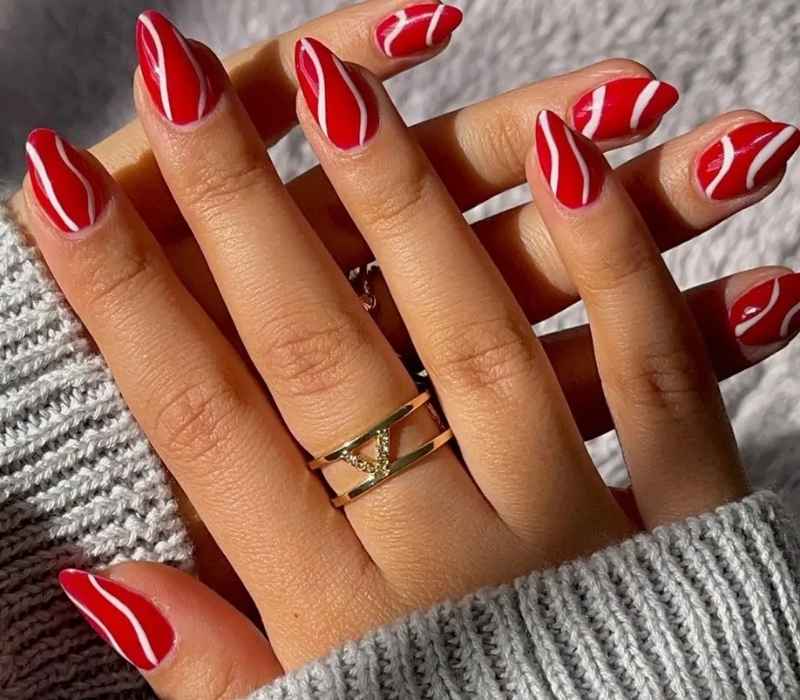
Red & White
A red and white manicure with abstract swirls is a perfect way to embrace festive vibes. Inspired by candy cane stripes yet breaking away from traditional patterns, this design is ideal for those with trust issues when it comes to classic looks. It’s a moment that blends creativity with holiday charm, offering a fresh take on seasonal nails.
How to Achieve Red & White Nails
1️⃣ Prep Your Nails: Clean, file, and shape your nails to your desired style. Almond and square shapes work best for this design.
2️⃣ Base Coat: Apply a clear base coat to protect your nails and ensure smooth polish application.
3️⃣ Apply Red Polish: Choose a bold, glossy red for a vibrant base. Leave one or two nails clear for the white accent design.
4️⃣ Create Abstract Swirls: Using a thin nail art brush, paint delicate white swirls on the red nails or keep it simple with a white accent nail featuring red swirls.
5️⃣ Top Coat: Seal the look with a clear, glossy top coat for a smooth, shiny finish.
Quick tip: Use a dotting tool for smooth, curved lines and even swirl patterns.
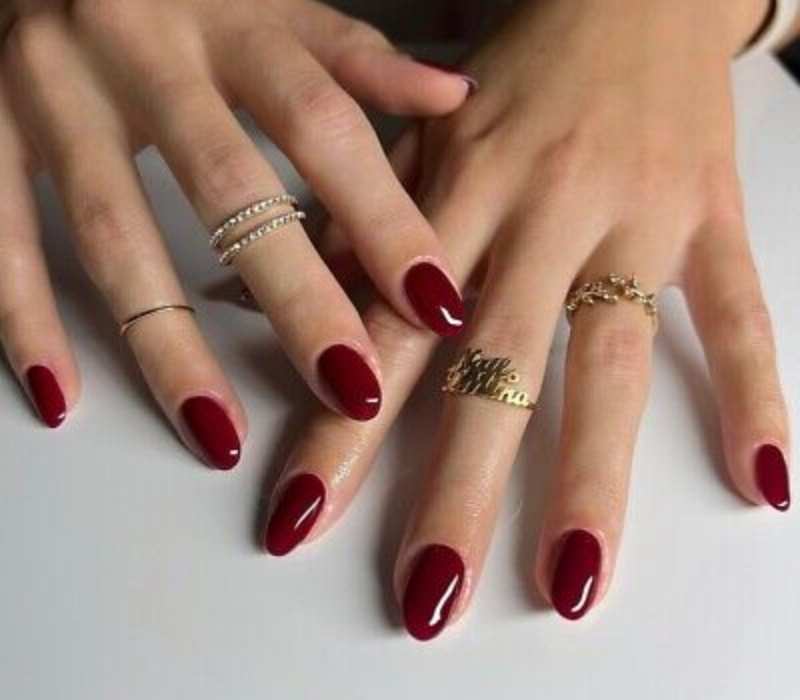
Wine Red
A wine-red shade is a must-have for nails that transition from holiday parties to chilly January days. This deep shade looks effortlessly expensive, even when paired with a simple Target sweater—and we respect that. It’s a bold yet sophisticated choice that remains stylish all winter long.
How to Achieve Wine Red Nails
1️⃣ Prep Your Nails: Start with clean, filed nails. Shape them to your preference—almond and square shapes work great with this colour.
2️⃣ Base Coat: Apply a clear base coat to protect your nails and ensure long-lasting colour.
3️⃣ Apply Wine Red Polish: Choose a high-quality, deep wine-red shade. Apply two thin coats for a rich, even finish.
4️⃣ Optional Accent: For a touch of glamour, add a subtle gold or silver glitter accent on one or two nails.
5️⃣ Top Coat: Seal the look with a glossy top coat for a smooth, shiny finish that lasts.
Quick tip: To prevent streaks, apply thin, even layers and let each coat dry completely.
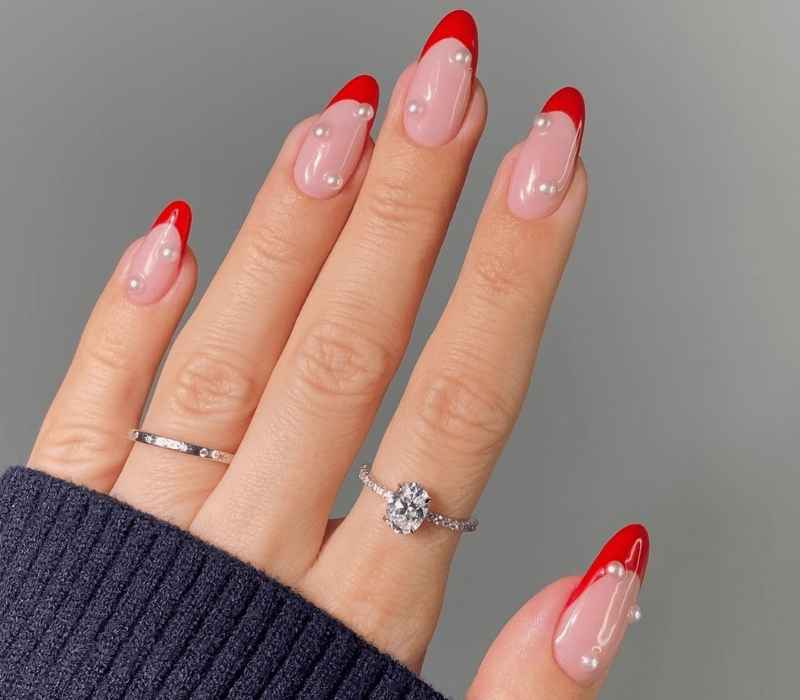
Pearl French
Red Frenchies with pearl stickers are simply adorable! Whether you’re still recovering from gift shopping in January or just want a fresh look, this style adds a touch of elegance to your nails without too much effort.
How to Achieve Pearl French Nails
1️⃣ Prep Your Nails: Start with clean, filed nails. Shape them into a square or almond shape for a classic look.
2️⃣ Base Coat: Apply a clear base coat to protect your nails and ensure a smooth application.
3️⃣ Create Red French Tips: Using a thin brush or French tip guide, apply a bold red polish to the tips of your nails. Make sure the lines are even and sharp.
4️⃣ Add Pearl Stickers: Carefully place small pearl stickers along the smile line of the French tip. Use tweezers for precision.
5️⃣ Seal the Look: Apply a clear, glossy top coat to keep the pearls in place and give your nails a beautiful shine.
Quick tip: If you want a more secure hold for the pearls, use a dot of clear nail glue before applying them.
Aura Nails
The aura trend gets a winter glow-up with a soft red and white fade. It’s giving holiday magic, cozy North Pole vibes, and a hint of psychic hotline mystery—all in one. Honestly, we need this immediately!
How to Achieve Aura Nails
1️⃣ Prepare Your Nails: Start with clean, filed nails and your preferred nail shape (almond, square, or oval).
2️⃣ Base Coat: Apply a clear base coat to protect your nails and create a smooth surface.
3️⃣ Create the Gradient: Use a makeup sponge for a flawless gradient effect. Apply red polish to the center of the sponge and white polish around it. Gently dab this onto your nails, focusing the red in the center.
4️⃣ Blend the Edges: Repeat the sponging for a more intense aura effect, letting the red and white blend softly.
5️⃣ Smooth the Design: Use a clear top coat to blend the gradient and add a glossy shine.
6️⃣ Optional Accent: Add a touch of shimmer or a delicate silver star sticker for a touch of holiday magic.
Quick tip: Use liquid latex around your nails before sponging to make cleanup easier.
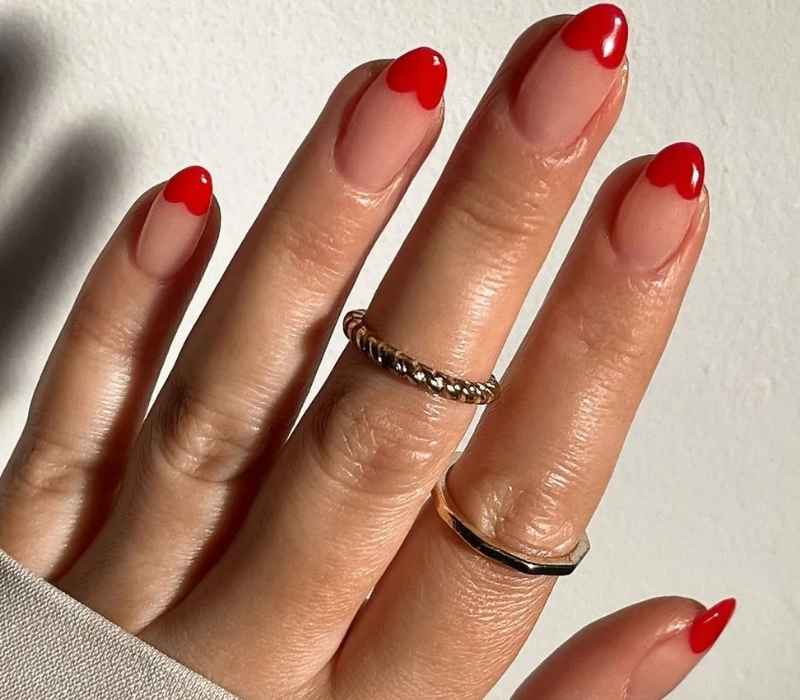
Half-Hearted French
Tiny red half-hearts at the tip bring a subtle nod to February’s romantic vibes. It’s a fun twist on a classic French, and you can go softer with baby pink or a bit edgier with oxblood.
How to Achieve Half-Hearted French Nails
1️⃣ Prep Your Nails: Clean, file, and shape your nails to your preference—almond, square, or oval works best.
2️⃣ Base Coat: Apply a clear or nude base coat for a smooth surface. Let it dry completely.
3️⃣ Half-Heart Design: Use a thin nail art brush and red polish to draw half-heart shapes at the tip of each nail. Start from the center and curve outward for a perfect half-heart.
4️⃣ Customize: Switch to baby pink for a soft, romantic feel or try oxblood for an edgier, dramatic look.
5️⃣ Top Coat: Seal your design with a glossy top coat for a smooth, shiny finish.
Quick tip: Use a dotting tool for a precise heart shape—just connect two dots and curve downward!
Impressionist Accents
A red manicure doesn’t have to be full coverage—try adding an accent over a neutral, milky polish. These squiggly, artistic strokes mimic lip prints, making them a fun and eye-catching choice for February and totally worth copying.
How to Achieve Impressionist Accent Nails
1️⃣ Prep Your Nails: Start with clean, shaped nails. Go for a classic almond or square shape for a chic look.
2️⃣ Base Coat: Apply a neutral, milky base polish and let it dry completely. This soft background makes your design pop.
3️⃣ Create Accent Strokes: Use a thin nail art brush and red polish to paint squiggly, abstract strokes on each nail. Keep them varied for an artistic feel.
4️⃣ Customize: Experiment with other shades like pink, wine, or even gold for a multi-tone effect.
5️⃣ Top Coat: Seal with a glossy top coat for a smooth, shiny finish that protects your design.
Quick tip: If freehand strokes feel tricky, practice on a plastic sheet before applying them to your nails.
Wire Details
A classic red mani gets an upgrade with gold wiring and tiny stones. This design is both elegant and understated, making it the perfect Valentine’s Day nail art for those who love a little sparkle.
How to Achieve Wire Detail Nails
1️⃣ Prep Your Nails: Start with clean, well-shaped nails—almond, square, or coffin shapes work best for this look.
2️⃣ Base Color: Apply two coats of a rich red polish, letting each layer dry completely. This will be your main base.
3️⃣ Add Gold Wire: Carefully apply thin gold nail art wire along the nail edges or create elegant patterns. Use nail glue to secure the wire in place.
4️⃣ Stone Accents: Add tiny rhinestones at key points, like the base or along the wire, for a touch of sparkle.
5️⃣ Top Coat: Seal your design with a clear, glossy top coat to protect the wire and stones and give your nails a smooth finish.
Quick tip: Use a fine-tipped tweezer for precise placement of wires and stones without smudging.
Abstract White Line Art
A bright red mani pops with white nail art, especially with a mattified finish. The romantic yet slightly risqué line drawings create the perfect abstract V-Day look, balancing boldness with elegance.
How to Achieve Abstract White Line Art Nails
1️⃣ Prep Your Nails: Begin with clean, shaped nails. Almond or square shapes work well for this design.
2️⃣ Apply Base Color: Paint your nails with a bright red polish. Two coats are recommended for a bold, even color. Let them dry completely.
3️⃣ Create Abstract Lines: Use a thin nail art brush or a white nail art pen to draw abstract, freehand lines or patterns on each nail. Focus on a mix of curves, swirls, or minimal line art for a chic look.
4️⃣ Matte Finish: For a sophisticated touch, seal the look with a matte top coat. It adds a soft, velvety texture and makes the white lines pop.
5️⃣ Clean Up: Use a thin brush dipped in nail polish remover to clean any stray white lines for a polished finish.
Quick tip: Practice your line art design on a plastic sheet before applying it to your nails for a steadier hand.
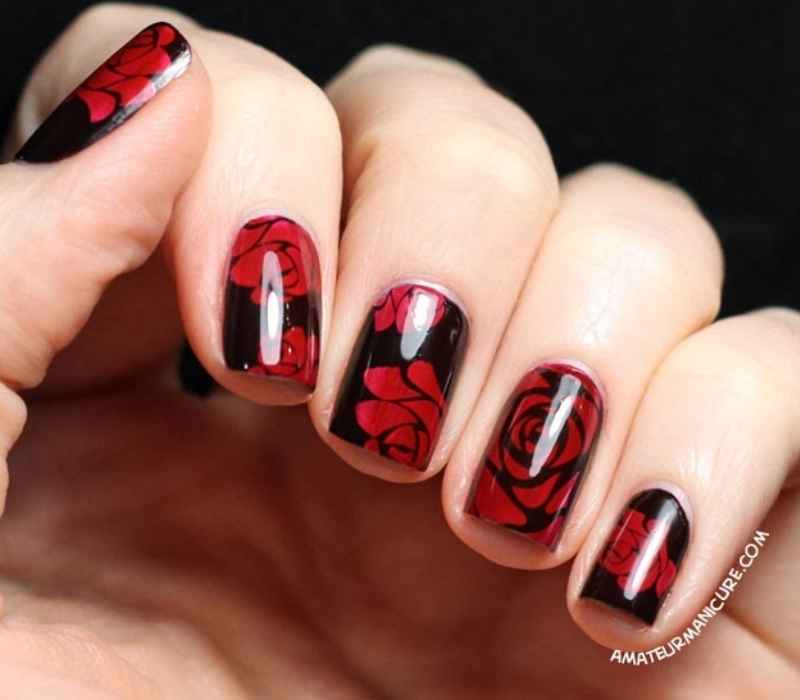
Floral Black Line Art
Black and matte red nails are always a bold choice, but adding delicate floral line drawings takes the look to another level. The contrast between the deep tones and intricate details makes this style eye-catching and unique. Whether you go for a matte red French or a full polish base, the background sets the perfect stage for an elegant yet edgy vibe.
How to Achieve Floral Black Line Art Nails
1️⃣ Nail Prep: Start with clean, well-shaped nails. Almond or square shapes work best for this look.
2️⃣ Apply Matte Red Base: Use a rich matte red polish as your base color. For a flawless look, apply two coats and allow them to dry completely.
3️⃣ Create Floral Designs: Using a fine black nail art brush or pen, draw delicate floral line art on each nail. Focus on simple flowers, leaves, and vines for a balanced, chic effect.
4️⃣ Refine Your Design: Keep the floral art minimal on some nails (like accent nails) for a stylish, balanced look.
5️⃣ Seal the Art: Apply a matte top coat to maintain the matte finish without affecting the floral design.
Quick tip: Keep a cotton swab dipped in nail polish remover handy to quickly fix any mistakes in the floral line art.
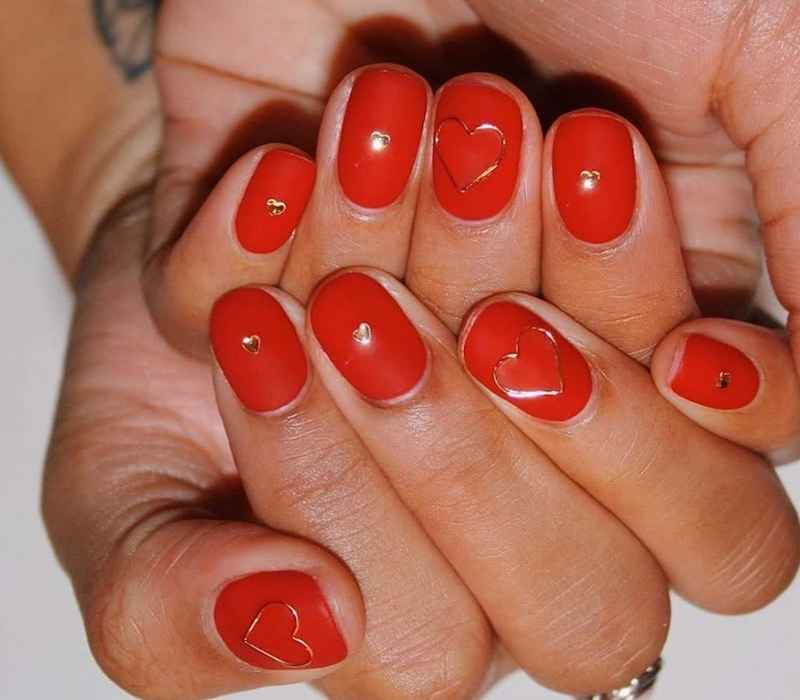
Dainty Heart Details
Even a small touch of red nail polish can make a statement. These tiny heart accent nails bring a gem-like shine, especially when layered over strawberry milk polish.
The shiny hearts look soft and romantic, making them perfect for a subtle yet striking manicure. This design is great for those who love a little punch of color without going overboard.
How to Achieve Dainty Heart Detail Nails
1️⃣ Prep Your Nails: Start with clean, shaped nails. Rounded or oval shapes work best for a soft look.
2️⃣ Apply Base Color: Paint your nails with a pale pink or strawberry milk polish. Two coats ensure a smooth, even finish.
3️⃣ Add Heart Accents: Using a thin nail art brush or dotting tool, carefully paint tiny red hearts on one or two accent nails. Keep hearts small and spaced for a dainty feel.
4️⃣ Seal It In: Finish with a glossy top coat to give your nails a shiny, gem-like effect that makes hearts pop.
Quick tip: Practice making small hearts on paper first to perfect the shape before applying to nails.
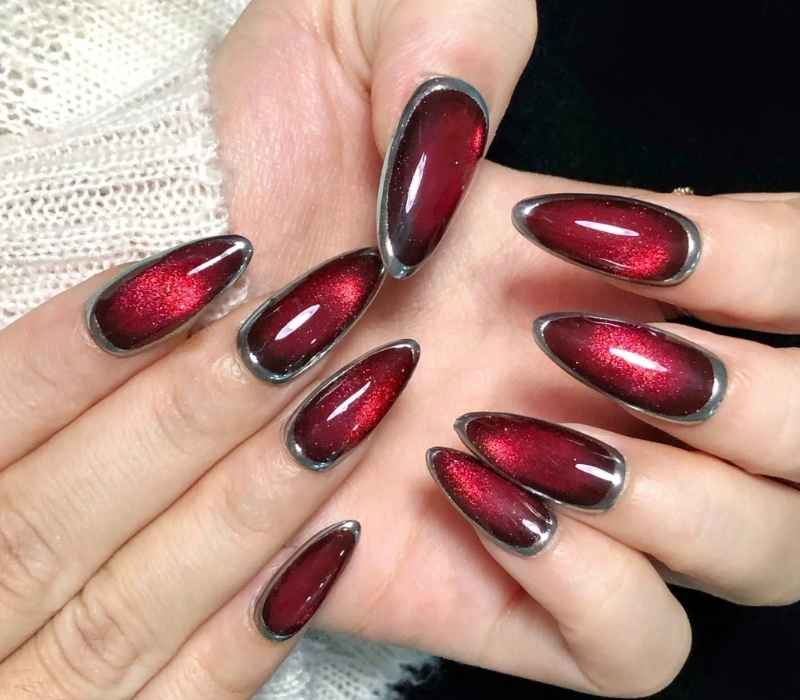
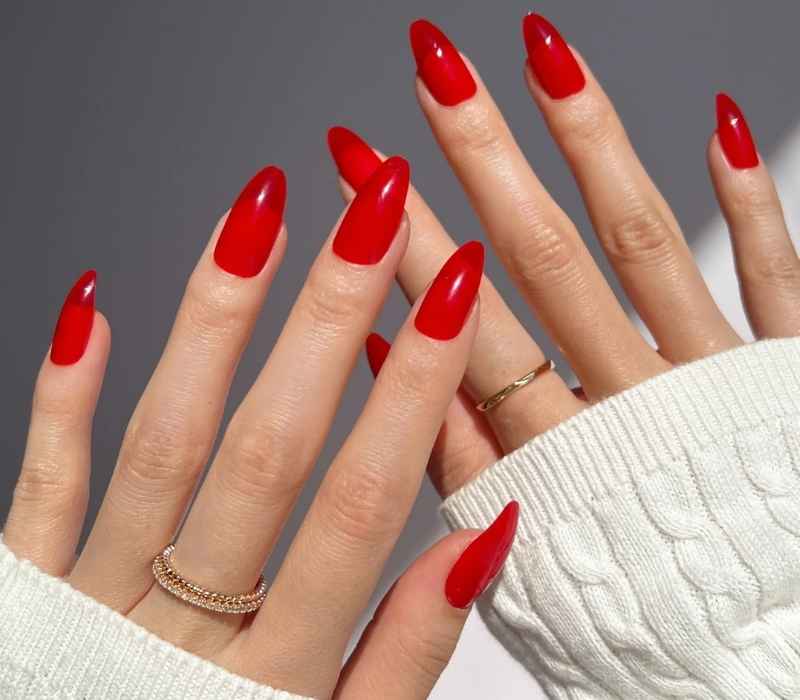
Red-y for the Jelly
The jelly nail trend is still here, and it’s easy to see why. A sheer red shade creates a playful and modern look, especially when paired with elongated round tips. The longer the extensions, the more noticeable the jelly effect, giving your nails a lightweight, glossy, and high-fashion feel. This is the ultimate way to make a maximum impact with a trendy and stylish design.
How to Achieve Red-y for the Jelly Nails
1️⃣ Prep Nails: Shape your nails into elongated rounds for the best jelly effect.
2️⃣ Apply Sheer Red Polish: Use a translucent red polish or a jelly nail polish. Apply 2-3 thin coats for depth while keeping the sheer, glassy look.
3️⃣ Build Extensions (Optional): For a bolder look, add nail extensions or tips before applying polish to enhance the jelly’s transparency and length.
4️⃣ Top Coat: Finish with a high-gloss top coat to boost shine and seal your mani.
Quick tip: Thin coats are key to keeping the jelly effect light and glossy—avoid thick layers.
No matter your style, red nails are a timeless statement that can elevate any look from bold and dramatic to soft and romantic. Whether you prefer classic glossy finishes, trendy chrome effects, or intricate nail art, there’s a perfect red manicure for every mood and occasion.
As we transition into spring, let your nails reflect your confidence and creativity—because nothing says chic like a fresh, perfectly polished set of red nails. So go ahead, experiment with these stunning designs, and embrace the power of red all year round!