
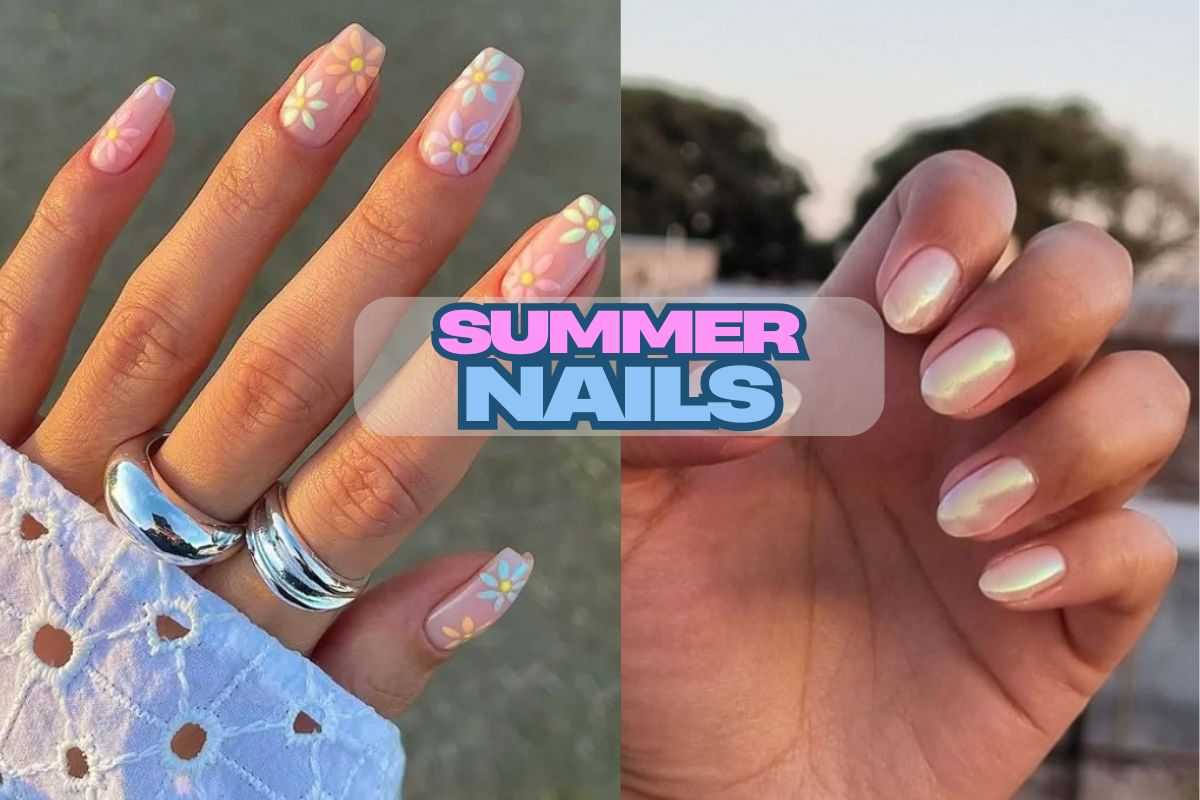
Is there anything better than a fresh manicure that instantly puts you in a sunny mood? Whether you’re drawn to bright colors, tropical florals, or bold patterns, this season is all about having fun with your nails. Your manicure isn’t just a beauty statement—it’s an extension of your personality and style!
Picture this: You’re lounging poolside, sipping on a cold drink, and your summer nails are absolutely stealing the show. Whether you’re rocking neon accents, pastel hues, or trendy nail art, your nail game is giving vacation-ready perfection.
Whether you love short natural nails or prefer the drama of long, stylish extensions, the hottest summer nail trends of 2025 are here to make your hands the ultimate accessory.
Ready to level up your look? Let’s dive into the prettiest summer nail ideas that will have you picture-perfect all season long!
The Hottest Summer 2025 Nail Trends You Need to Try!
This summer, nothing shines brighter than pink glazed donut nails! This trend is all about a soft, The Hottest Summer 2025 Nail Trends You Need to Try!
This summer, nothing shines brighter than pink glazed donut nails! This trend is all about a soft, shimmery glow with a hue that feels effortlessly chic. Whether you prefer acrylic extensions or a simple mani, this style adds a touch of elegance to your nails.
Inspired by the Finger Suit aesthetic, it’s a go-to look for anyone wanting to level up their summer nail trends in 2025.
Chromatics:
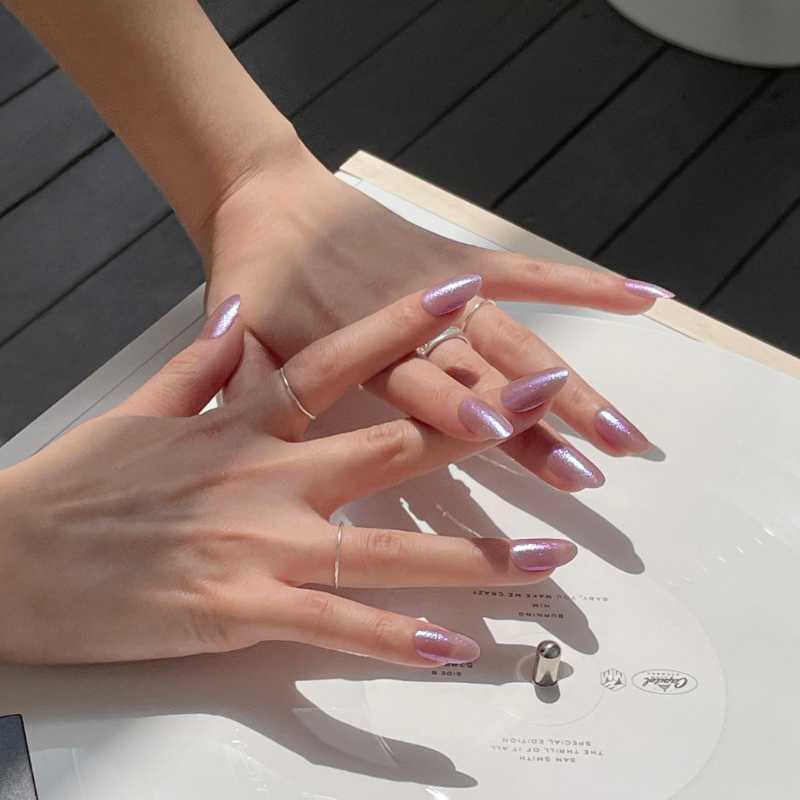
If you love glazed donut nails but want something bolder, Chromatica is for you. This trend gives your nails a metallic summer makeover with iridescent chrome finishes and pearly topcoats.
It’s the ultimate dreamy design for anyone embracing the mermaid core aesthetic. Perfect for summer nights or festival season, this look adds a futuristic touch to classic glossy nails.
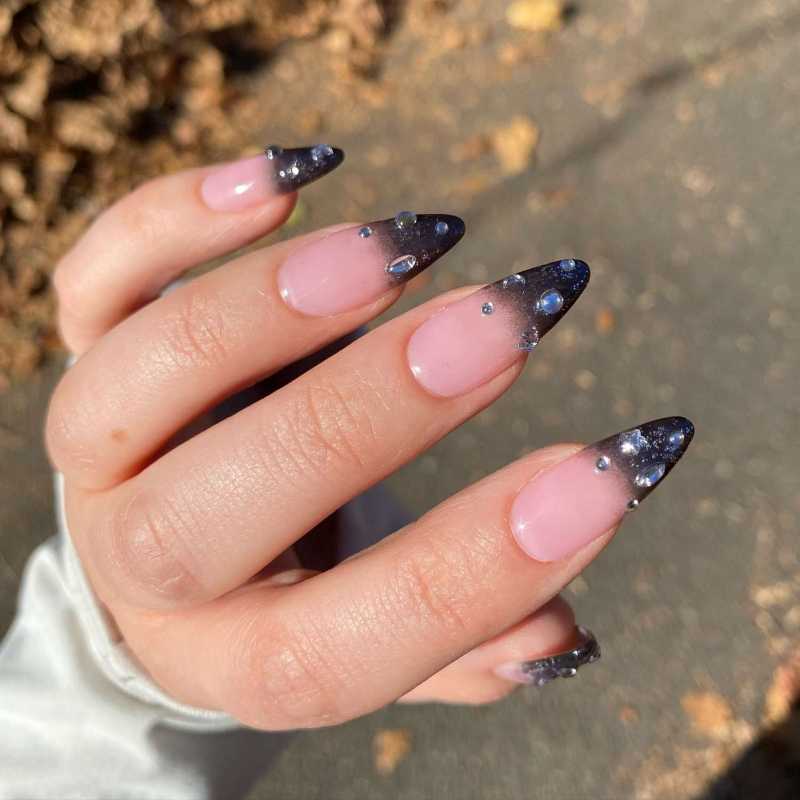
How to Achieve Gems & Chrome Nails
1️⃣ Prep Your Nails: Clean, file, and shape your nails. Apply a clear base coat for a smooth surface.
2️⃣ Choose Your Base Colors: Use a mix of soft pink, white, and chrome for variety. Alternate between solid pink, chrome, and French-tipped nails.
3️⃣ Add Rhinestones: Carefully place tiny rhinestones along your cuticles on a few nails for a luxe touch. Use nail glue for a secure hold.
4️⃣ Seal with Top Coat: Apply a glossy top coat to lock in the designs and keep them shiny.
💎 Pro Tip: Use a dotting tool for precise rhinestone placement, and always cure under a UV lamp for long-lasting wear.
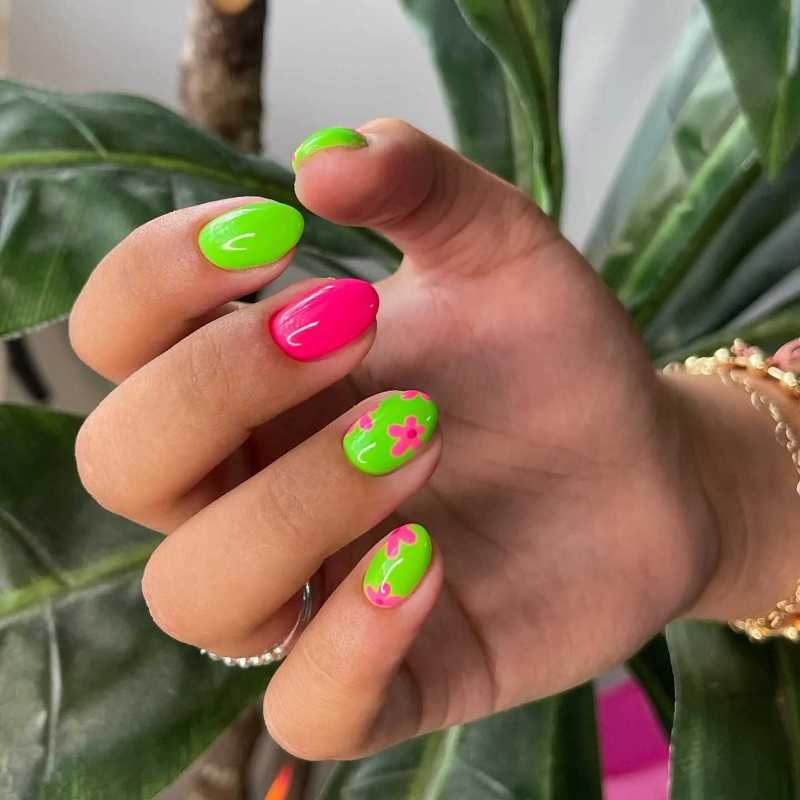
Bright + Bold:
After months of soft shades, it’s time for bright and bold hues to steal the show. This season, we’re seeing dopamine-inducing nail designs with rainbow color palettes, botanical nail art, and dreamy aura nails. If you love fun, eye-catching styles, these nails will make you feel like you’re soaking up the sunshine.
How to Achieve Bright + Bold Nails
1️⃣ Prep Your Nails: Start with clean, shaped nails. Apply a base coat to protect your natural nails.
2️⃣ Pick Your Colors: Choose a mix of bright, bold shades like neon pink, sunny yellow, vibrant blue, and lush green. Each nail can have a different color or a fun mix of hues.
3️⃣ Add Artistic Details: Use a thin brush to paint botanical designs, rainbow swirls, or abstract aura patterns. Don’t worry about being perfect—bold is all about being fun.
4️⃣ Seal with Top Coat: Finish with a clear, glossy top coat to make your designs pop and ensure they last longer.
🌈 Pro Tip: If freehand designs feel tricky, use nail stickers or stamps for an easy yet stunning look.
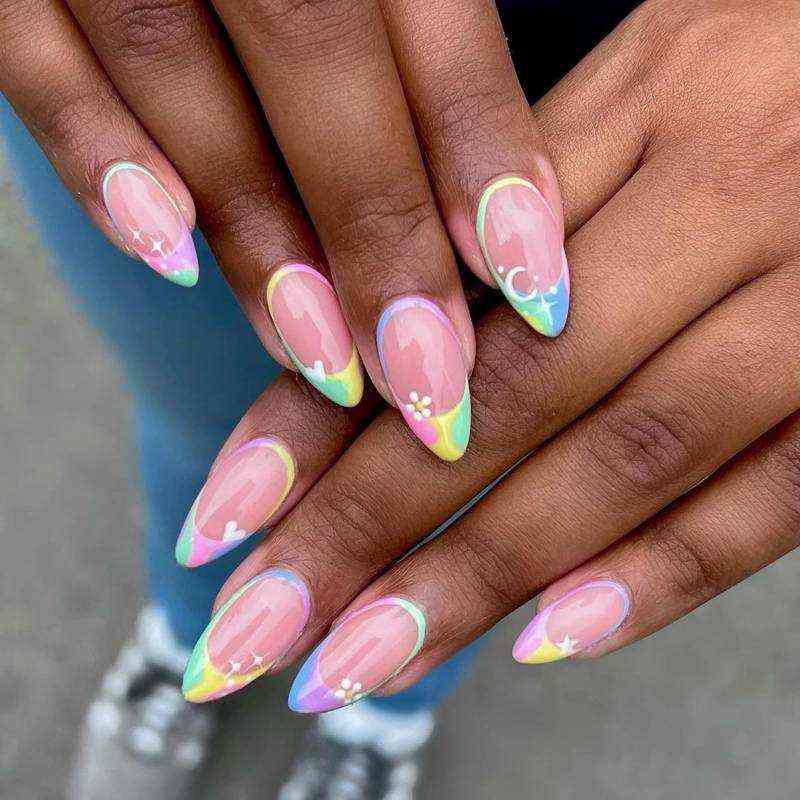
Funky French:
The French tips are here to stay, but with funky nails! This summer, they’re getting a makeover with pastel hues, floral designs, and playful details.
Whether you’re into soft shades or daring patterns, now is the perfect time to experiment and give this classic look a modern spin.
How to Achieve Funky French Nails
1️⃣ Prep Your Nails: Begin with clean, shaped nails. Apply a base coat for protection.
2️⃣ Pick Your Funky Tips: Choose pastel shades like mint, lilac, baby blue, or peach for your French tips. You can mix and match colors for a playful look.
3️⃣ Get Creative with Designs: Add tiny flowers, abstract shapes, or even small gems along the tips. Use a fine nail brush for precise details.
4️⃣ Seal It with a Top Coat: Apply a glossy top coat to lock in your designs and give them a smooth, polished finish.
🌸 Pro Tip: For a unique twist, try a wavy or diagonal French tip instead of the classic straight line
Clean Girl Nails:
For those who love a minimalist style, clean girl summer nails are a must. This trend focuses on natural, glossy, healthy-looking nails that give off a radiant glow. Also called lip gloss nails, they are perfect for anyone who prefers an effortless yet polished look. This trend is all about enhancing your natural nails while keeping them chic and fresh.
How to Achieve Funky French Nails
1️⃣ Prep Your Nails: Start with clean, shaped nails. Apply a clear base coat for a smooth surface.
2️⃣ Choose Your Funky Colors: Pick vibrant shades like neon pink, electric blue, or sunny yellow for your French tips. Feel free to mix and match for a playful vibe.
3️⃣ Add Creative Designs: Use a fine nail brush to draw tiny hearts, stars, swirls, or smiley faces on the tips. Let your creativity shine!
4️⃣ Seal with a Glossy Top Coat: Finish with a clear, high-shine top coat to protect your design and add a glossy finish.
🌟 Pro Tip: Want something unique? Try a diagonal, curved, or double-lined French tip for a trendy twist.

Hibiscus Dream Nails – A Tropical Touch for Your Fingertips
Want to bring tropical vibes to your fingertips? Imagine a delicate hibiscus flower, slightly airbrushed with soft, blended edges to create that dreamy, sun-kissed look. Whether you keep it simple by painting your nails in a matching color or mix it up with French tips and full-color nails.
this style is the definition of vacation-ready! Add a floral flair that’s subtle yet never over the top—a perfect alternative to classic Valentine’s Day nails.
How to Achieve Hibiscus Dream Nails 🌺
1️⃣ Prep Your Nails for Perfection
- Clean and Shape: Start with clean, trimmed nails in your preferred shape (oval, almond, or square).
- Apply a Base Coat: This protects your natural nails and helps the polish last longer.
2️⃣ Choose Your Tropical Colors
- Base Color: Opt for soft pink, coral, or a nude shade as your base.
- Hibiscus Accent: Use a thin nail brush to paint delicate hibiscus flowers in shades of pink, red, or white.
3️⃣ Master the Airbrushed Look
- Blend Edges: Use a makeup sponge to lightly dab the flower edges, creating a soft, dreamy look.
- Optional Twist: Try a hibiscus design on one or two accent nails, leaving the others with a glossy base.
4️⃣ Seal and Shine
- Top Coat: Apply a glossy top coat for a radiant, glass-like finish.
- Cuticle Care: Finish with cuticle oil for healthy, nourished nails.
🌴 Pro Tip: Not great with freehand designs? Use hibiscus nail stickers for an easy, professional look.
Bright Summer Nail – Time to Shine!
It’s time to showcase the boldest, brightest nail set of the season! Go for dazzling designs, neon hues, and bright ombre patterns blended with eyeshadow to achieve that seamless glow.
Match your nails to the vibrant vibes of the sunny season, and let every gesture steal the spotlight. Whether you’re at a festival, a beach, or just out and about—your nails should be as bright as your summer spirit!
How to Achieve Bright Summer Nails 🌞
1️⃣ Prep Your Nails: Clean, shape, and apply a base coat.
2️⃣ Choose Bold Colors: Pick neon shades like hot pink, lime green, or electric blue.
3️⃣ Create Ombre Glow: Use a sponge to blend colors or dab matching eyeshadow for shimmer.
4️⃣ Seal with Shine: Apply a glossy top coat and nourish with cuticle oil.
🌟 Pro Tip: Try neon French tips for a trendy twist.
READ ALSO: Trendy Neutral Summer Nail for a Classy Look
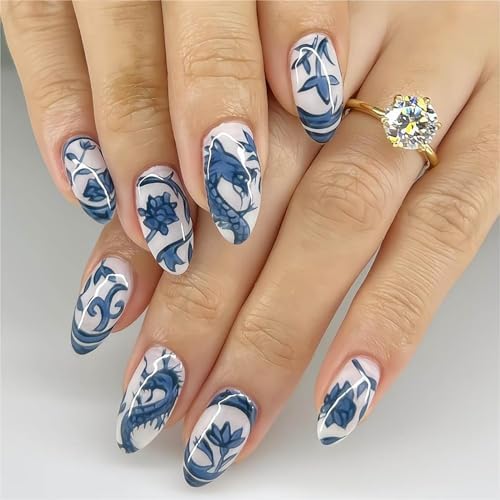
Blue China Nails: A Touch of Elegance
Imagine your nails looking like a piece of art! With Blue China Nails, you get the elegance of porcelain patterns mixed with a playful summer vibe.
Start with a light blue French tip, then add intricate cobalt blue detailing—tiny dots and delicate strokes that make your nails stand out. Whether you have short nails or love simple summer nails, this sophisticated look is a must-try!
How to Achieve Blue China Nails 💙
1️⃣ Prep Your Nails: Clean, shape, and apply a clear base coat.
2️⃣ Light Blue Base: Paint a soft blue French tip on each nail.
3️⃣ Add Porcelain Details: Use a fine brush to draw cobalt blue floral patterns, dots, or delicate swirls.
4️⃣ Seal with Shine: Finish with a glossy top coat for a polished, elegant look.
🌟 Pro Tip: For a quick version, use blue floral nail stickers.
Reverse French Nails: A Bold Twist
Ready to flip the script on your French manicure? Reverse French nails take the traditional look and give it a modern twist with a bold, vibrant base and a lighter French tip.
Picture hot pink with a pale pink tip or neon orange paired with soft peach—the perfect unexpected pop for cute summer nails. Try it and watch the compliments roll in!
How to Achieve Reverse French Nails 💅
1️⃣ Prep Your Nails: Clean, shape, and apply a clear base coat.
2️⃣ Bold Base Color: Choose a vibrant shade like hot pink, neon orange, or electric blue.
3️⃣ Add a Lighter Tip: Use a fine brush to create a thin, light-colored French tip at the nail base (near the cuticle).
4️⃣ Top It Off: Seal with a glossy top coat for a smooth, lasting finish.
🌟 Pro Tip: Try a metallic tip (gold or silver) for a chic twist.
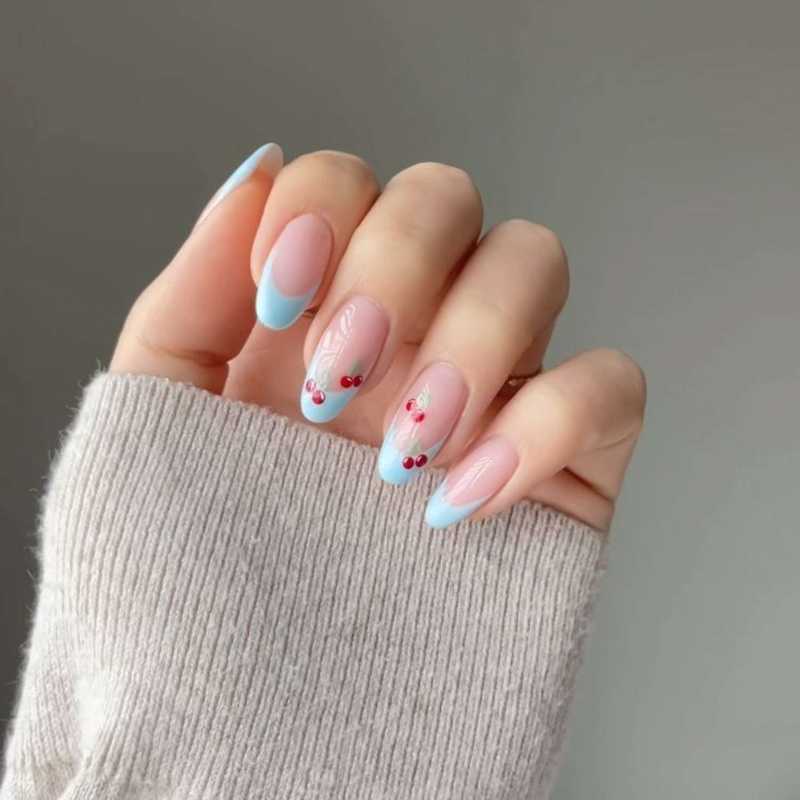
Cherry Nails
If you love a playful, retro vibe, then cherry nails are for you! This style adds a sweet, fresh touch to your look by combining a classic French tip manicure with tiny cherry designs.
The contrast between crisp white tips and juicy red cherries makes this design pop, giving off the ultimate sunny days and picnic-ready aesthetic. Plus, if you’re into DIY nails, you can achieve this look easily with a dotting tool, making it perfect for at-home nail art lovers.
How to Achieve Cherry Nails 🍒
1️⃣ Prep Your Nails: Clean, shape, and apply a clear base coat.
2️⃣ French Tips: Paint classic white tips on each nail.
3️⃣ Add Cherries: Use a dotting tool or toothpick to place two small red dots just below the tip for the cherries.
4️⃣ Draw Stems: With a thin brush or toothpick dipped in green polish, draw tiny curved stems connecting the dots.
5️⃣ Seal the Design: Finish with a glossy top coat for shine and long-lasting wear.
🌟 Pro Tip: Use a bright red polish for cherries that really pop!
READ ALSO: Fall in Love with These Stunning Burgundy Nail Ideas
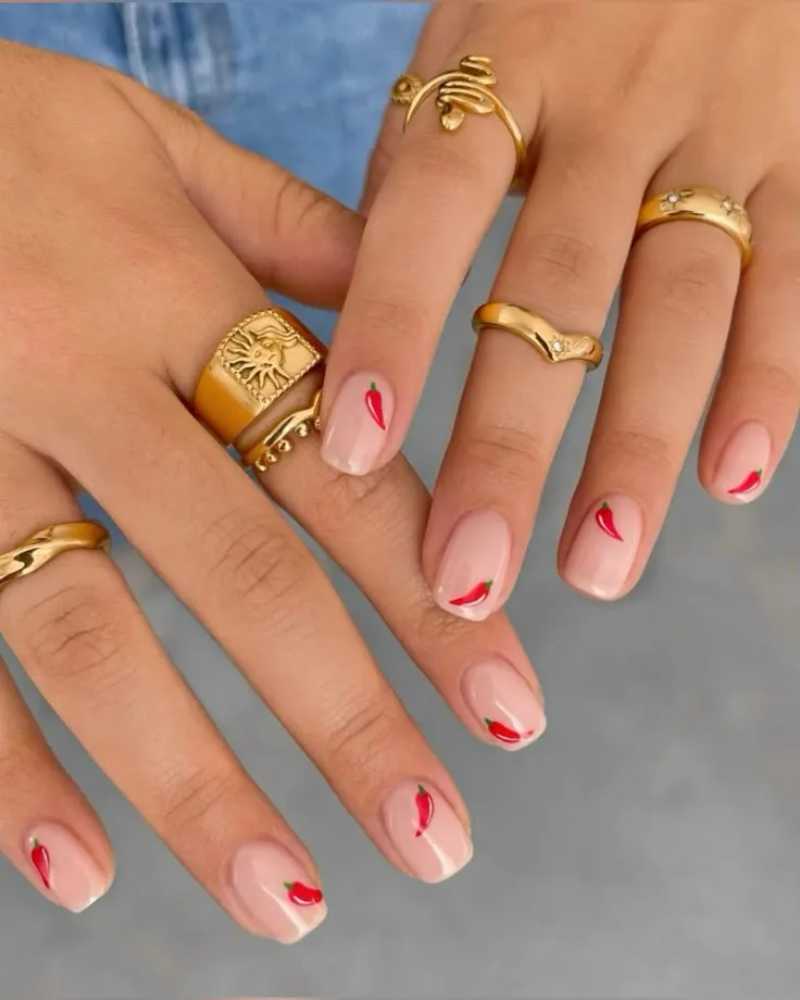
Hot Chilli Nails
Turn up the heat this summer with hot chili nails! This bold, edgy design features tiny chili accents over a neutral base, creating a striking contrast between nude backgrounds and red chilies.
Whether you’re going for a simple yet cute look or want a conversation starter at your next summer gathering, these nails add a fun flair to your seasonal collection. If you love adding a bit of spice to your style, this look is a must-try!
How to Achieve Hot Chili Nails at Home 🌶️
1️⃣ Prep Your Nails: Clean, shape, and apply a clear base coat.
2️⃣ Apply a Nude Base: Choose a soft nude or beige polish for a clean background.
3️⃣ Draw Chili Peppers: Use a thin brush or toothpick to paint small red chili shapes.
4️⃣ Add Green Stems: With a fine brush, add tiny green stems to complete the chili look.
5️⃣ Seal with Top Coat: Finish with a glossy top coat for shine and durability.
🌟 Pro Tip: Want extra flair? Use a metallic green for the stems to make them pop!
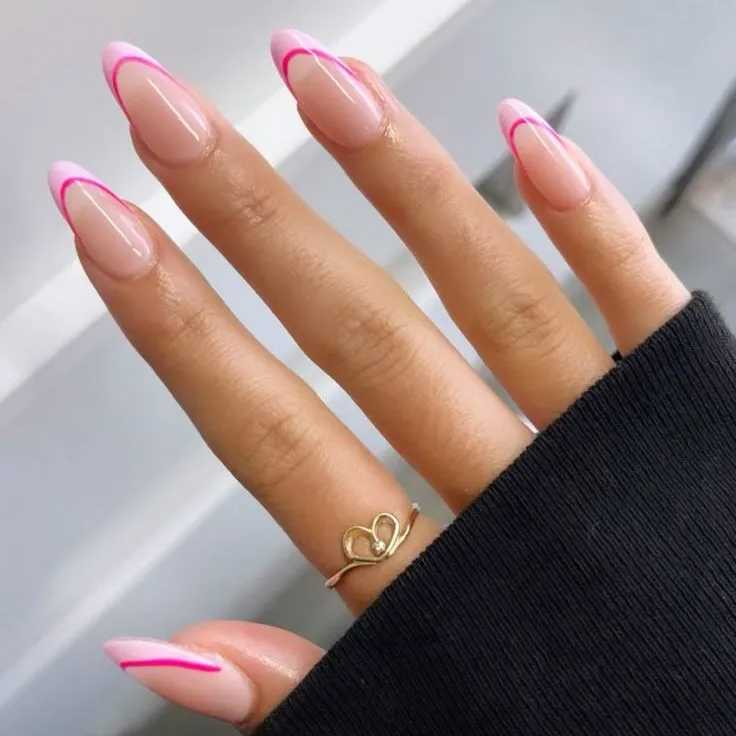
French Tip Neon Outline
Want to add a bold and eye-catching touch to your nails? Try the pink French tip neon outline! Start with a soft pastel pink French tip and then make it pop by outlining the underside of the tip with a neon shade like electric yellow or bright green.
This double-layered design gives a modern, dynamic effect that looks stunning under the summer sun. It’s a fresh take on the classic French tip, perfect for anyone looking to upgrade their nail art repertoire with a trendy twist.
How to Achieve French Tip Neon Outline Nails 💖
1️⃣ Prep Your Nails: Clean, shape, and apply a clear base coat for protection.
2️⃣ Paint Pastel Tips: Use a soft pink polish to create classic French tips.
3️⃣ Outline with Neon: Use a thin brush or nail art pen to carefully outline the underside of the tips with a neon shade (like bright yellow or green).
4️⃣ Seal with Top Coat: Apply a glossy top coat to protect your design and add shine.
🌟 Pro Tip: For an extra pop, try using a different neon color on each nail!
READ ALSO: How to Get the Perfect Spring Nails in 2025?
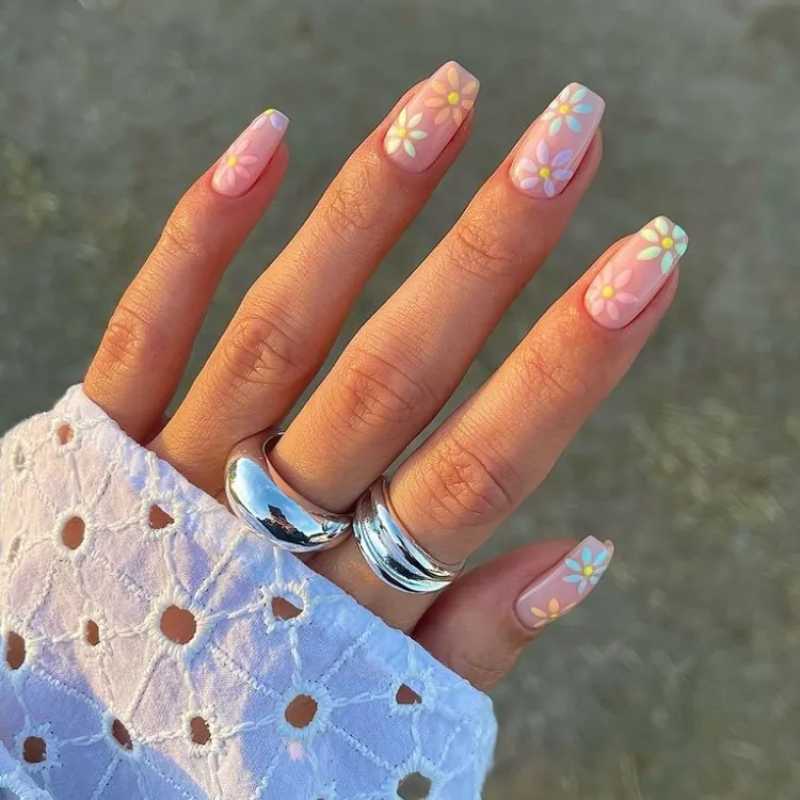
Cute Summer Nails
If bold colors aren’t your style, you can still enjoy summer vibes with cute nail designs! Go for a sweet pastel hue, add a whimsical floral pattern, or keep it understated yet fun with simple accents.
Whether you’re heading to the beach or just want a fresh look for the season, these playful designs will make your hands stand out in any summer fit.
How to Achieve Cute Summer Nails at Home 🌼
1️⃣ Prep Your Nails: Clean, shape, and apply a clear base coat for protection.
2️⃣ Pick Your Base Color: Choose a soft pastel shade like baby pink, mint green, or light lavender.
3️⃣ Add Cute Designs: Use a dotting tool, thin brush, or stickers to create tiny flowers, hearts, or any fun pattern.
4️⃣ Seal with Top Coat: Apply a glossy top coat to protect your design and keep it shiny.
🌟 Pro Tip: Mix and match designs—try flowers on some nails and simple dots on others for a playful mix!
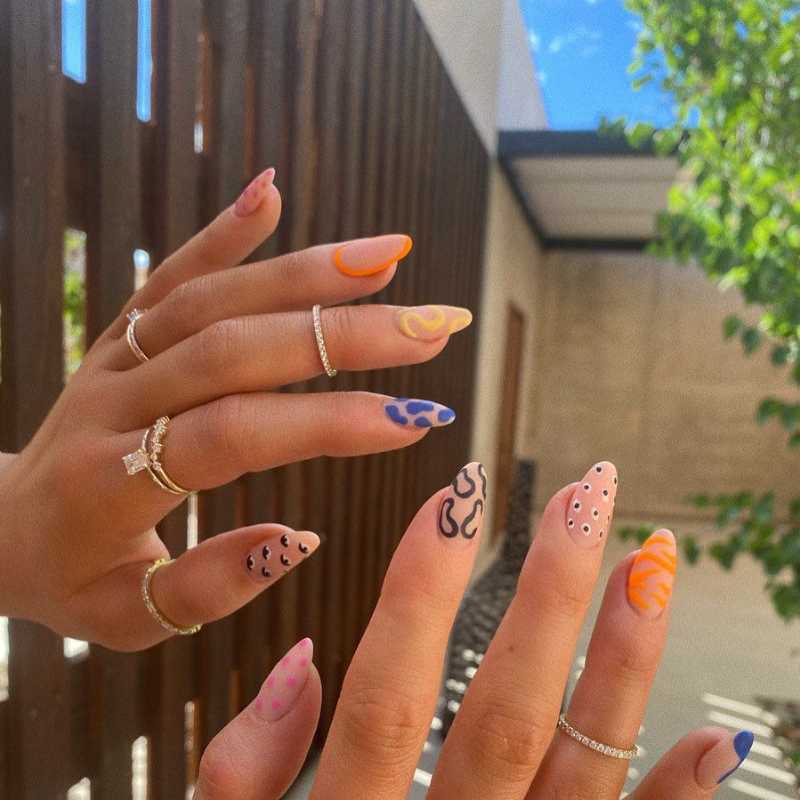
Mismatched Nail Art
Why settle for one style? Mismatched nails blend bold colors, reptile prints, hibiscus flowers, and abstract swirls for a playful, Hailey Bieber-inspired look. Each nail is a unique canvas of creativity, perfect for a fun summer vibe.
How to Achieve Mismatched Nail Art at Home 🌺
1️⃣ Prep Your Nails: Clean, shape, and apply a clear base coat to protect them.
2️⃣ Choose Your Designs: Pick a mix of designs—bold colors, floral patterns, reptile prints, or abstract swirls.
3️⃣ Paint Each Nail Differently: Use a fine brush for details and let your creativity shine. Try bright colors, metallics, or even some glitter.
4️⃣ Seal with Top Coat: Finish with a glossy top coat for shine and long-lasting wear.
🌟 Pro Tip: Feeling unsure? Start with two or three designs and build up as you gain confidence!
Bold Stripes
Stripes are in! Inspired by beach towels and sun loungers, bold stripes add a vibrant, modern touch. Use complementary or contrasting shades for striking vertical, diagonal, or horizontal lines that pop.
How to Achieve Bold Stripe Nails at Home
1️⃣ Prep Your Nails: Clean, shape, and apply a clear base coat for protection.
2️⃣ Pick Your Colors: Choose two or more bright shades that complement or contrast.
3️⃣ Create Stripes: Use nail tape for clean lines, then paint vertical, horizontal, or diagonal stripes on each nail.
4️⃣ Carefully Remove Tape: Peel off the tape slowly for crisp, clean lines.
5️⃣ Seal with Top Coat: Finish with a glossy top coat to protect your stripes and add shine.
🌟 Pro Tip: For a beachy vibe, try a mix of white, blue, and yellow stripes!
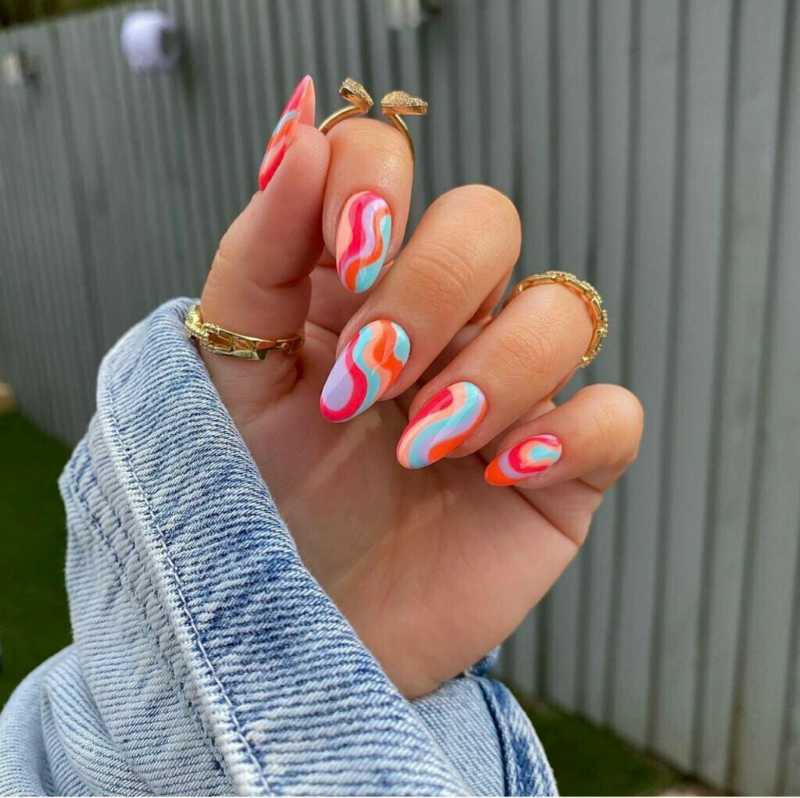
Soft Pastel Watercolors
Channel your inner artist with a watercolor mani that feels straight out of Cruel Summer nails. This dreamy Lover-inspired look is easier than it seems—just apply a coat of your favorite shade as the canvas, then dilute pastel polish using alcohol.
Use a brush or dotting tool to blend delicate hues like pink, blue, peach, and purple across the surface of each nail, creating an effortless ombre effect. The result? A soft, artistic, hand-painted design that looks both ethereal and chic.
How to Achieve Soft Pastel Watercolor Nails at Home 💖
1️⃣ Prep Your Nails: Clean, shape, and apply a clear base coat to protect them.
2️⃣ Apply Base Color: Choose a soft, neutral shade (like light pink or white) as your canvas.
3️⃣ Create Watercolor Effect: Dilute pastel polish colors (pink, blue, peach, purple) with a few drops of alcohol.
4️⃣ Blend Colors: Use a brush or dotting tool to gently apply and blend the colors on each nail, creating a soft, ombre effect.
5️⃣ Seal with Top Coat: Finish with a glossy top coat for a smooth, shiny finish.
🌟 Pro Tip: Use a small, clean brush dipped in alcohol to soften any harsh edges for a true watercolor look!
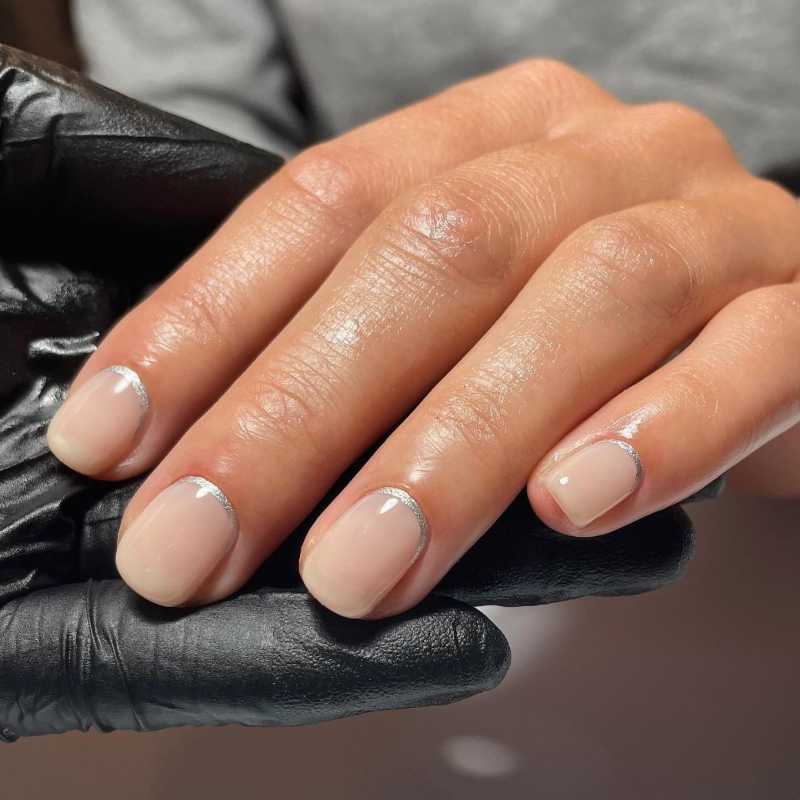
Peach and Pearl Elegance
For neutral summer nails with a coquettish twist, add itty-bitty pearl accents to your mani. These blink-and-you’ll-miss-it details bring a touch of elegance, making your nails feel both cool and refined. The glossy, understated, and dainty finish makes it perfect for any occasion, whether you’re keeping it minimalist or adding a luxurious touch to your look.
How to Achieve Peach and Pearl Elegance Nails at Home
1️⃣ Prep Your Nails: Clean, shape, and apply a clear base coat for protection.
2️⃣ Apply Peach Base Color: Choose a soft, peachy nude polish and paint a smooth layer on each nail.
3️⃣ Add Pearl Accents: Use a dotting tool or tweezers to place tiny pearl beads on each nail while the polish is still tacky.
4️⃣ Secure with Top Coat: Apply a clear, glossy top coat to lock the pearls in place and give your nails a shiny, polished finish.
🌟 Pro Tip: For a more delicate look, keep the pearls only on one or two accent nails.

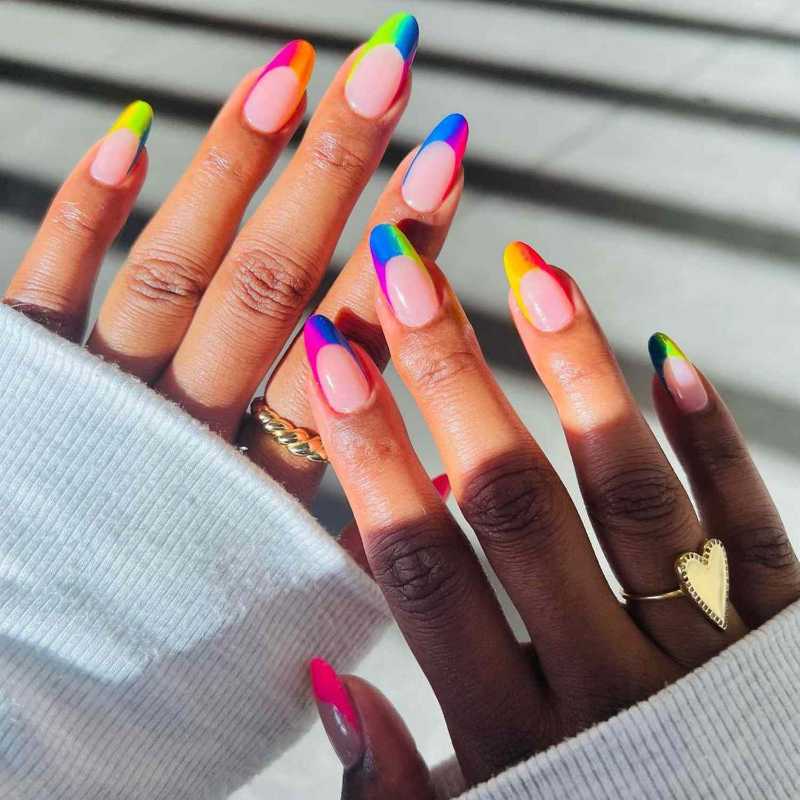
Rainbow Brights for a Bold Look
Say goodbye to dark polish and embrace the final chance to play with vibrant brights this summer. Go all out by painting your tips in every shade of the rainbow.
For a seamless gradient effect, use a sponge to blend the tones, creating a fun, cheerful, and eye-catching style. This bold, multicolor look is the perfect way to add a festive, lively touch to your nails before cooler weather sets in.
How to Achieve Rainbow Brights Nails at Home 🌈
1️⃣ Prep Your Nails: Clean, shape, and apply a clear base coat for protection.
2️⃣ Choose Your Colors: Pick a range of bright, bold shades—red, orange, yellow, green, blue, and purple.
3️⃣ Create Gradient Tips: Use a makeup sponge to blend the colors onto each nail for a seamless ombre effect. Dab lightly and layer as needed.
4️⃣ Clean Up Edges: Use a thin brush dipped in nail polish remover to clean around your cuticles.
5️⃣ Seal with Top Coat: Apply a clear, glossy top coat to protect the gradient and add shine.
🌟 Pro Tip: For even bolder nails, add a touch of fine glitter for a sparkling rainbow finish!
Pink Marbled Magic
If you love soft, elegant designs, a pink marbled mani is a must-try. Inspired by rose quartz, which symbolizes harmony, this serene, polished look is all about delicate swirls that add a trendy gemstone effect. Bonus: It pairs perfectly with your favorite rose, making it the ultimate Summer 2025 vibes statement.
How to Achieve Pink Marbled Magic Nails at Home
1️⃣ Prep Your Nails: Clean, shape, and apply a clear base coat for protection.
2️⃣ Apply Pink Base: Choose a soft pink polish as your base color and let it dry.
3️⃣ Create Marble Effect: Drop small dots of white polish over the pink base, then use a thin brush or toothpick to gently swirl them for a marbled look.
4️⃣ Blend for Softness: Lightly dab a makeup sponge to soften the swirls and blend the colors.
5️⃣ Seal with Top Coat: Apply a glossy top coat to lock in the marble design and add shine.
🌟 Pro Tip: Add a hint of gold foil for a touch of luxury and extra shine!

Black 3D French Mani
Think black polish isn’t a summer choice? Think again! A thin tip on a neutral base makes a major statement, while studs add an extra edge. This isn’t your mother’s French manicure—it’s bold, sleek, and stylish.
Want to turn heads? Go glossy for a modern look, or try matte for a minimalistic vibe. Either way, this edgy, sophisticated design is your go-to for an effortlessly chic manicure.
How to Achieve Black 3D French Mani at Home
1️⃣ Prep Your Nails: Clean, shape, and apply a clear base coat for protection.
2️⃣ Apply Neutral Base: Choose a soft nude or clear polish as your base and let it dry.
3️⃣ Create Black Tips: Use a thin brush to carefully paint black French tips on each nail.
4️⃣ Add 3D Studs: While the black polish is still slightly tacky, place tiny studs along the tips or at the base for a textured effect.
5️⃣ Seal with Top Coat: Apply a glossy top coat for a sleek finish or a matte top coat for a modern, understated look.
🌟 Pro Tip: For a more dramatic style, mix glossy and matte finishes—glossy tips with a matte base.
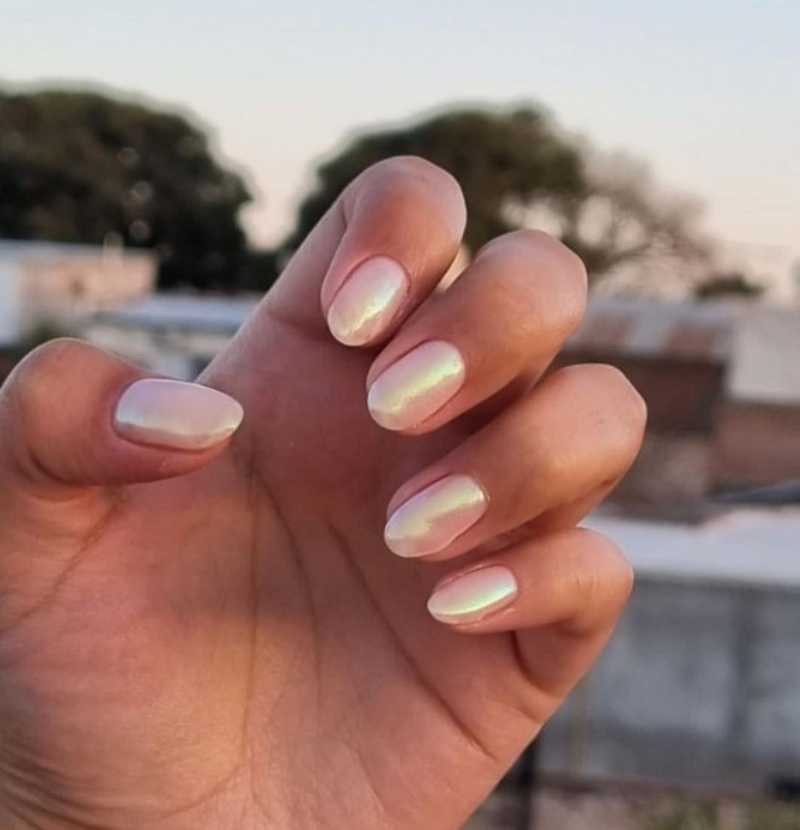
Pearly Chrome
Obsessed with the glazed donut trend? Take it up a notch by opting for two shades instead of one. The iridescent, luminous finish gives your nails a soft, elegant, and reflective glow.
With countless ways to customize, you can go cool-toned chrome or warm and metallic. Whatever you choose, this smooth, pearlescent mani keeps you looking luxurious and trendy all season.
How to Achieve Pearly Chrome Nails at Home 🌟
1️⃣ Prep Your Nails: Clean, shape, and apply a clear base coat to protect your nails.
2️⃣ Pick Two Shades: Choose two pearlescent polishes—cool-toned silvers or warm metallics.
3️⃣ Apply Base Color: Paint your nails with one shade as the base and let it dry.
4️⃣ Add Second Shade: Use a sponge or brush to gently blend the second shade over the nails for a soft, glowing finish.
5️⃣ Seal with Top Coat: Finish with a glossy top coat to enhance shine and durability.
🌟 Pro Tip: Experiment with mixing cool and warm tones for a unique, multidimensional look!
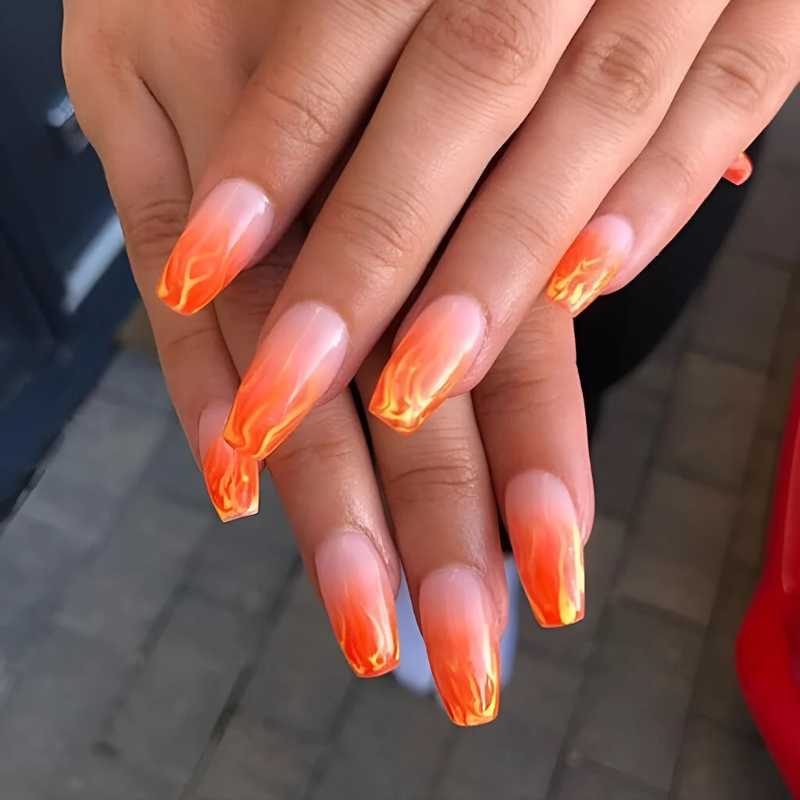
Summer Sunbursts
Nothing says summer like a red and orange glow on your nails, capturing the beauty of late August afternoons when the sun is at its hottest. This aura mani blends warm tones effortlessly, making it the perfect choice for those who love a bold and energetic look. Plus, you get all the beauty of a glowing sunset without worrying about UV damage.
How to Achieve Summer Sunbursts Nails at Home
1️⃣ Prep Your Nails: Clean, shape, and apply a clear base coat to protect your nails.
2️⃣ Choose Warm Colors: Pick bright red and orange polishes that complement each other.
3️⃣ Create Gradient Effect: Use a makeup sponge to dab and blend the red and orange colors on each nail, creating a smooth sunset gradient.
4️⃣ Clean Edges: Use a small brush dipped in nail polish remover to clean up around your nails.
5️⃣ Seal with Top Coat: Apply a glossy top coat to lock in the colors and add shine.
🌟 Pro Tip: Add a tiny gold or yellow dot near the cuticle to mimic the sun for extra flair!
Fiery Tips
Too much red can feel intense for summer, but don’t ditch your go-to shade! Try fiery tips instead—this French manicure update keeps your nails brighter, bolder, and statement-making all the way into September.
How to Achieve Fiery Tips at Home 🔥
1️⃣ Prep Your Nails: Clean, shape, and apply a clear base coat for protection.
2️⃣ Apply Neutral Base: Paint your nails with a soft nude or pale pink polish and let it dry.
3️⃣ Add Red Tips: Using a thin brush, carefully paint bright red tips for a modern French manicure look.
4️⃣ Clean Up: Use a small brush dipped in remover to fix any mistakes around the edges.
5️⃣ Seal with Top Coat: Finish with a glossy top coat to add shine and make your manicure last longer.
🌟 Pro Tip: Try a slightly angled tip instead of a straight line for a trendy, dynamic effect!
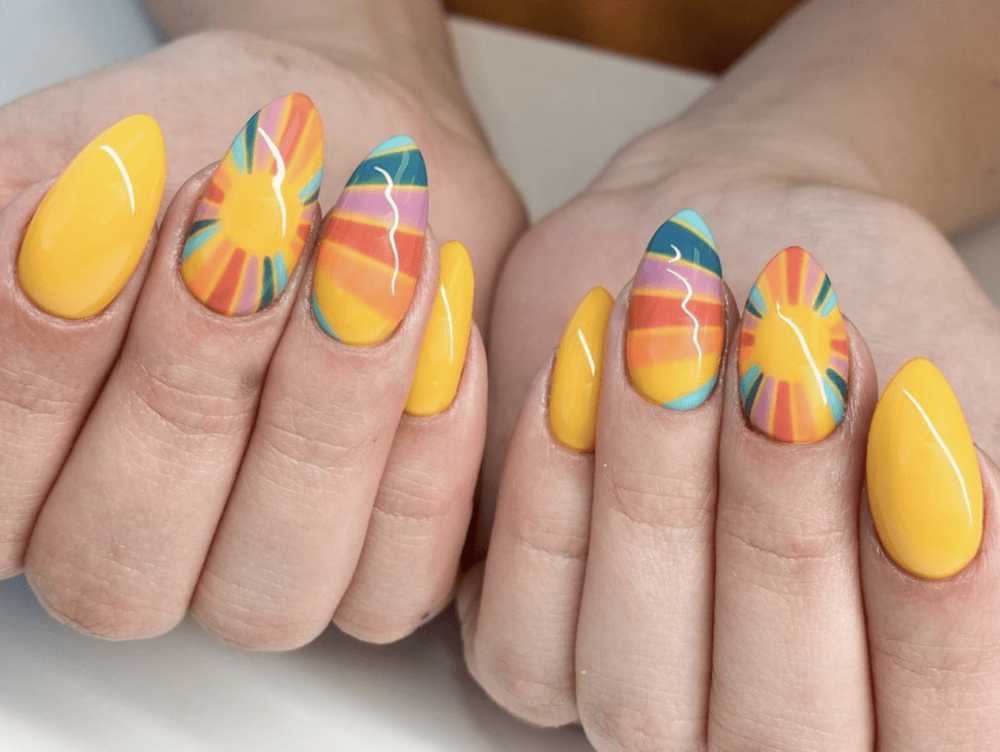
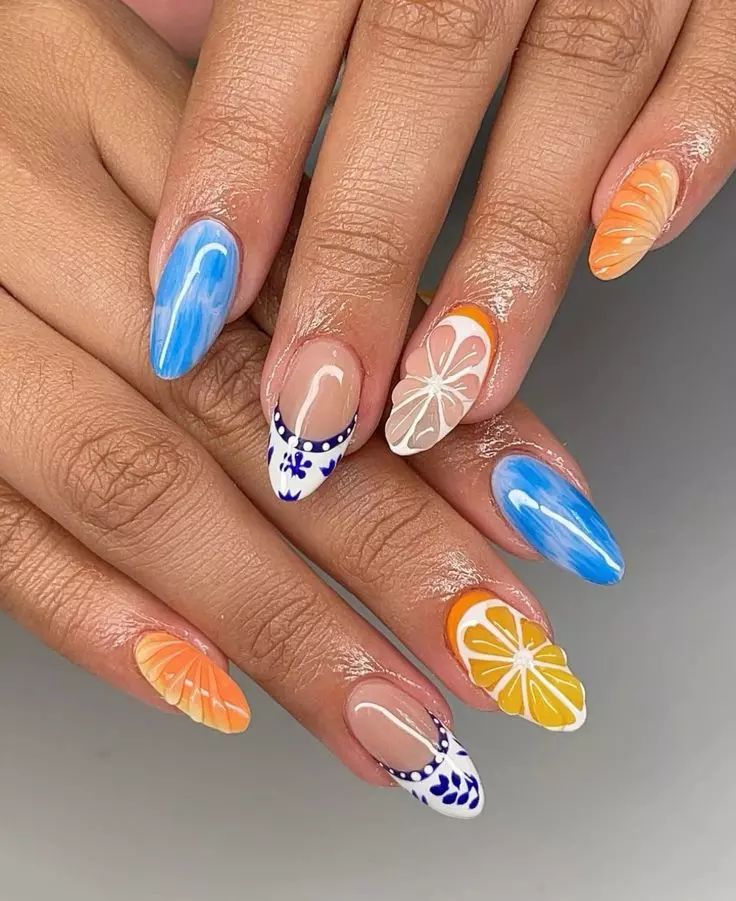
Coastal Italian Art
Can’t make it to Positano this August? Capture that Italy-inspired vibe with coastal art on your nails. Think limoncello hues and dreamy vacation details—perfect for feeling like one of the lucky few, even if you’re just playing pretend!
How to Achieve Coastal Italian Art Nails at Home
1️⃣ Prep Your Nails: Clean, shape, and apply a clear base coat to protect your nails.
2️⃣ Choose a Soft Yellow Base: Paint your nails with a pale lemon-yellow polish and let it dry.
3️⃣ Add Coastal Details: Use a fine brush to draw small seashells, waves, or lemons on one or two nails for that vacation feel.
4️⃣ Keep It Simple: Leave some nails just yellow for a fresh, balanced look.
5️⃣ Seal with Top Coat: Apply a glossy top coat to protect your art and add shine.
🌟 Pro Tip: Use white or light blue polish for the coastal accents to keep the look breezy and bright!
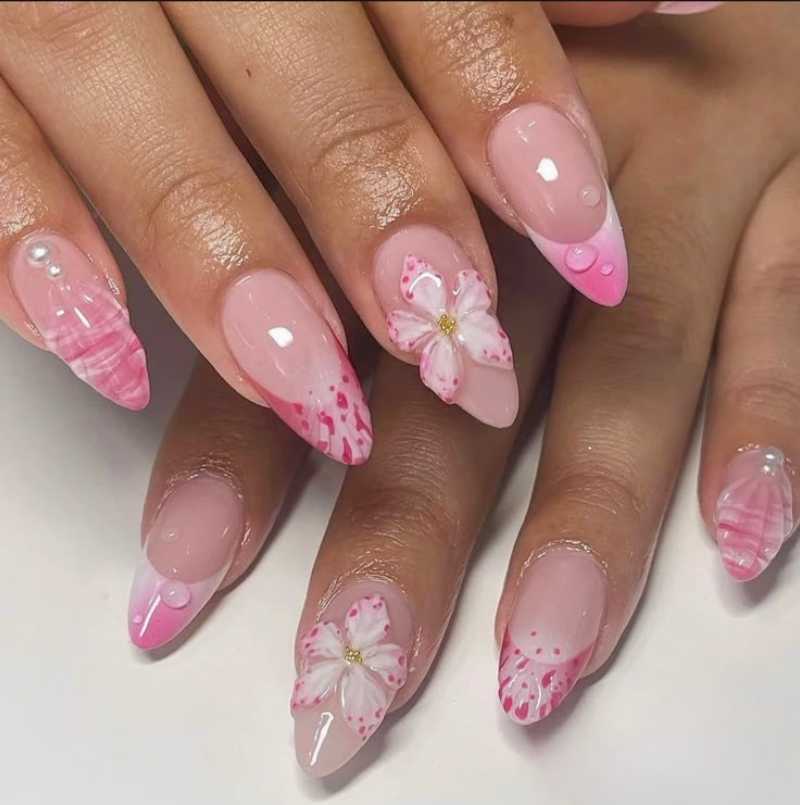
Summer in 3D
Why fight the humidity when you can embrace it with fun 3D nail designs? Add a playful twist by decorating your nails with buzzy dewdrop designs that bring extra dimension and texture. A mismatched set like this makes your manicure unique while keeping it trendy and stylish.
This look is all about making your nails stand out while staying effortlessly cool. If you love vibrant and artistic styles, these glossy designs will be your go-to this summer.
How to Achieve Summer in 3D Nails at Home 💧
1️⃣ Prep Your Nails: Clean, shape, and apply a clear base coat to protect your nails.
2️⃣ Choose Base Colors: Pick bright or pastel polishes you love and paint your nails.
3️⃣ Create Dewdrop 3D Drops: Using a clear or slightly tinted gel or thick top coat, build small rounded drops on different nails for a dewy effect. Cure under a UV lamp if using gel.
4️⃣ Mix & Match: Add drops to random nails to create a playful, mismatched look.
5️⃣ Finish with Gloss: Seal everything with a glossy top coat for extra shine and long-lasting wear.
🌟 Pro Tip: Use clear rhinestones or tiny beads for even more 3D sparkle!
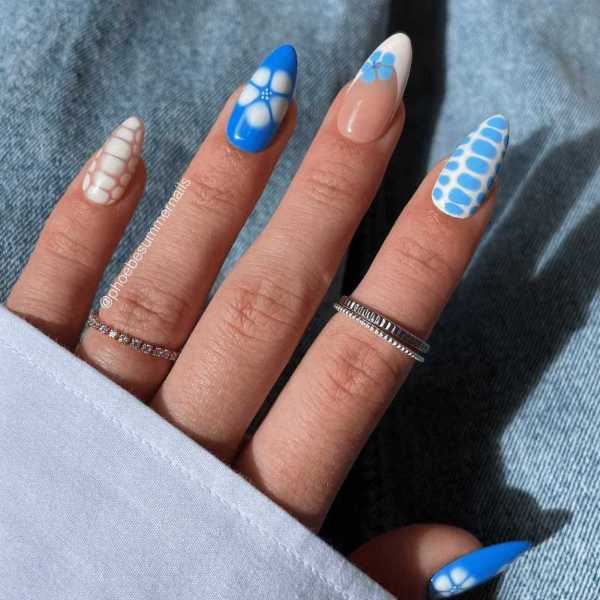
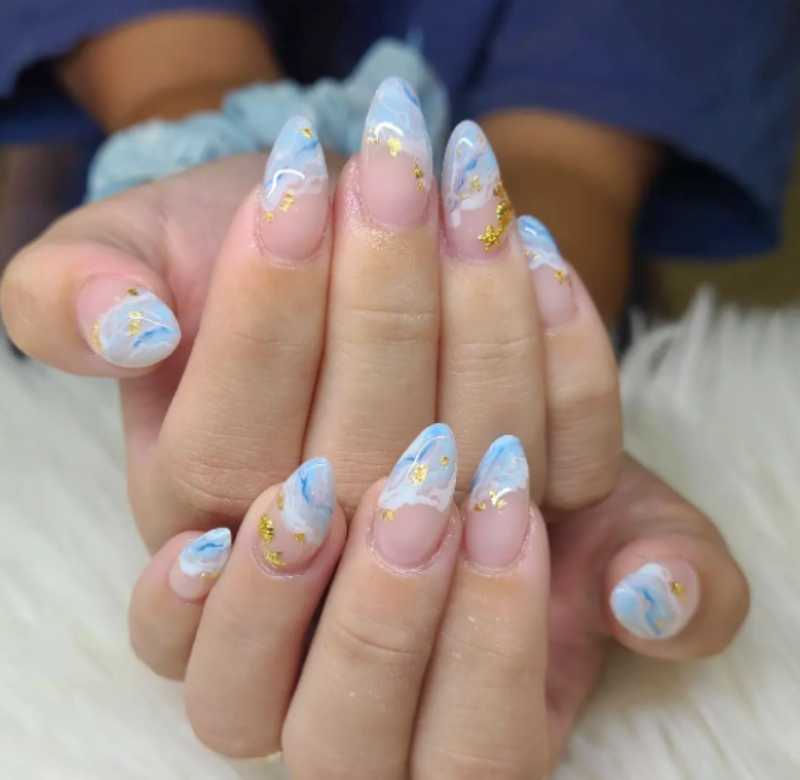
Ocean Nails
Even if your days aren’t spent at the beach, you can still enjoy that fresh, ocean-inspired vibe. A calming mani with deep blues and soft whites lets you pretend you’re near the waves, adding a relaxing, tropical touch to your look.
This style is perfect for anyone who loves vacation vibes and effortless beauty. Whether you’re into minimal or bold nails, this design makes everyday feel like a breezy getaway.
How to Achieve Ocean Nails at Home 🌊
1️⃣ Prep Your Nails: Clean and shape your nails, then apply a clear base coat.
2️⃣ Pick Your Colors: Choose a rich navy blue and a crisp white polish.
3️⃣ Create Waves: Use a thin brush or dotting tool to paint soft, wave-like patterns or swirls mixing the blue and white on a few nails.
4️⃣ Keep Some Nails Simple: Paint the rest solid blue or white for balance.
5️⃣ Seal with Top Coat: Finish with a glossy top coat for shine and durability.
🌟 Pro Tip: Add tiny silver or pearl accents to mimic sparkling ocean reflections!
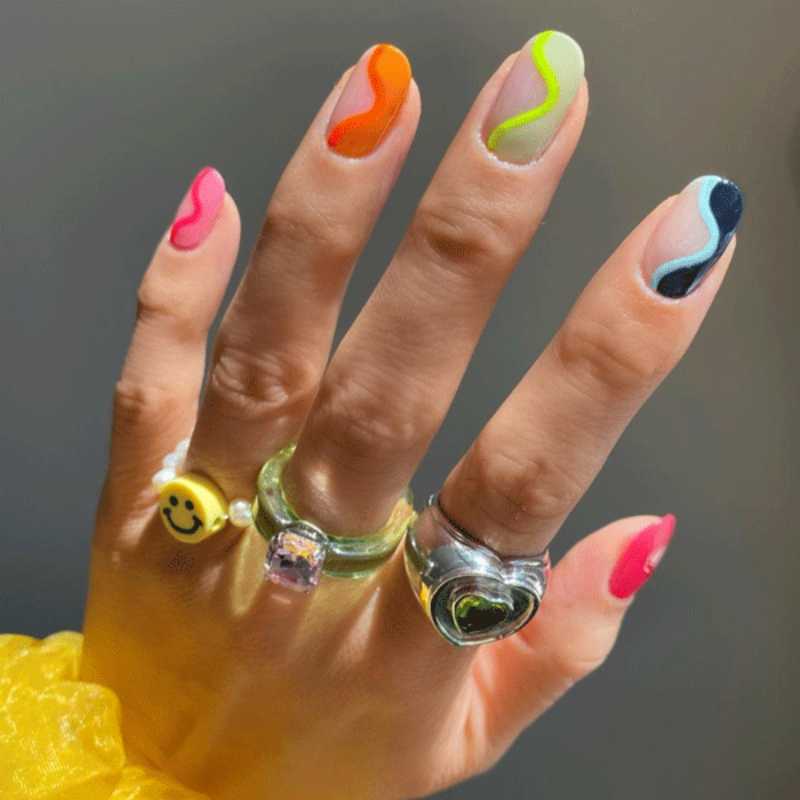
Neon Squiggles
Think neon can’t be understated? This oxymoron of a design proves otherwise. The dainty squiggles add just the right pop of color, keeping your nail art fun but not overwhelming.
To get this 3D effect, try using a builder gel—its slightly thicker texture makes it easier to draw bold, wavy lines that stand out in a glossy, vibrant way.
How to Achieve Neon Squiggles Nails at Home
1️⃣ Prep Your Nails: Clean and shape nails, then apply a clear base coat.
2️⃣ Choose a Neutral Base: Paint your nails with a soft nude or white polish.
3️⃣ Draw Squiggles: Use a builder gel or thick polish with a thin brush to create neon squiggly lines on each nail. Cure under a UV lamp if using gel.
4️⃣ Add Dimension: Make sure your lines are slightly raised for that 3D effect.
5️⃣ Finish with Gloss: Seal with a shiny top coat for a vibrant, long-lasting look.
🌟 Pro Tip: Mix different neon colors like pink, green, or orange for extra fun!
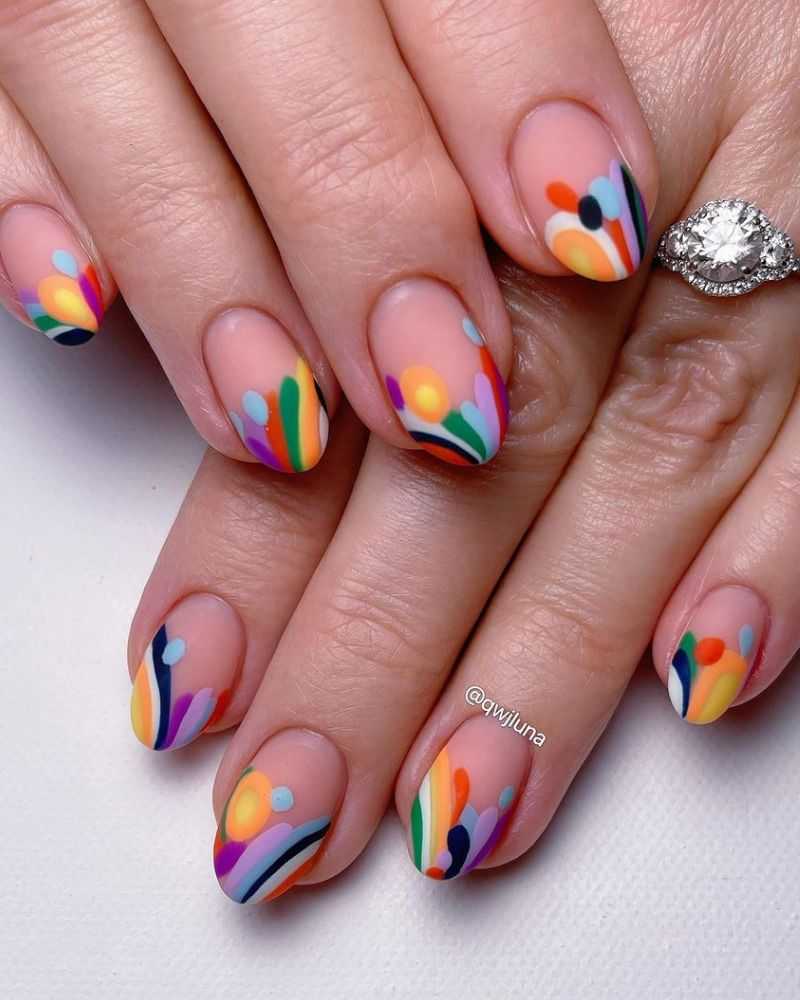
Dopamine Nails
Boost your mood with a dopamine-boosting mani packed with vibrant colors and fun prints. Every time you look down at your nails, you’ll feel instant joy, making the back-to-school season less dull.
Pick bold shades or mix playful patterns—whatever makes you smile! A little color therapy on your nails can turn any day into something brighter. What colors make you happy?
How to Achieve Dopamine Nails at Home
1️⃣ Prep Your Nails: Clean, file, and apply a clear base coat.
2️⃣ Pick Bright Colors: Choose your favorite bold shades—think sunny yellow, bright pink, or electric blue.
3️⃣ Mix & Match Patterns: Paint each nail a different color or add fun prints like dots, stripes, or smiley faces using a dotting tool or thin brush.
4️⃣ Keep It Playful: Don’t worry about perfect symmetry—happy nails are all about fun!
5️⃣ Seal the Look: Finish with a glossy top coat to lock in your vibrant design.
🌟 Pro Tip: Use contrasting colors to make your patterns pop even more!
This summer, your nails are more than just an accessory—they’re a statement of style, mood, and creativity! Whether you’re drawn to bold neon hues, soft pastels, or glossy chrome finishes, there’s a trendy manicure waiting to elevate your look.
From beach days to vacation vibes, the right nail design can make every moment feel extra special. So why not treat yourself to a dopamine-boosting mani that sparks joy every time you look down? Try out these trending summer nails and let your hands shine all season long! Which style will you rock first? Let us know in the comments!