
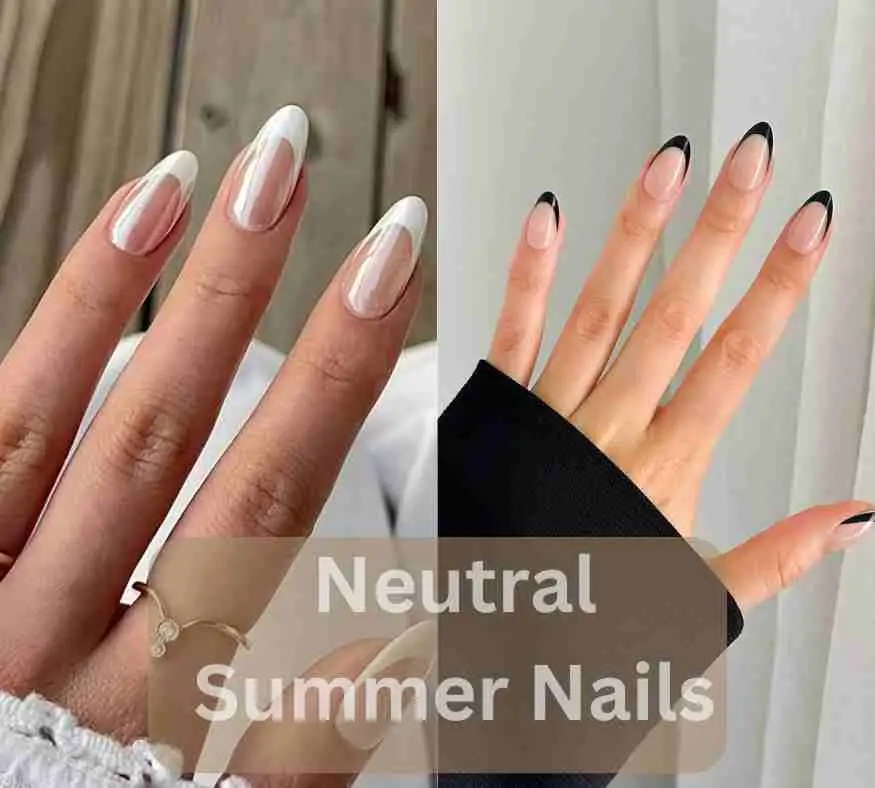
As someone who constantly explores nail trends, I’ve found that short, neutral manicures always impress. Their versatile nature makes them ideal for everything from casual outings to professional settings. I’ve personally experimented with understated, simple shades like creamy white, soft beige, and muted blush; they always add an effortlessly chic touch to my look.
Having followed countless nail accounts on Instagram, I’ve seen how professionals recommend polishes in a wide range of shades to choose from. Whether you prefer a salon appointment or a DIY session, the ability to customize your mani ensures a flawless finish perfectly tailored to your style.
If you’re seeking inspo for your next manicure, rest assured that their ability to complement any outfit proves why they remain a staple in the beauty world.
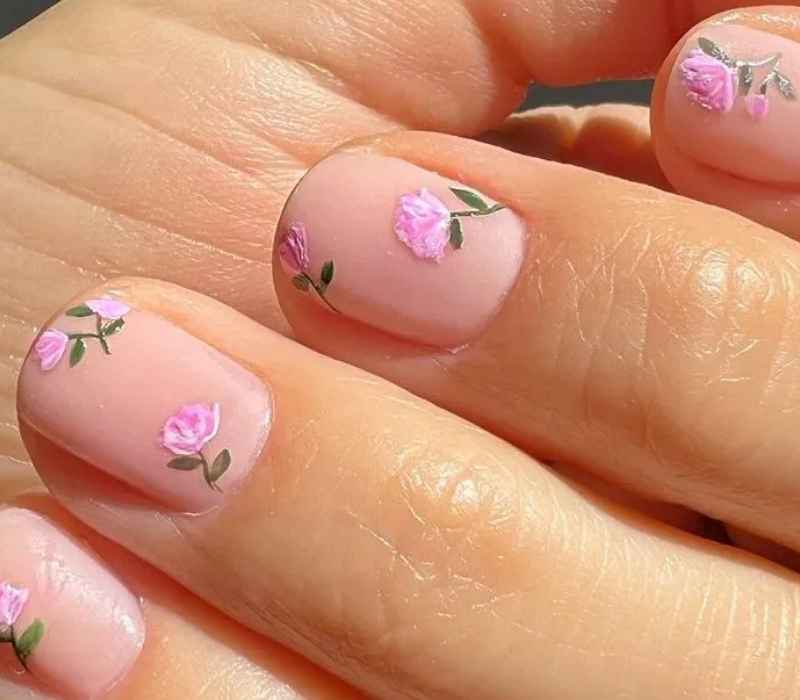
Floral Details on Soft Pink Base
There’s something so charming about floral details on a soft pink base—it feels like a little touch of nature right at your fingertips. The tiny flowers add a sense of joy and playfulness, making your manicure look fresh and fun. Whether you’re embracing a summer fling or just want to bring some bloom into your everyday routine, this nail style is effortlessly beautiful.
The soft pink base keeps things delicate and romantic, while the floral accents add just the right amount of personality.
How to Achieve This Look
1️⃣ Prep & Paint the Base
Shape your nails and apply a soft pink polish as your base for a clean, romantic backdrop.
2️⃣ Add Mini Flowers
Use a dotting tool or thin brush to paint small white or pastel flowers on one or two accent nails.
3️⃣ Finish with Top Coat
Seal everything with a glossy top coat to protect the design and add shine.
Pro tip: Apply a small gold dot in the center of each flower for a luxe detail that makes the florals pop without overpowering the look.
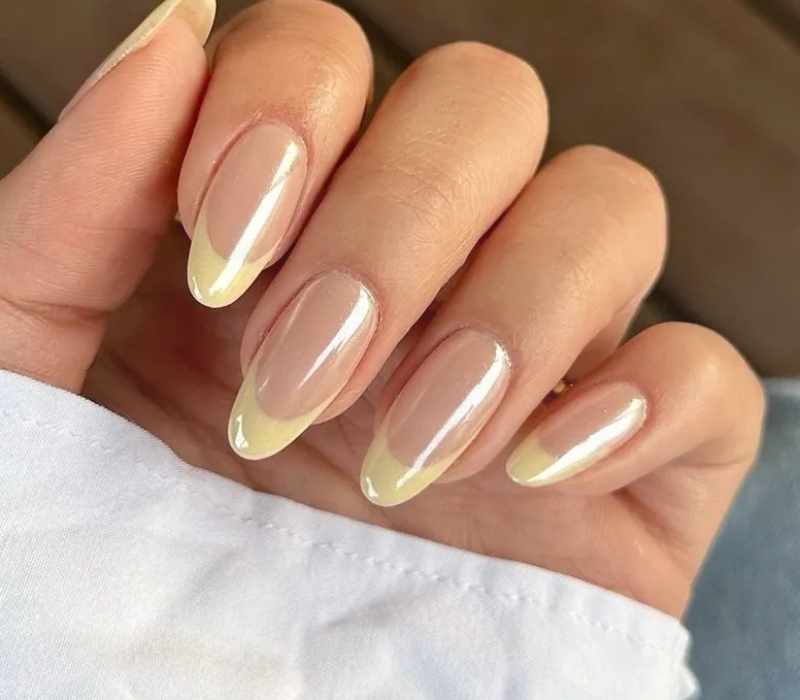
Glazed Frenchies
There’s something undeniably classy about a French tip, but when you add a glazed finish, it instantly becomes next level. This manicure is sleek, modern, and oh-so-chic! The glossy shine catches the light beautifully, making your nails look polished and expensive.
How to Achieve This Look
1️⃣ Prep & Base
Shape your nails and apply a sheer nude or milky base coat for that clean, natural vibe.
2️⃣ Paint the French Tips
Use white polish to create classic French tips—stick to thin, clean lines for a modern feel.
3️⃣ Apply the Glazed Top Layer
Finish with a chrome or pearl-effect top coat for that signature glazed shine.
4️⃣ Seal & Shine
Lock it all in with a clear, glossy top coat to enhance the glow and keep your mani long-lasting.
Pro tip: Use a chrome powder over your top coat (before it fully dries) for a smoother, salon-level glazed effect at home.
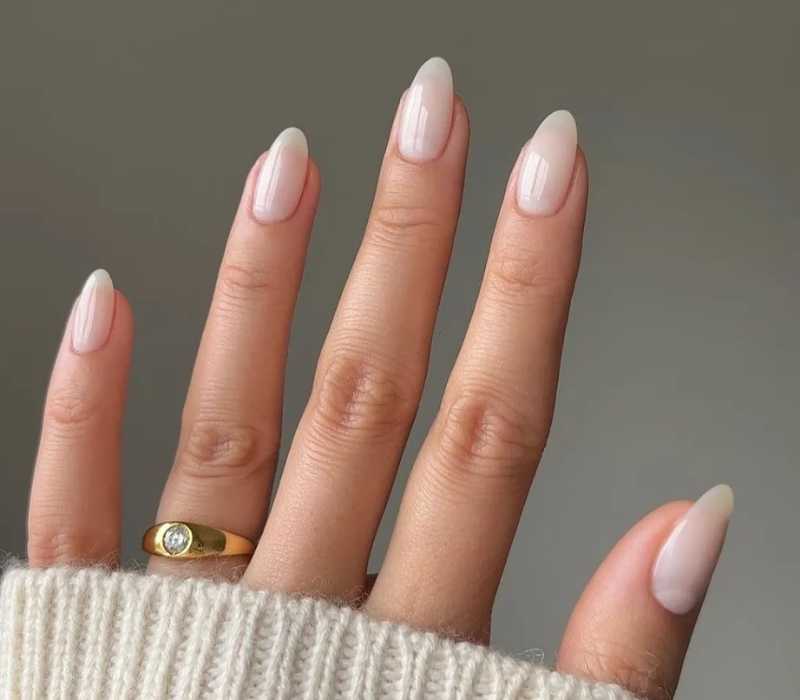
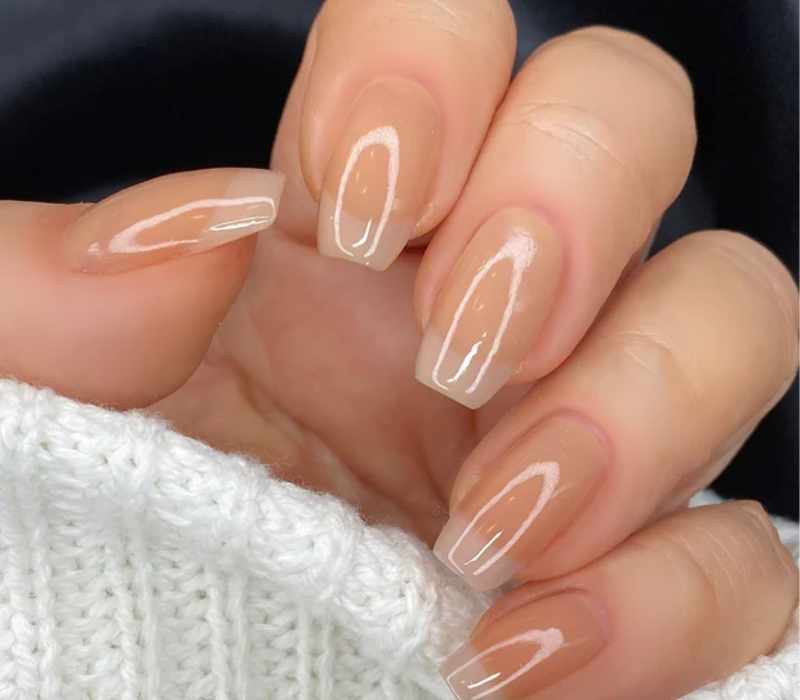
Milky Nude Gradient Nails
A milky nude ombre is proof that neutral nails don’t have to be boring. This gradient manicure softly blends various shades of nude, creating a seamless transition that feels effortlessly elegant. It’s understated yet makes a statement—a perfect balance of simplicity and creativity.
It’s the kind of manicure that makes you feel confident and put together no matter what.
How to Achieve This Look
1️⃣ Prep & Base Coat
Shape your nails and apply a clear or very light nude base coat to prep the surface.
2️⃣ Create the Gradient
Using a sponge, dab on layers of different nude shades—lightest near the cuticle, deepest at the tip. Blend gently to avoid harsh lines.
3️⃣ Smooth & Set
Apply a sheer milky nude polish over the gradient to soften and unify the look.
4️⃣ Top Coat for Gloss
Seal with a glossy top coat to add shine and protect the ombré finish.
Pro tip: Use a makeup sponge for the gradient application—it helps blend colors smoothly without streaks.
Sheer Nude Nails
If you’re all about effortless beauty, sheer neutral nails are the way to go. The barely-there polish gives your nails a clean, polished look without trying too hard. It’s that kind of manicure that makes your hands look naturally beautiful—soft, elegant, and timeless.
There’s something comforting about knowing your manicure will always match your vibe.
How to Achieve This Look
1️⃣ Shape & Buff
Start with clean nails. Shape them into your preferred style and gently buff the surface for a smooth finish.
2️⃣ Apply a Sheer Nude Polish
Choose a neutral polish with a sheer formula and apply 1–2 coats for a soft tint.
3️⃣ Top It Off
Finish with a clear top coat to boost shine and protect the polish from chipping.
Pro tip: For an ultra-natural finish, go for a polish that matches your skin tone or has a slight pink or beige tint to enhance your natural nail color.
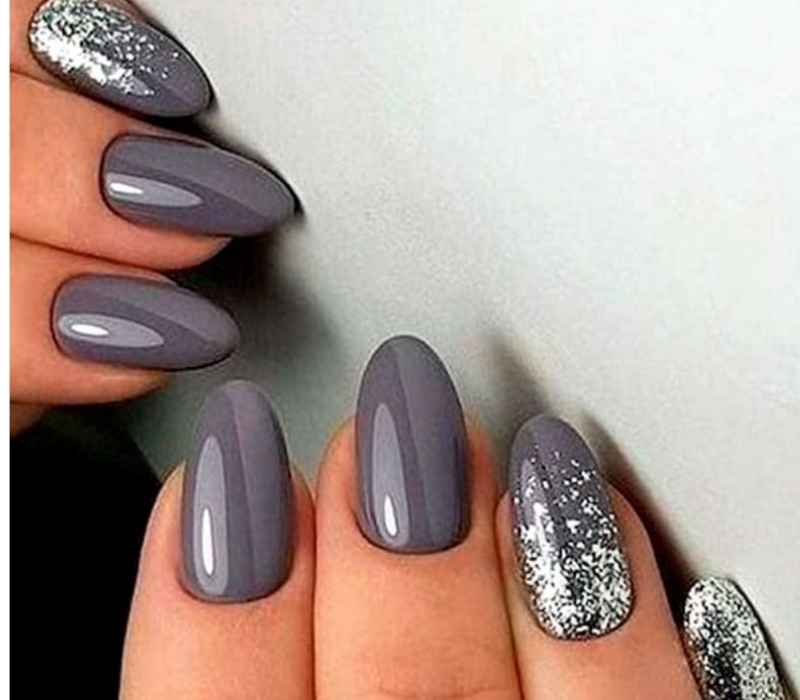
Grey Nails
There’s something effortlessly chic about moody grey nails—they work in any season and add a hint of sophistication to your look. Whether you’re dressing up or keeping it casual, this perfect shade goes with everything in your closet, making it a must-try.
How to Achieve This Look
1️⃣ Prep & File
Shape your nails and clean the surface. Apply a base coat to protect from staining.
2️⃣ Choose Your Grey
Pick a shade that matches your mood—light grey for a soft touch or dark grey for bold vibes. Apply 2 thin coats.
3️⃣ Seal with Shine
Add a glossy or matte top coat depending on your style for a smooth, long-lasting finish.
Pro tip: Pair grey nails with silver or gold rings to elevate the cool-tone aesthetic and add instant polish to your look.
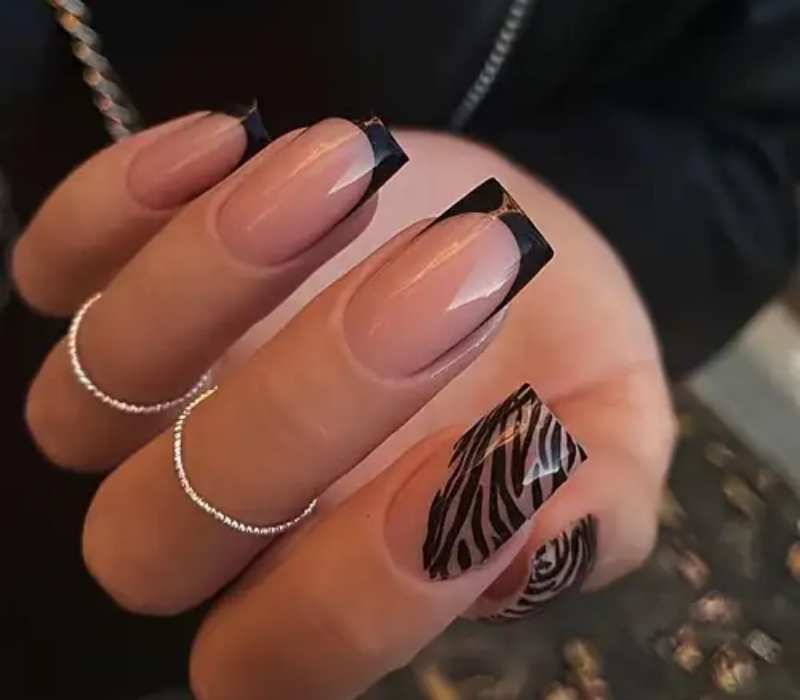
Nude with Zebra
A fresh take on nude nails, adding a wild twist with zebra print on an accent nail is a subtle yet fierce choice. It’s a fun way to keep your manicure neutral while still making a statement.
How to Achieve This Look
1️⃣ Start with Nude
Apply a base coat, then 1–2 coats of your favorite nude polish. Let it dry completely.
2️⃣ Add the Zebra Accent
Using black polish or a nail art pen, draw thin, wavy zebra lines on one or two accent nails. You can freehand or use stickers for precision.
3️⃣ Top Coat Time
Seal the look with a glossy top coat for extra shine and lasting wear.
Pro tip: Keep the zebra print on just one or two nails to keep the look modern and avoid overpowering the nude base.
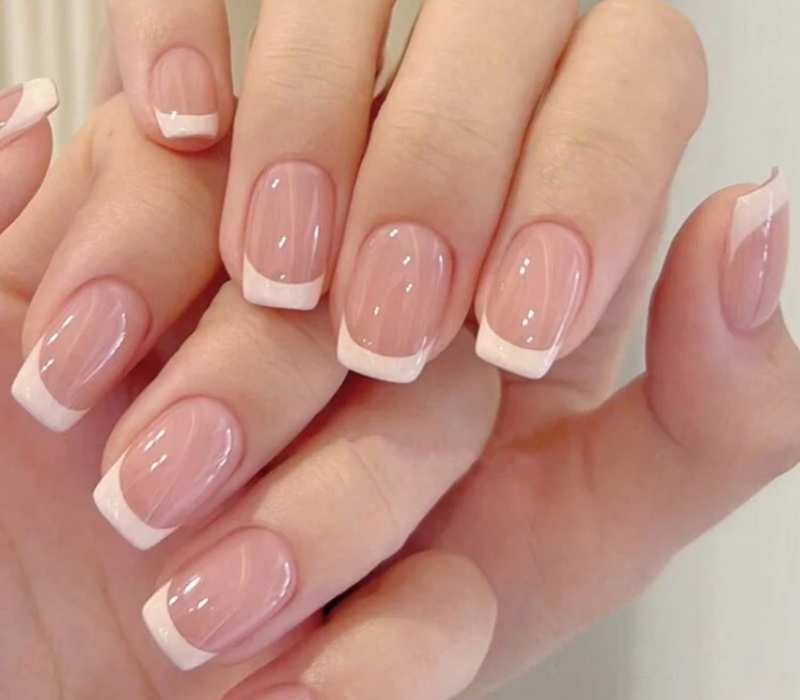
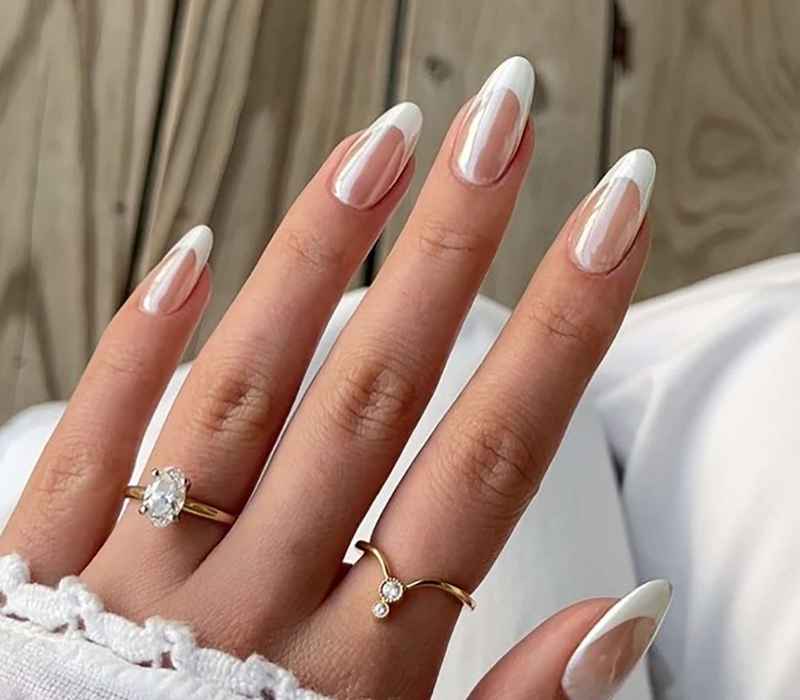
Classic French
A classic French manicure never goes out of style. With crisp white tips on a natural base, it’s the definition of elegance and simplicity, giving your hands a timelessly polished look.
How to Achieve This Look
1️⃣ Prep & Shape
File your nails into your preferred shape—square or oval work best. Clean the surface and apply a clear base coat.
2️⃣ Apply the Base Color
Choose a sheer nude or pale pink polish. Apply 1–2 coats and let it dry.
3️⃣ Paint the Tips
Use white polish or a French tip sticker guide to paint crisp tips. Keep the curve smooth and symmetrical.
4️⃣ Finish with Top Coat
Apply a glossy top coat to seal and enhance shine.
Pro tip: Use a fine brush or French tip stickers if you’re a beginner—precision makes all the difference in keeping it classic and clean.
If you are interested to know more about the best classic french tip nails then you must read this guide:
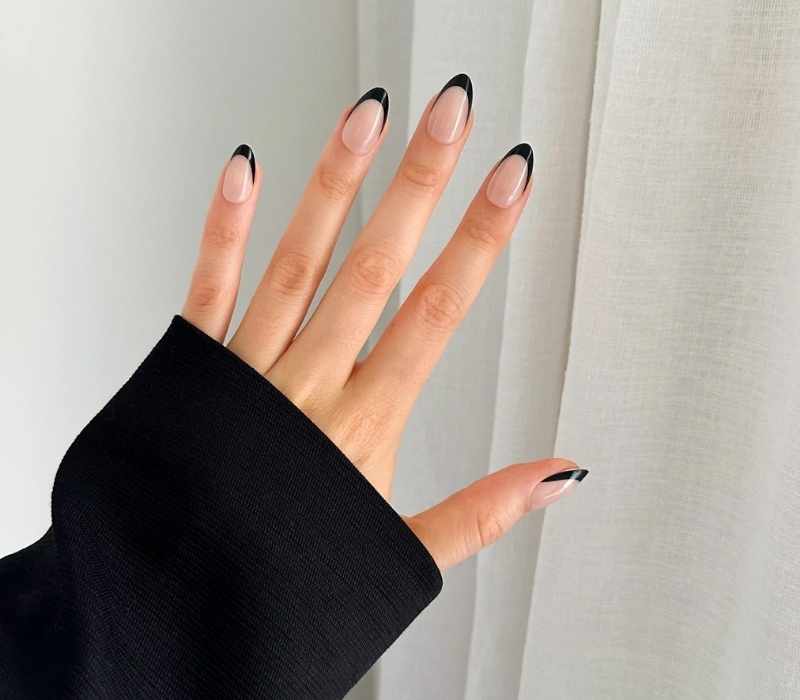
Black Skinny French
This Black French manicure makeover worth trying—black French tips are edgy yet sophisticated. This look is perfect for adding a little drama to your everyday style while still keeping it sleek.
How to Achieve This Look
1️⃣ Prep & Base
Start by shaping your nails and applying a sheer nude or milky base coat. Let it dry fully.
2️⃣ Create Skinny Tips
Using a thin nail art brush or striping tool, carefully paint skinny black tips. Keep the line fine and sharp for a clean, polished finish.
3️⃣ Top Coat Finish
Apply a clear, glossy top coat to seal the look and enhance shine.
Pro tip: To keep the tips symmetrical, mark small guide dots before painting the line—this trick helps you stay precise on both hands.
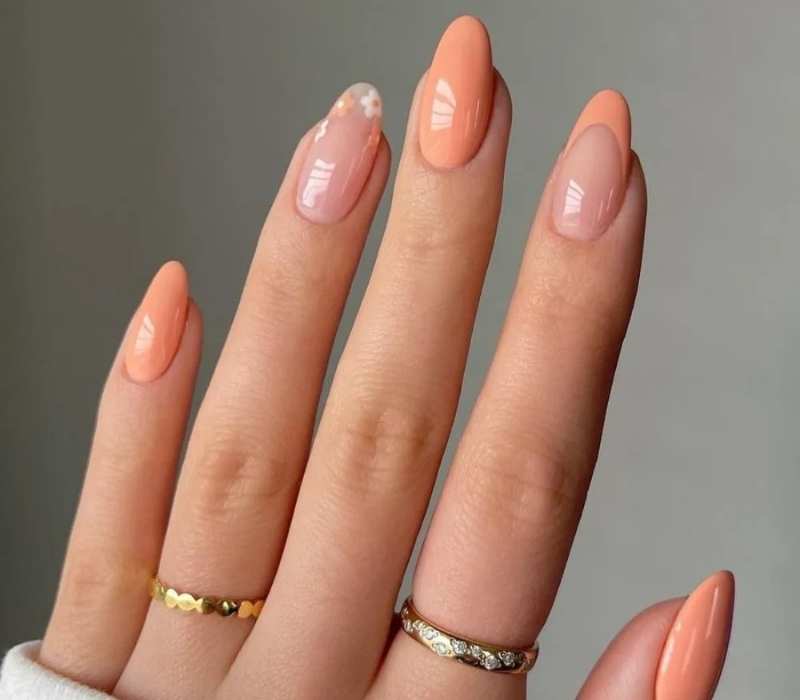
Pale Peach Nails
Soft and delicate, short peach nails with a white pearl accent are an elegant yet understated choice. This neutral category shade can be accessorized with pearls for an extra touch of glamour.
How to Achieve This Look
1️⃣ Prep & Shape
File nails short and rounded. Clean and buff the surface, then apply a nourishing base coat.
2️⃣ Apply the Peach Base
Use a pale peach polish (two thin coats for full color). Let each layer dry before applying the next.
3️⃣ Add Pearl Detail
Once dry, place a small adhesive pearl at the cuticle or center of one or two accent nails.
4️⃣ Seal with Top Coat
Finish with a high-shine top coat to lock in the design and add a soft gloss.
Pro tip: Use tweezers or a dotting tool to place pearls precisely and avoid smudging the polish.
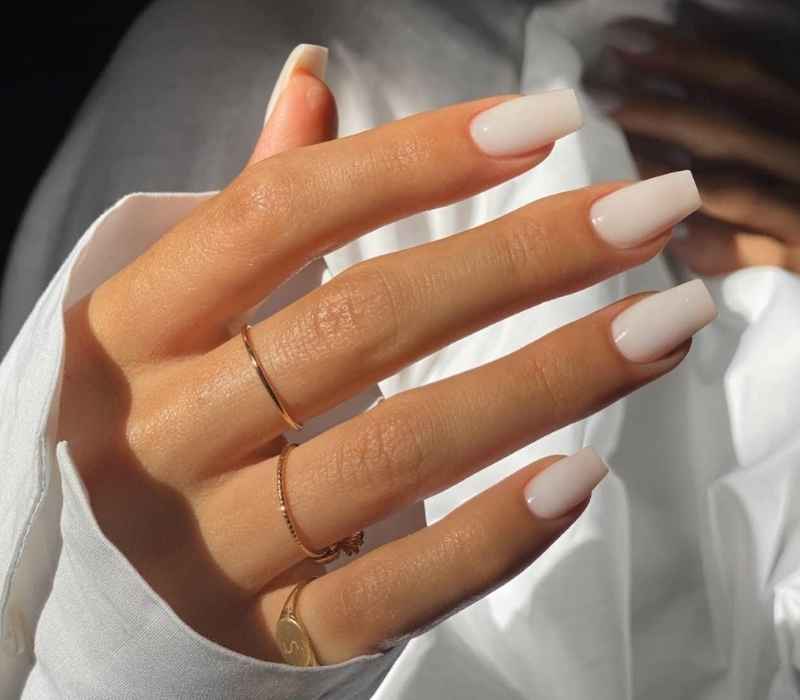
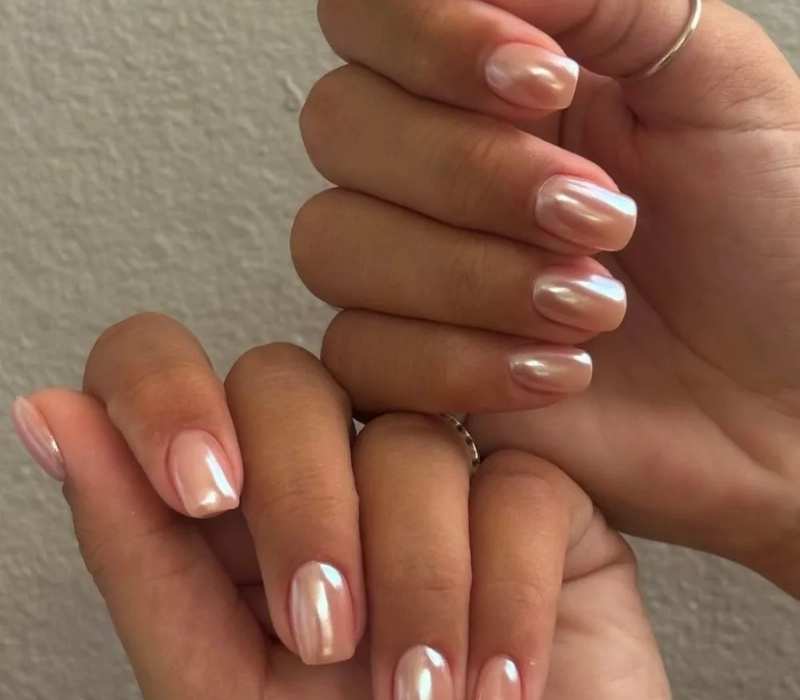
Milky White Nails
A crisp white manicure with a milky sheer finish gives your nails a clean yet delicate look. Unlike a fully opaque polish, this subtle style adds a fresh and natural feel.
How to Achieve This Look
1️⃣ Prep Your Nails
Start with clean, filed nails. Push back cuticles and apply a hydrating base coat.
2️⃣ Apply Milky White Polish
Choose a semi-sheer white polish. Apply 1–2 thin coats, letting each layer dry for a smooth finish.
3️⃣ Finish with Gloss
Seal the look with a high-shine top coat to enhance the milky glow and protect your manicure.
Pro tip: For an ultra-glassy look, cure each layer under a UV lamp if using gel polish. It makes the sheer finish even more flawless.
Baby Pink Nails
For a pretty, posh vibe, short sheer baby pink polish is the way to go. Apply just one or two coats for a soft, subtle manicure that enhances your natural nails beautifully.
How to Achieve This Look
1️⃣ Prep Your Nails
Shape your nails short and round. Clean and apply a clear base coat to protect your nails.
2️⃣ Apply Sheer Baby Pink Polish
Use a sheer baby pink polish and apply one or two light coats. Let each coat dry before applying the next for a smooth finish.
3️⃣ Seal with Glossy Top Coat
Finish with a shiny top coat to boost durability and add a polished shine.
Pro tip: Apply thin layers to avoid streaks and maintain the soft, sheer effect.
Read Also: 18 Pink Fall Nail Ideas That Are Too Pretty To Miss
Peach Chrome Nails
If you love a high-shine look, peach chrome short nails are perfect. With a glossy top coat and an iridescent finish, this manicure is nothing short of stunning.
How to Achieve This Look
1️⃣ Prep Your Nails
Start by shaping your nails short and smooth. Apply a clear base coat to protect your natural nails.
2️⃣ Apply Peach Base Color
Use a peach nail polish as your base. Apply 1–2 coats for an even, opaque finish.
3️⃣ Add Chrome Powder
Once dry (or cured if using gel), gently rub peach chrome powder over the nails for that signature metallic shine.
4️⃣ Seal with Glossy Top Coat
Finish with a glossy top coat to lock in the chrome effect and add extra durability.
Pro tip: Use a sponge applicator for the chrome powder to get an even, mirror-like finish without streaks.
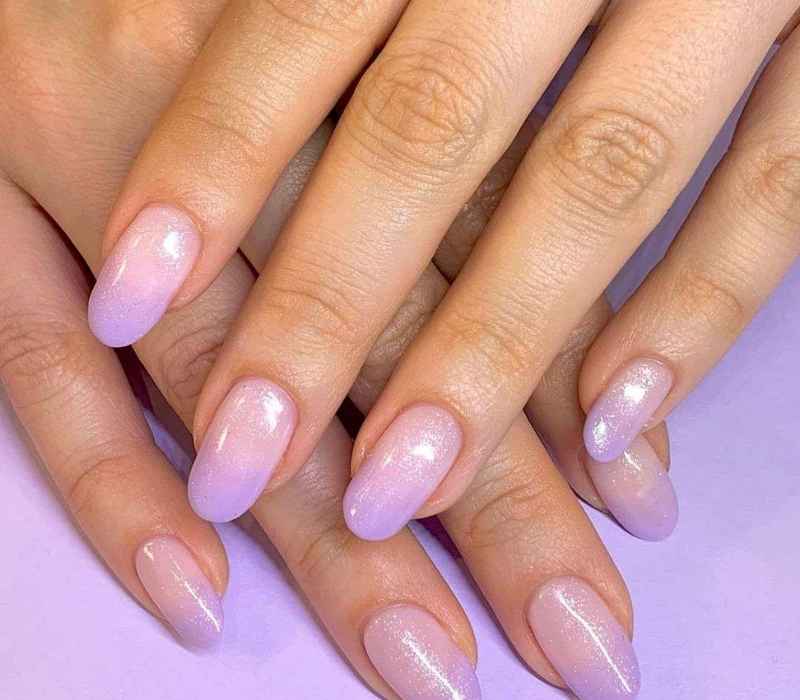
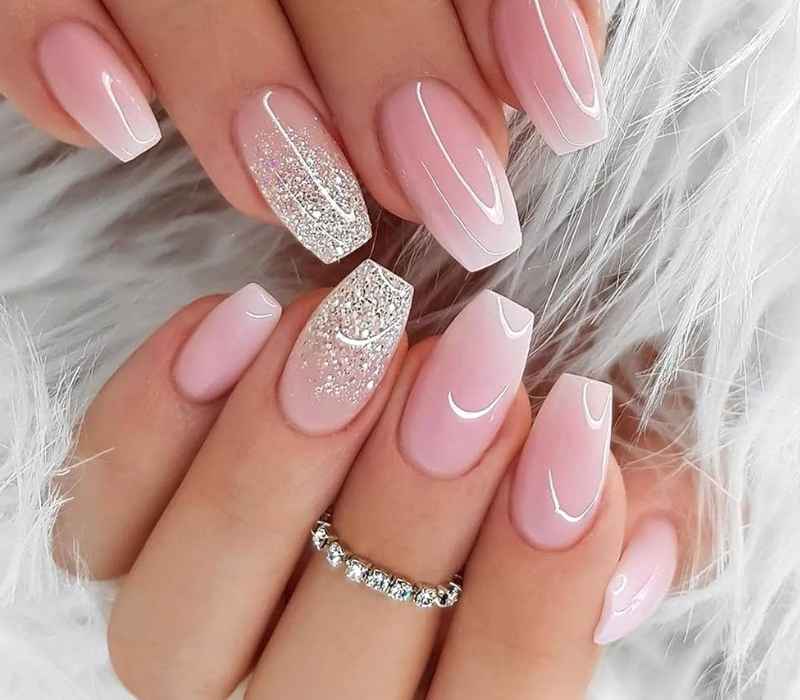
Gradient Pink & Lilac Nails
There’s something magical about a gradient from pink to lilac—it feels like a dreamy sunset painted right onto your nails. The soft, romantic transition between shades makes this style not only stunning but also Instagram-worthy. Whether you’re dressing up for a special occasion or just want a touch of elegance, this look is a perfect choice.
How to Achieve This Look
1️⃣ Prepare Your Nails
Shape and clean your nails, then apply a clear base coat to protect them.
2️⃣ Apply Base Color
Start with a light pink polish as your base color. Let it dry completely.
3️⃣ Create the Gradient
Using a makeup sponge, dab pink polish on one end and lilac polish on the other. Gently press the sponge onto your nails, blending the two colors to create a seamless gradient.
4️⃣ Clean & Seal
Clean up the edges with a brush dipped in nail polish remover, then finish with a glossy top coat for shine and durability.
Pro tip: Use a light hand when sponging to avoid harsh lines and get a soft, flawless gradient.
White Chrome
A chrome manicure is a must-try this summer, especially in white. The sleek, shiny, and modern finish makes it the ultimate pick for those who love chic sophistication. Whether in bright sunlight or under city lights, this reflective look will always stand out.
How to Achieve This Look
1️⃣ Prep Your Nails
Shape and buff your nails, then apply a clear base coat for smooth application.
2️⃣ Apply White Base
Paint your nails with a solid white polish. Let it dry completely for the best chrome effect.
3️⃣ Add Chrome Powder
Use a white chrome powder and gently rub it onto your nails with a sponge applicator or silicone tool until you get a smooth, reflective surface.
4️⃣ Seal with Top Coat
Finish with a no-wipe glossy top coat to lock in the shine and increase durability.
Pro tip: Make sure the white polish is fully dry before applying chrome powder to avoid patchiness and get a flawless finish.
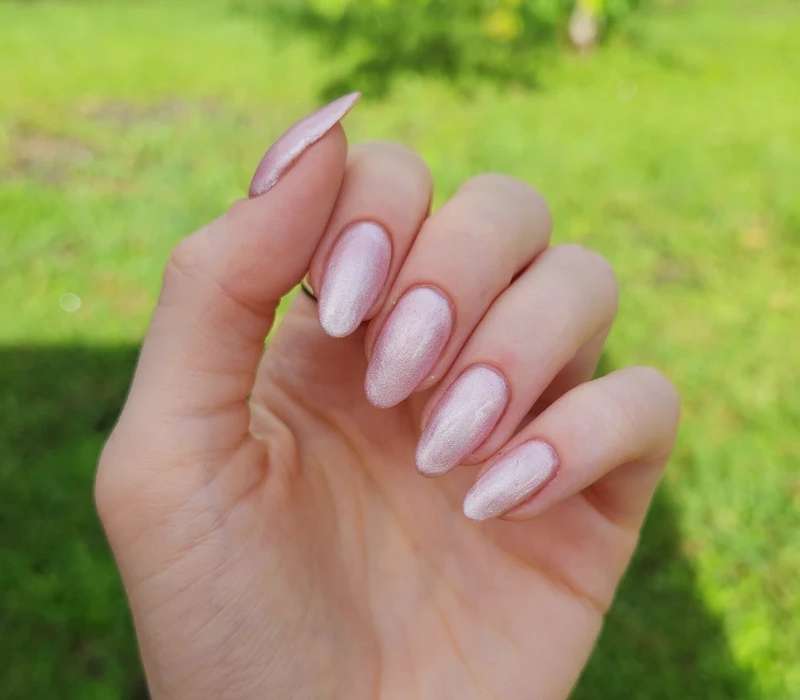
Fleshy Nude Aura
For a natural yet enhanced look, go for fleshy, neutral, aura nails. This style brings life to your manicure with a subtle blend of pink and nude, creating a glow that looks effortlessly natural—but even better. It’s the perfect balance between minimalism and elegance.
How to Achieve This Look
1️⃣ Prep Your Nails
Start by shaping and buffing your nails. Clean them well before applying any polish.
2️⃣ Choose the Right Base
Pick a sheer nude or soft pink polish with a creamy or slightly translucent finish. Apply two thin coats for a natural glow.
3️⃣ Add Aura Effect
To get that subtle aura glow, lightly dab a soft shimmer or pearl polish on the center of each nail and gently blend it out.
4️⃣ Seal with Top Coat
Use a glossy top coat to finish. This seals the color and adds a smooth, radiant shine.
Pro tip: Use thin layers of polish and let each dry fully to keep the look soft and natural without streaks.
Marble White
If you’re looking for an ideal, neutral manicure with a luxurious touch, marble nude nails are a perfect choice. The subtle marbling effect adds a hint of luxury to the clean base, making it a stylish yet sophisticated option for summer or any season.
How to Achieve This Look
1️⃣ Prepare Your Nails
Start with clean, shaped nails. Apply a base coat to protect your nails and create a smooth surface.
2️⃣ Apply Base Color
Use a sheer white or very light nude polish as the base. Apply two thin coats and let them dry completely.
3️⃣ Create Marble Effect
On a small palette, mix a few drops of white, grey, and nude polish. Use a thin brush or toothpick to swirl the colors gently. Lightly dab or brush this mixture onto your nails for a subtle marbled look.
4️⃣ Finish with Top Coat
Seal the design with a glossy top coat to add shine and protect your marble art.
Pro tip: Work quickly with the marbling colors while they’re still wet to blend smoothly without harsh lines.

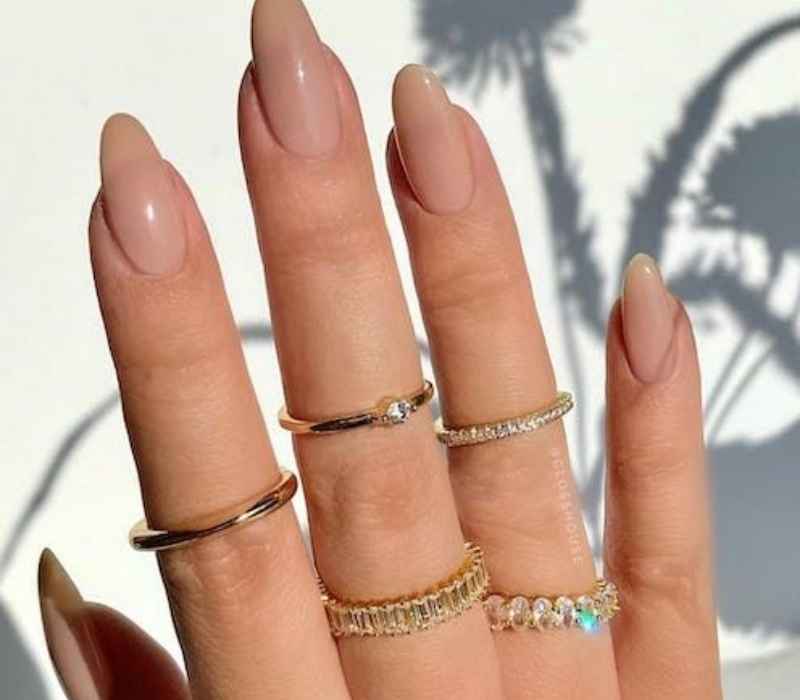
Nude Gem Nails
A glossy, nude base with silver gems can take your manicure to the next level. To achieve an ultra-shiny finish, carefully decorate your nails with a small jewel at the tip and cuticle. This creates a balanced look that is both minimal and eye-catching.
How to Achieve This Look
1️⃣ Prep Your Nails
Start with clean, shaped nails and apply a clear base coat to protect them.
2️⃣ Apply Nude Polish
Choose a glossy nude polish and apply two thin coats. Let it dry completely for a smooth finish.
3️⃣ Add Silver Gems
Using nail glue or a top coat, carefully place small silver gems at the tips and near the cuticles of each nail. Use a dotting tool or tweezers for precision.
4️⃣ Seal the Design
Finish with a glossy top coat to secure the gems and add extra shine.
Pro tip: Use a thin layer of top coat around the gems to keep them in place longer without dulling their sparkle.
Abstract Nude Nails
For a trendy twist, nude nails with white accent designs offer a fresh take on minimalism. A peachy polish as a base combined with abstract details adds a unique flair, making your nails a true work of art.
How to Achieve This Look
1️⃣ Prepare Your Nails
Clean and shape your nails, then apply a clear base coat for smooth application and protection.
2️⃣ Apply Peachy Nude Base
Use a peach-toned nude polish and apply two even coats. Allow drying time between layers for a flawless finish.
3️⃣ Create Abstract White Designs
With a thin nail art brush or a fine detail tool, paint random white shapes or lines on each nail. Keep it minimal and freeform for that abstract feel.
4️⃣ Seal with Top Coat
Finish with a glossy top coat to protect your design and add shine.
Pro tip: Use quick-dry polish for the white details to avoid smudging and keep your abstract art crisp.

Best Neutral Nail Colors for a Summer Look In 2025

“Your nails are a way to speak your style without saying a word!”As a nail expert, I’ve seen how pastel tones and a glossy finish can instantly elevate any look.
Whether you prefer muted colors for everyday wear or want to embrace trendy neutrals, the right nail colors create a polished and timeless aesthetic. “Great nails, great mood, great day!” Stay stylish, modern, and chic with understated beauty that enhances every outfit and event!
White Nails
Nothing feels as clean and crisp as a fresh coat of white nail polish. Whether you prefer milky white for a sheer and soft finish or go for a bold opaque look, white nails are an easy go-to for any season. Sporting this timeless color year-round gives a seasonless and effortlessly beautiful appeal.
How to Achieve This Look
1️⃣ Prep Your Nails
Start with clean, shaped nails and apply a base coat to protect and smooth the surface.
2️⃣ Choose Your White Polish
Pick a white polish based on your preference—milky for soft and sheer or opaque for a strong statement.
3️⃣ Apply White Polish
Paint two thin coats for even coverage. Allow each coat to dry well before applying the next.
4️⃣ Finish with a Top Coat
Seal the color with a glossy top coat to boost shine and extend wear.
Pro tip: If your white polish tends to streak, use a makeup sponge to dab it on for a smoother, more even finish.
Ivory Nails
For those who love neutral shades, ivory sits perfectly between beige and white. This nail polish shade is an excellent alternative to a bright white manicure, offering softer tones that enhance a natural, elegant look. Whether you keep it simple or pair it with delicate designs, ivory is a chic and timeless choice.

Black Nails
Who said black is just for Halloween? A black French manicure in matte, short and glossy, or long and sleek styles is a total game-changer. No wonder it’s a fan favorite! This versatile shade adds a chic, bold touch to any look, proving that black isn’t just edgy—it’s downright stylish.
How to Achieve This Look
1️⃣ Prep Your Nails
Clean, file, and buff nails to create a smooth base. Apply a clear base coat to protect your nails.
2️⃣ Apply Ivory Polish
Choose a creamy ivory polish. Apply two thin coats for an even and smooth finish. Let each coat dry fully.
3️⃣ Seal with Top Coat
Finish with a shiny top coat to enhance durability and add a soft glow.
Pro tip: For a flawless finish, apply polish in thin layers and avoid flooding the cuticles to keep the look neat and professional.

Brown Nails
Chocolate brown nails are the definition of rich and sophisticated beauty. Whether you prefer cappuccino hues or dark chocolate, this trending neutral works in any season. Once just a fall manicure staple, brown polish is now a year-round favorite because it complements literally everything with ease. If you are interested in Brown Nails as I am then you must take a look to this guide:

Tan Nails
If you love a natural vibe, tan nail polish is the perfect choice. This popular shade requires little effort yet delivers a stunning result. Sometimes, just one coat is enough, depending on the depth of the pigment. Whether you go for a short matte finish or a glossy shine, tan nails suit everyone beautifully.
How to Achieve This Look
1️⃣ Prepare Your Nails
Start with clean, filed nails. Apply a base coat to protect your nails and help the polish last longer.
2️⃣ Apply Tan Polish
Depending on the polish’s pigmentation, one or two coats of tan polish will do. Choose matte or glossy finish based on your style.
3️⃣ Seal the Look
Use a top coat—matte or shiny—to lock in the color and add durability.
Pro tip: If you want a smooth, even color, apply thin coats and let each layer dry completely before adding the next.
Beige Nails

A beige manicure is a classic choice for those who love a neutral yet sophisticated nail look. This soft, muted shade works beautifully, whether you prefer a sheer polish for a natural glow or an opaque lacquer for a bold touch. The beauty of beige nails lies in their simplicity and style, making them perfect for any occasion.
How to Achieve This Look
1️⃣ Prep Your Nails
Start with clean, shaped nails. Apply a base coat to protect your nails and ensure smooth polish application.
2️⃣ Apply Beige Polish
Choose a beige shade that suits your skin tone. Apply one or two coats depending on your desired opacity, letting each layer dry fully.
3️⃣ Finish with a Top Coat
Seal the manicure with a glossy or matte top coat for a long-lasting, flawless finish.
Pro tip: For a flawless look, apply thin coats of polish and let each dry completely before the next layer.
Light Pink
For fans of minimal manicures, light pink polish is a must-have in any routine. A sheer or semi-sheer finish keeps nails effortless while adding a polished vibe. This pale shade is neutral yet glossy, making it perfect for anything from a casual brunch to a formal event. No matter the setting, light pink nails always look perfectly manicured.
How to Achieve This Look
1️⃣ Prep Your Nails
Clean and shape your nails, then apply a base coat to protect them and help the polish last longer.
2️⃣ Apply Light Pink Polish
Choose a sheer or semi-sheer light pink polish. Apply one or two thin coats, allowing each to dry fully for that natural, glossy finish.
3️⃣ Seal with Top Coat
Finish with a clear top coat for extra shine and durability.
Pro tip: Applying thin layers helps avoid streaks and keeps the light pink color looking smooth and natural.
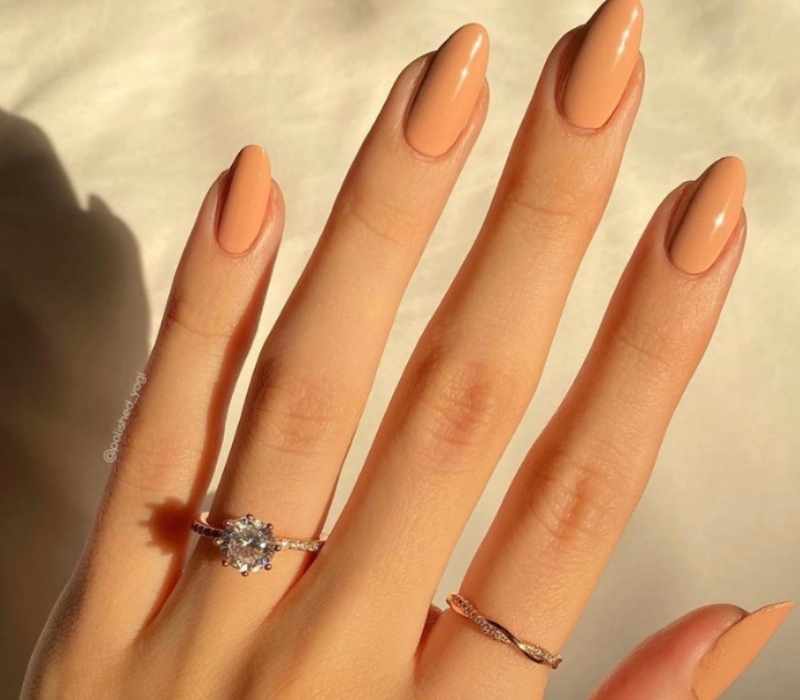
Peach Nails
Unlike bold orange shades tied to certain seasons, peach nail polish is a year-round favorite. With soft nude undertones, this creamy hue gives a sun-kissed glow. Whether you choose a sheer, opaque, shimmery, or chrome topper finish, it blends warmth and charm effortlessly. Its versatility makes it a top pick for those who want a chic, adaptable manicure.
How to Achieve This Look
1️⃣ Prepare Your Nails
Start by cleaning, shaping, and applying a base coat to protect your nails and ensure smooth polish application.
2️⃣ Apply Peach Polish
Choose your favorite peach polish—sheer for a light glow or opaque for full coverage. Apply 2 thin coats, letting each dry properly.
3️⃣ Add Your Favorite Finish
Top with a shimmer or chrome top coat if you want extra shine and dimension.
Pro tip: Use thin layers to avoid clumps and get a smooth, even peach glow that lasts longer.
Mauve Nails
A mauve manicure is an elegant way to achieve a subdued yet sophisticated nail look. The lighter the shade, the more neutral it appears, making it perfect for any outfit. With pink or grey undertones, mauve nails offer a modern and stylish twist. For extra glamour, finish it with an extra glossy topcoat to keep your muted look fresh.
How to Achieve This Look
1️⃣ Prep Your Nails
Clean and shape your nails, then apply a base coat to protect them and help the polish last longer.
2️⃣ Apply Mauve Polish
Choose a mauve shade with pink or grey undertones. Apply 2 thin coats, allowing each to dry fully for an even color.
3️⃣ Seal with Gloss
Finish with a shiny topcoat to add depth and keep your nails looking fresh and polished.
Pro tip: For a flawless finish, use thin coats and avoid rushing the drying process to prevent smudging.

And there you have it—endless ways to rock neutral nails while keeping your manicure stylish and timeless! Whether you’re into soft, sheer finishes or bold, modern twists, there’s a perfect shade and design for everyone.
Which style are you loving the most? Let me know in the comments, and don’t forget to show off your mani by sharing it on social media and dont forget to share the post as you know sharing is caring.