
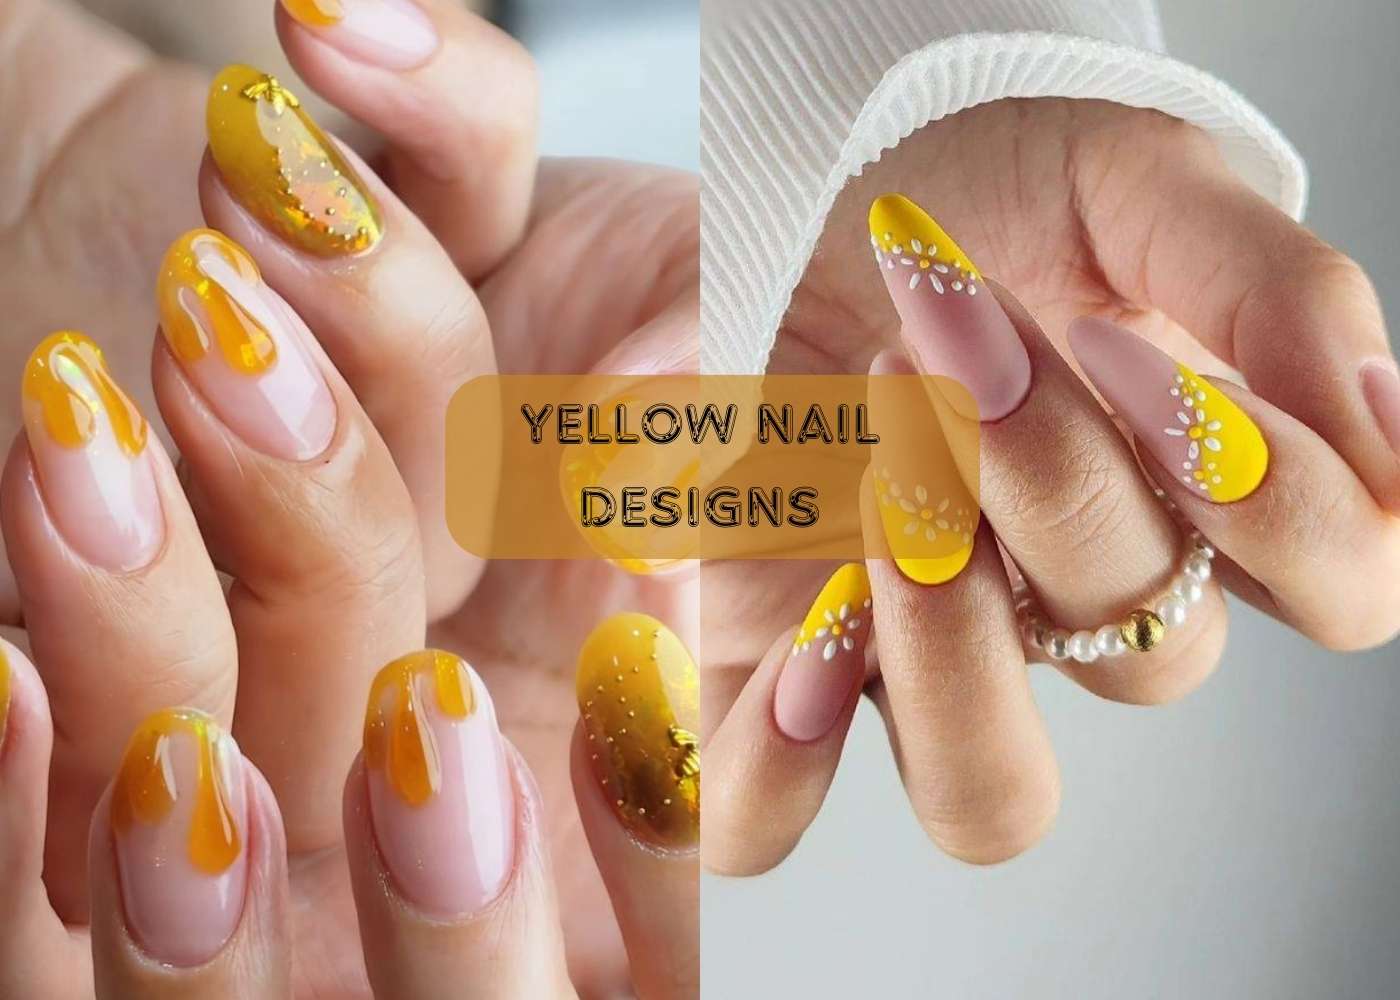
Looking for the ultimate summer nail inspiration?
Yellow is the color that turns heads—and hearts. Summer is here, and it’s time your nails joined the sunshine party.
Nothing beats the warm glow of yellow nail designs to bring out the happiness of the season. I stumbled on a blog post with 37 insanely cute and dazzling yellow nail art designs, and honestly, I didn’t expect to fall in love with every single one.
From soft pastels to bold neons, and from ombre fades to floral tips and minimalist accents, each yellow nail design felt like a mini vacation.
Yellow isn’t just a color—it’s a mood. And on nails, it’s a total splash of joy.
Whether you’re trying fresh yellow nail art designs or just switching things up for the season, these sunny picks will brighten your look and your day.
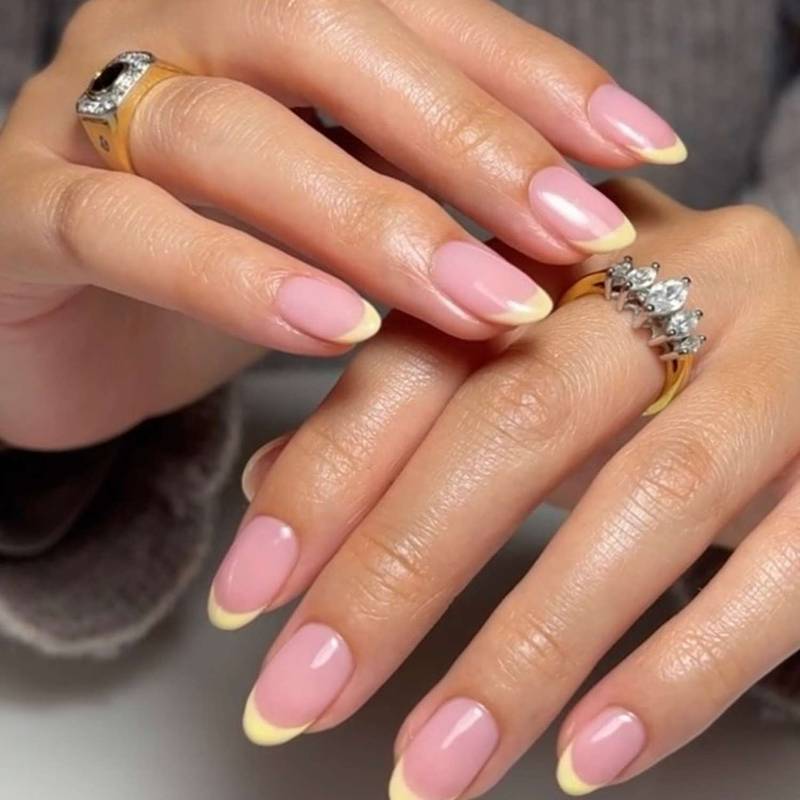
Elegant Pastel Yellow Nails for Summer
Pastel yellow nails are a stylish summer choice—soft, elegant, and bold. A short stiletto manicure with swirly lines offers a fresh, unique perspective. This design perfectly balances fun and class, making your nails shine in the sun without being too loud.
How to Achieve Elegant Pastel Yellow Nails
1️⃣ Prep Your Nails
Shape your nails into a short stiletto and gently buff the surface. Clean and push back your cuticles for a neat base.
2️⃣ Apply a Base Coat
Start with a clear base coat to protect your nails and help the color stay on longer.
3️⃣ Paint with Pastel Yellow
Apply two thin layers of pastel yellow polish. Let each coat dry before applying the next for a smooth, streak-free finish.
4️⃣ Add Swirly Line Art
Use a fine detail brush or nail art pen to draw delicate swirls in white or a soft contrast color. Keep it minimal for a chic vibe.
5️⃣ Top It Off with Gloss
Finish with a glossy top coat to add shine and lock in your design.
Pro tip: Add a tiny touch of shimmer or foil on one swirl for a subtle but stunning summer glow.
Read Also: 20+ Summer Nail Designs That Will Turn Heads In 2025!

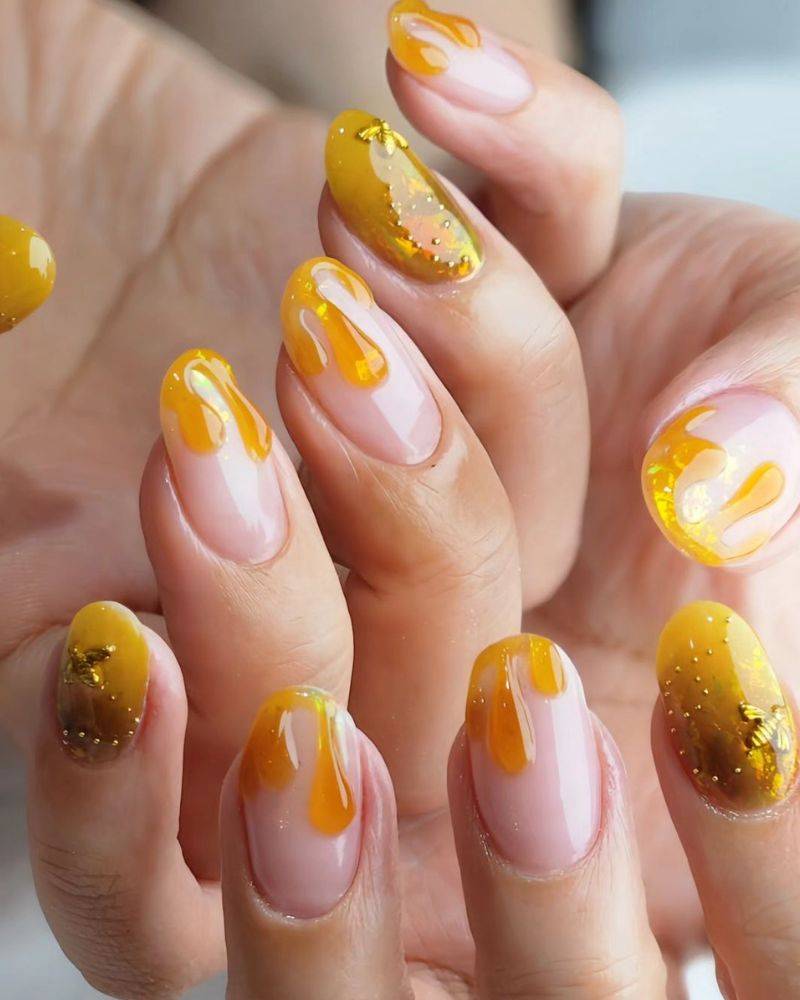
Sweet Honey Dripping Nail Art Ideas
Yellow nails with 3D honey dripping create a playful, creative look. This bold nail art blends texture and flair, ideal for festivals or everyday wear. It’s a sweet idea that’s eye-catching and fun, sure to earn compliments.
How to Achieve This Look
1️⃣ Prep Your Nails
Shape and buff your nails, then gently push back cuticles. Clean nails mean longer-lasting art. Almond or square shapes work great here.
2️⃣ Apply a Yellow Base
Use a bright or pastel yellow polish for a cheerful, honey-inspired look. Apply two thin coats and let them dry fully.
3️⃣ Create the Honey Drip
Use clear builder gel or 3D nail gel. Add small beads of gel near the cuticle or tip, then let them slightly flow down to mimic real honey drips. Cure under a UV/LED lamp.
4️⃣ Add Warm Golden Tint (Optional)
For a more realistic effect, mix in a bit of gold or amber gel. It gives the “honey” a sweet, glowing finish.
5️⃣ Seal It In
Apply a glossy top coat to lock in the design and give it that fresh, sticky shine.
Pro tip: Add a tiny bee charm or hexagon accent to one nail for a fun, themed detail that ties the whole look together.
Playful Yellow Nail Art Designs Full of Energy
Bright yellow nail art featuring lightning bolts, and finish lines expresses a fun, fast-paced personality. This style is perfect for those who want playful, colorful nails that grab attention and spread positive vibes.
Ready to let your nails show off your boldest side? Try this vibrant design and bring some extra fun to your fingertips!
How to Achieve This Look
1️⃣ Prep and Shape Your Nails
Start with clean, trimmed nails. Round or squoval shapes work best for a playful look. Buff the surface and push back cuticles.
2️⃣ Apply a Bright Yellow Base
Choose a sunny, bright yellow polish. Apply two thin coats and let each layer dry completely for a smooth, bold color.
3️⃣ Add Fun Nail Art
Use nail stickers or a fine brush to add lines, lightning bolts, or checkered flag designs. You can mix and match across fingers for a fun, random layout.
4️⃣ Use Black and White Accents
Add contrast with white outlines or small doodles to highlight the playful elements and keep things dynamic.
5️⃣ Finish with a Glossy Top Coat
Seal your design with a shiny top coat to protect the art and boost vibrance.
Pro tip: If you’re not great at freehand art, use nail stamps or decals—they make this look super easy and beginner-friendly.
READ ALSO: Why Are White Nail Designs the Hottest Trend in 2025?
Short Yellow Nails Design
Short yellow nails don’t mean boring. In fact, this mustard vibe is a bold summer and autumn favorite when paired in the correct combination. This manicure idea works wonders for all the short nail girlies out there. It’s simple but elegant, and with the right design, your look can totally stand out in any season.
How to Achieve This Look
1️⃣ Prep and Shape Your Short Nails
Trim your nails evenly and file into a soft square or rounded shape. Gently buff the surface and clean up the cuticles.
2️⃣ Apply a Base Coat
Always start with a clear base coat to protect your natural nails and make the polish last longer.
3️⃣ Paint with Mustard Yellow
Choose a mustard or warm-toned yellow shade. Apply two thin coats for full coverage, letting each layer dry completely.
4️⃣ Add Minimal Detail (Optional)
If you want a little extra flair, try a tiny gold dot, stripe, or matte finish on one or two accent nails.
5️⃣ Finish with a Top Coat
Seal your look with a glossy or matte top coat, depending on the vibe you want.
Pro tip: Mustard yellow pairs beautifully with gold rings—keep your nail art minimal and let your accessories shine.
READ AlSO: How to Get the Perfect Spring Nails in 2025?
Summer Yellow Nails with a Pop
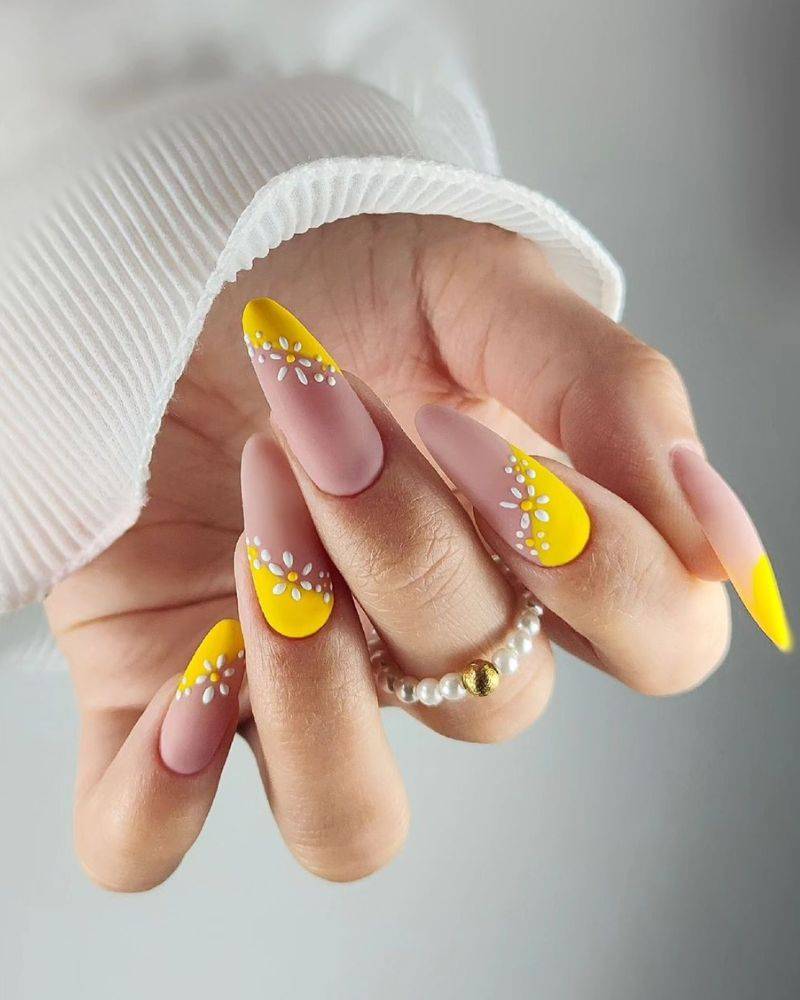
If this yellow nail design doesn’t scream summer, I don’t know what does! This half-nail design, combined with little flower art on a matte nude base, is the perfect way to show elegance with a splash of boldness. Everything about this look—from the color to the finish—gives off major summer nail designs energy. It’s a great way to pop without trying too hard.
How to Achieve This Look
1️⃣ Prep Your Nails
Shape your nails into a natural round or almond. Buff the surface and push back the cuticles for a clean start.
2️⃣ Apply a Matte Nude Base
Use a soft nude polish and finish with a matte top coat for that velvety look. Let it dry fully before adding details.
3️⃣ Add Half-Yellow Tips
Using tape or a nail guide, paint just the top half of each nail with a bright yellow polish. Keep the line clean and sharp.
4️⃣ Create Simple Floral Accents
Add tiny white or yellow flowers near the base or side of one or two nails using a dotting tool or nail stickers.
5️⃣ Seal It In
Use a matte top coat again to keep the finish consistent and lock in your floral art.
Pro tip: To make the flowers pop more, add a small gold dot in the center—this tiny detail makes a big difference.
READ ALSO: Trendy Neutral Summer Nails for a Classy Look
Fun Summer Yellow Nails
Back in the beauty department, I discovered that yellow nail art can be more fun than expected. Though it’s often seen as a scary color to wear in day-to-day life, giving it a fair chance can totally change your style. This is a good example of how bright yellow nails bring playful energy. If you love color, this one’s for you.
This cheerful look shows what a bold polish can do—it adds joy, confidence, and personality to your nails. It’s a little style fight that’s worth winning. One of the boldest summer nail designs, it’s a look that turns heads.
How to Achieve This Look
1️⃣ Shape and Prep Your Nails
File your nails into your preferred shape—square, round, or almond. Buff the surface and clean up the cuticles for a neat base.
2️⃣ Apply a Bright Yellow Polish
Choose a vibrant yellow that suits your skin tone. Apply two thin coats for smooth coverage, letting each coat dry before the next.
3️⃣ Add a Fun Accent (Optional)
Make it extra fun by adding smiley faces, dots, or colorful tips to one or two nails. Nail stickers or simple hand-drawn shapes work great.
4️⃣ Finish with a Glossy Top Coat
Seal the look with a shiny top coat to make the yellow pop even more and protect your polish.
Pro tip: Pair these nails with fun summer accessories—like rings or stacked bracelets—to amplify the playful vibe.
Soft Pastel Yellow Nail Designs
Using a pretty, light yellow polish might not pop at first glance, but pair it with flower art—especially red—and you get a touch of artistic charm. It takes talent to recreate this kind of manicure, but the result is totally worth it. You can wear it to bless your next 2ish weeks with a calm, elegant vibe.
It’s one of those summer nail designs that whispers instead of shouts. The soft tone and subtle details offer a relaxed but trendy look perfect for warmer days or even early fall.
How to Achieve This Look
1️⃣ Prep Your Nails
File your nails into a natural shape like oval or round. Buff gently and clean your cuticles for a smooth base.
2️⃣ Apply Pastel Yellow Polish
Choose a light pastel yellow and apply two thin coats. Let each coat dry fully to avoid streaks.
3️⃣ Add Red Flower Details
Use a fine brush or nail art pen to paint one or two lines. Keep the design simple and spaced out for a delicate effect.
4️⃣ Seal with a Clear Top Coat
Finish with a glossy or satin top coat to protect your nail art and keep it looking fresh.
Pro tip: If painting flowers is tricky, try floral nail stickers or decals—they save time and look just as lovely.
If you are interested in light shades nail designs then you must checkout this article:
Soft Pastel Yellow Nail Designs
This yellow manicure instantly takes me to a hot summer day with a cold stick of ice cream in hand—yes, that one. The pastel pink is a great fit for the soft yellow shade, blending comfort with charm in the best way.
If you’re into pastel polish and effortless flair, this is one of the sweetest summer nail designs to try. It gives your nails a breezy, balanced feel for sunny weekends or casual moments. Try it—you’ll fall in love with the vibe.
How to Achieve This Look
1️⃣ Prep Your Nails
Shape your nails to a soft square or rounded edge. Buff and clean the nail surface for smooth application.
2️⃣ Apply Pastel Yellow and Pink
Paint half your nails with pastel yellow and the other half with pastel pink. Use two thin coats for even coverage, letting each dry fully.
3️⃣ Add Simple Accent Details (Optional)
For extra flair, add small dots or tiny hearts in contrasting colors on one or two nails.
4️⃣ Seal with a Glossy Top Coat
Finish with a clear glossy top coat to add shine and protect your manicure.
Pro tip: Switch up the pattern—try alternating colors on each nail or create a diagonal split for a fresh twist.
Happy Yellow Nails
When you think about happy yellow nails, it’s easy to see how this bright color can make you smile even after a bad couple of days. I’ve noticed that a cheerful yellow manicure can lift your mood more often, adding a fresh burst of joy to your day.
Nail experts say yellow triggers positivity, making it the perfect pick if you want to brighten your look and your spirit.
How to Achieve This Look
1️⃣ Prep Your Nails
Start with clean, shaped nails—round or squoval shapes work well. Gently buff and push back cuticles for a smooth canvas.
2️⃣ Apply a Bright Yellow Polish
Choose a vibrant yellow shade that suits your skin tone. Apply two thin coats, letting each dry completely for even coverage.
3️⃣ Keep It Simple or Add Fun Accents
For a classic happy look, keep nails all yellow. Or add small smiley faces or tiny dots on accent nails to enhance the cheerful vibe.
4️⃣ Seal with a Glossy Top Coat
Finish with a shiny top coat to boost shine and make your manicure last longer.
Pro tip: Pair happy yellow nails with light, cheerful outfits to amplify the feel-good energy.
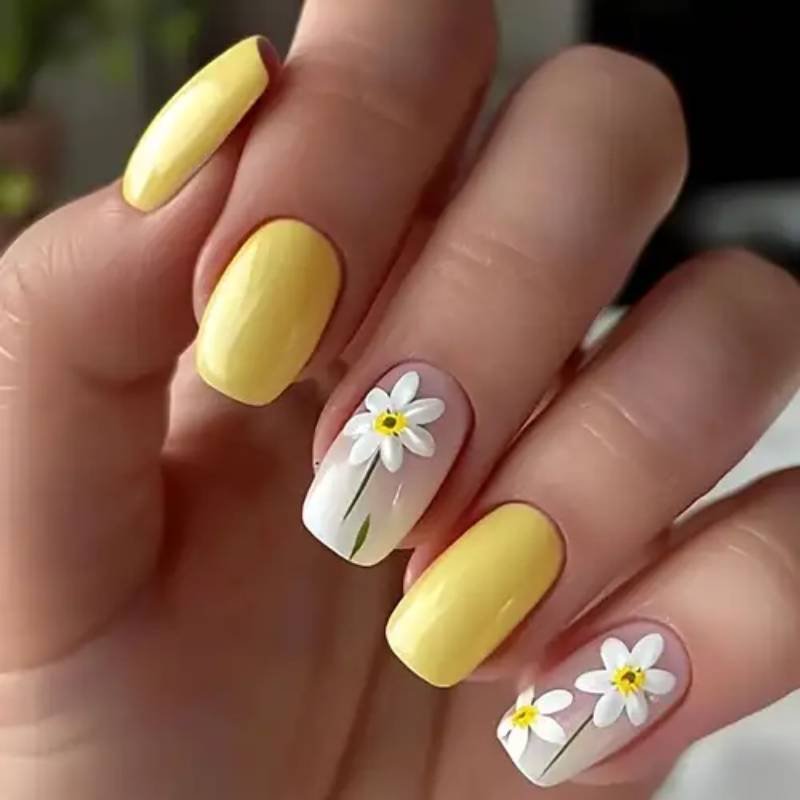
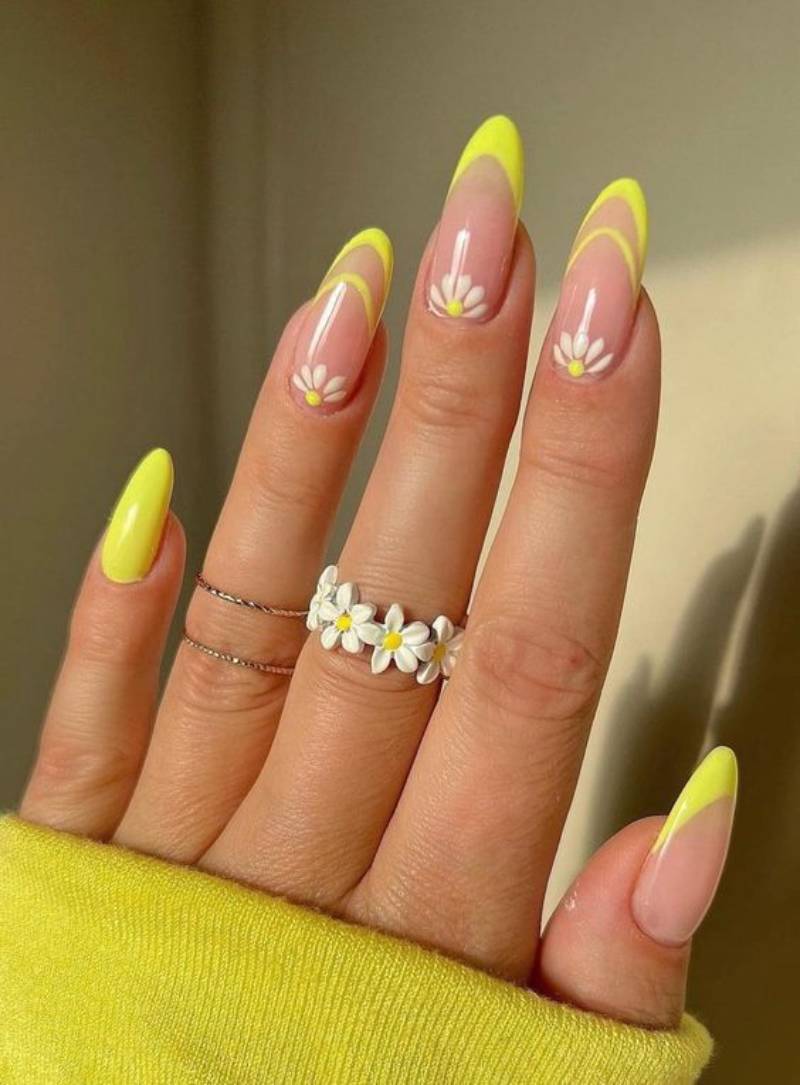
Light Yellow Nails for Summer
Light yellow nails for summer are a soft yet stylish choice that makes me want to go back to the nail artist again, even when my current manicure still has some days ahead. The pastel French design, paired with a delicate yellow flower, creates a subtle, elegant feel that never disappoints. This gentle look keeps your nails feeling light and fresh, perfect for those sunny summer vibes.
How to Achieve This Look
1️⃣ Prep and Shape Your Nails
File nails into a neat oval or almond shape. Buff lightly and push back cuticles for a smooth surface.
2️⃣ Apply a Soft Nude or Pastel Base
Start with a pale nude or very light yellow polish as your base. Let it dry completely.
3️⃣ Create Pastel Yellow French Tips
Use a thin brush or nail guide to paint soft yellow tips on each nail. Keep the lines clean and even.
4️⃣ Add a Delicate Flower Accent
On one or two nails, paint a small yellow flower using a fine detail brush or apply a floral nail sticker.
5️⃣ Seal with a Clear Glossy Top Coat
Finish with a shiny top coat to protect your design and add a fresh glow.
Pro tip: For a more natural look, keep the flower size small and simple—it adds charm without stealing the show.
Neon Yellow Nail Design
If you don’t really feel the vibe of a full-on neon yellow nail design, try a little twist with a nude base. This balances the boldness of neon’s intense shade while keeping the vibrant energy intact.
The nude base softens the look, making it a great fit for everyday wear without losing the bright, eye-catching appeal that makes neon so fun. Which yellow shade will you try first?
How to Achieve This Look
1️⃣ Prep Your Nails
Shape your nails into a neat oval or squoval. Buff gently and clean cuticles for smooth application.
2️⃣ Apply a Nude Base Coat
Choose a soft nude polish and apply two even coats. Let it dry fully before moving on.
3️⃣ Add Neon Yellow Tips
Use nail guides or tape to paint neon yellow tips on each nail. Keep the edge sharp for a clean finish.
4️⃣ Seal with a Glossy Top Coat
Finish with a clear top coat to add shine and extend the life of your manicure.
Pro tip: For extra flair, add a thin gold or white line between the nude base and neon tip—it makes the colors pop even more.
This neon yellow design is a fun way to wear bright nails without going all out, perfect for those who want a lively summer look with a touch of subtlety.
Light Yellow Manicure Idea for Short Nails
A light yellow manicure on short nails feels like a gentle, warm hug—simple, delicate, and perfect for summer. This soft shade brings calm and clean energy, making it an ideal choice when you want a fresh, low-key look that still stands out with natural charm. It’s a subtle pop of color that shows off great taste without needing extra details.
How to Achieve This Look
1️⃣ Prep Your Nails
Shape your short nails into a neat round or squoval shape. Buff lightly and push back cuticles for a smooth base.
2️⃣ Apply a Soft Yellow Polish
Choose a light pastel yellow and apply two thin coats for even coverage. Let each coat dry completely.
3️⃣ Keep It Simple
Skip extra nail art to let the soft yellow shine on its own. This minimalist look is all about natural elegance.
4️⃣ Finish with a Clear Top Coat
Seal your manicure with a glossy or satin top coat to add shine and protect your nails.
Pro tip: If you want a little extra, add a single small white dot or tiny gold accent on one nail for understated flair.
This light yellow manicure is the perfect summer surprise—fresh, easy, and effortlessly stylish on short nails.

Yellow Nails with Animal Print Nail Art
You might not expect it, but yellow nails with animal print accents are kind of a style slayer. It’s an unexpected combo, but one that really works. Something about the light yellow base paired with bold prints makes this design both wild and refined.
If you want something that stands out but still feels polished, this is it. I tried it recently and was surprised by how many compliments I got. It’s playful but with an edge—exactly what summer vibes are made of.
How to Achieve This Look
1️⃣ Prep Your Nails
Shape nails to your preferred style—oval or almond work great. Buff and clean your nails for smooth polish application.
2️⃣ Apply a Light Yellow Base
Paint your nails with two thin coats of pastel yellow polish. Let each layer dry completely.
3️⃣ Create Animal Print Accents
Using a fine nail art brush or a dotting tool, paint black or dark brown animal print spots on one or two accent nails. Keep the shapes irregular for a natural look.
4️⃣ Seal with a Glossy Top Coat
Finish with a clear top coat to protect your design and add shine.
Pro tip: Use nail stencils or stickers for perfect animal prints if you’re not confident with freehand art—it saves time and looks professional.
Yellow Tips French Manicure
The yellow French manicure takes a fresh twist by reversing the classic design and adding subtle nail art. The result is a stylish look that effortlessly earns compliments without you even trying. It’s a modern update that feels both chic and playful.
How to Achieve This Look
1️⃣ Prep Your Nails
Shape your nails to a neat oval or squoval. Buff gently and push back cuticles for a smooth base.
2️⃣ Apply a Nude or Clear Base
Start with a sheer nude or clear polish as your base coat. Let it dry completely.
3️⃣ Paint Yellow Tips
Use nail guides or tape to create clean lines, then paint the tips with a bright or pastel yellow polish. Let dry.
4️⃣ Add Subtle Nail Art (Optional)
Enhance one or two nails with delicate white dots, thin lines, or tiny floral designs near the tips for extra charm.
5️⃣ Seal with a Glossy Top Coat
Apply a clear top coat to add shine and protect your manicure.
Pro tip: Use a fine brush for detailed nail art to keep the look neat and elegant.
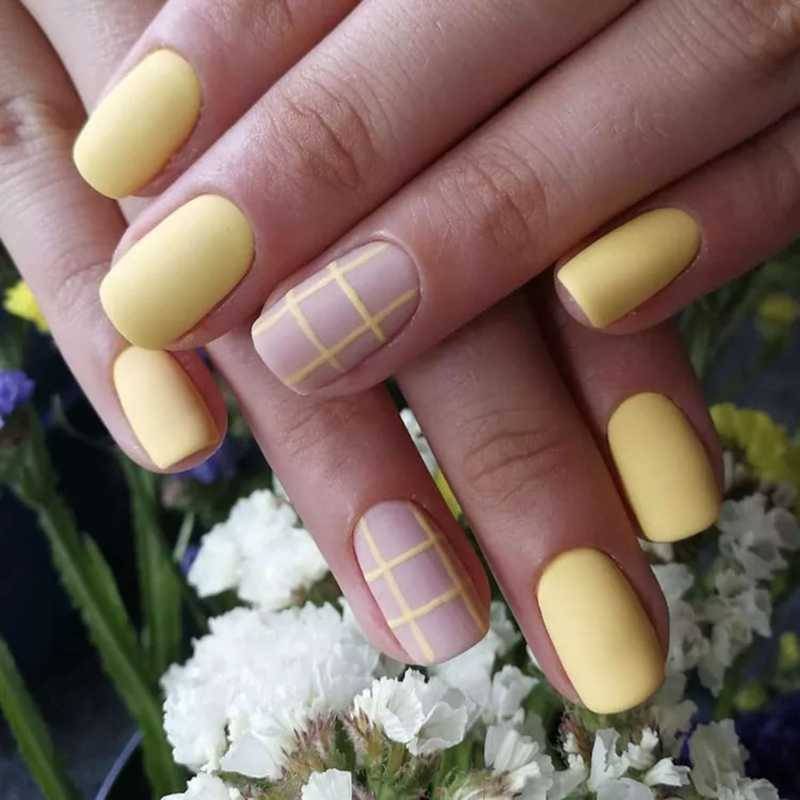
Matte Yellow Nail Designs
For the girlies who love a clean, short nail manicure, this matte yellow look is one of the season’s best highlights. Pair it with silver foil accessories and you’re instantly set for any occasion. It’s a simple yet striking way to keep your nails on-trend.
How to Achieve This Look
1️⃣ Prep Your Nails
Shape your nails short and neat—square or rounded edges work well. Buff lightly and clean your nails.
2️⃣ Apply Yellow Polish
Paint two thin coats of a bright or pastel yellow polish. Allow each coat to dry completely.
3️⃣ Add Matte Top Coat
Once dry, apply a matte top coat to give your nails that smooth, velvety finish.
4️⃣ Decorate with Silver Foil
Place small pieces of silver foil on one or two nails for a subtle, stylish accent.
Pro tip: Use tweezers to place foil pieces precisely and seal them with another matte top coat to keep them in place longer.
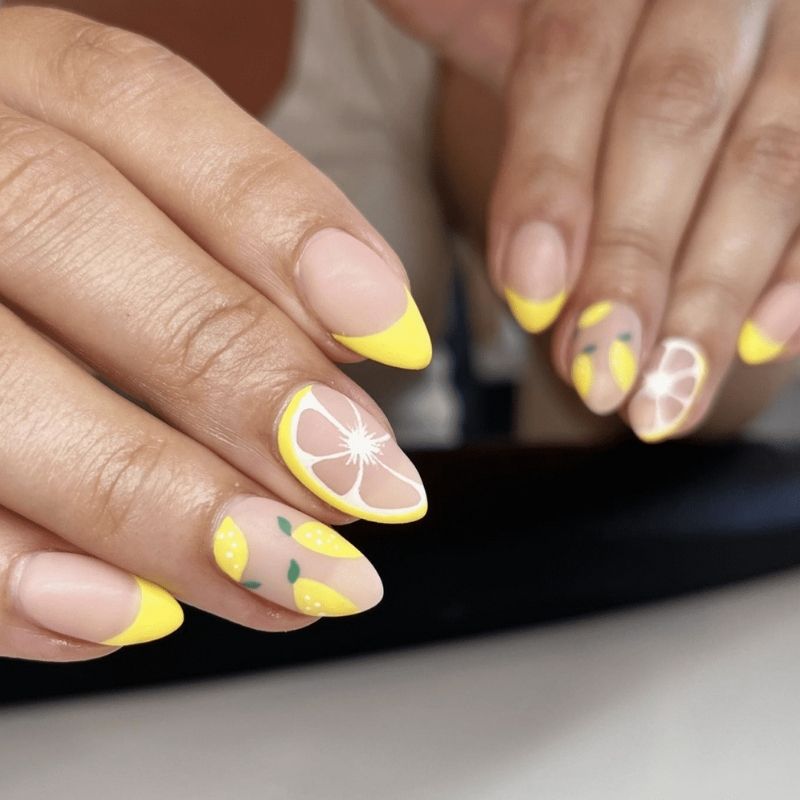
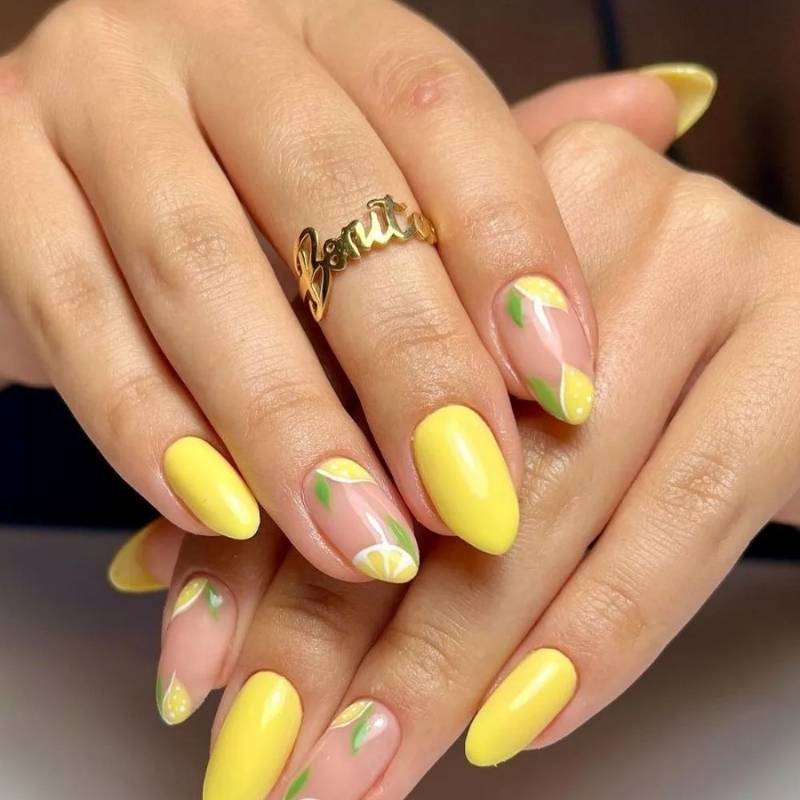
Lemon Department – The Small-Size Version
A short manicure doesn’t have to be dull or stuck with plain colors. This cute lemon nail art is a refreshing pop that catches the eye with its bright charm. It’s proof that small designs can make a big statement.
How to Achieve This Look
1️⃣ Prep Your Nails
Shape your nails short and neat. Buff gently and clean for a smooth canvas.
2️⃣ Apply a Light Yellow Base
Paint two thin coats of soft yellow polish. Let each layer dry completely.
3️⃣ Create Tiny Lemon Designs
Using a fine nail art brush or dotting tool, paint small lemon slices or lemon shapes on one or two nails with white and green details.
4️⃣ Finish with a Clear Top Coat
Seal your design with a glossy top coat for shine and protection.
Pro tip: Practice lemon shapes on paper first to get the perfect small size and neat details.
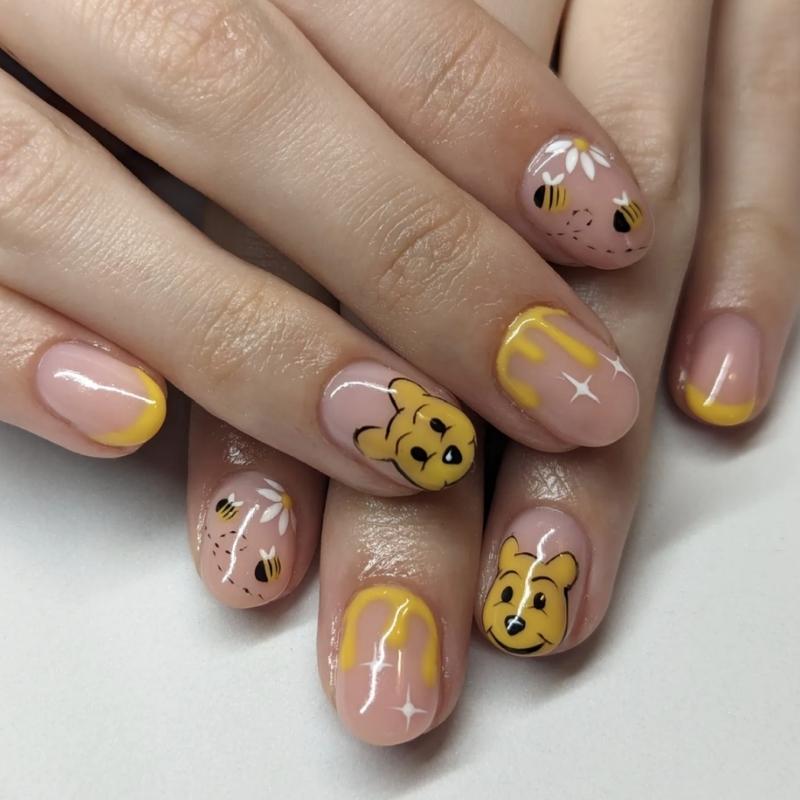
Winnie the Pooh Nails Design
If you love cartoons and adore the yellow color, this Winnie the Pooh manicure is a perfect match. It’s a fun design that instantly transports you back to childhood, bringing a dose of nostalgia right to your fingertips.
How to Achieve This Look
1️⃣ Prep Your Nails
Shape your nails to your favorite style, then buff and clean them for a smooth surface.
2️⃣ Apply a Bright Yellow Base
Paint two coats of a vibrant yellow polish. Let each coat dry fully for a smooth finish.
3️⃣ Add Winnie the Pooh Details
Use a fine nail art brush or nail stickers to create Pooh’s face or honey pot accents on one or two nails.
4️⃣ Seal with a Clear Glossy Top Coat
Apply a top coat to protect your design and add shine.
Pro tip: If freehand drawing feels tricky, use cartoon-themed nail decals or stickers for crisp, easy details.
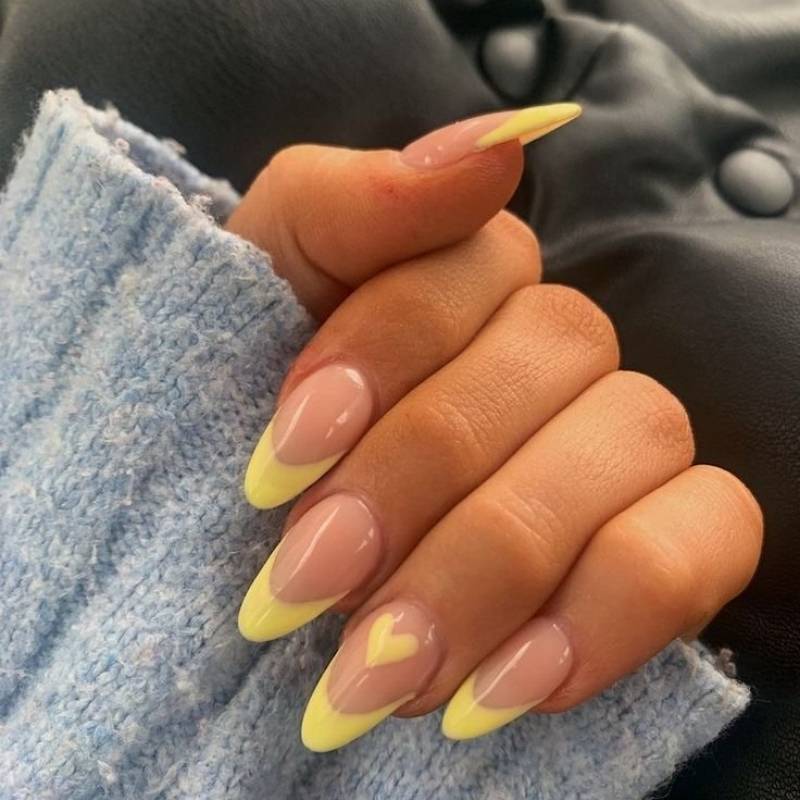
French Yellow Hearts
Nothing beats the charm of French yellow hearts on your nails. Every morning, seeing those cute smiley heart nail art designs gives you a little boost—a portable pick-me-up that lifts your spirits for any day-to-day situation. It’s a sweet, simple touch that combines elegance with fun, making your nails feel both stylish and cheerful.
How to Achieve This Look
1️⃣ Prep Your Nails
Shape your nails neatly and push back cuticles. Buff the surface for smooth polish application.
2️⃣ Apply a Nude or Clear Base
Start with a nude or sheer pink base coat. Let it dry completely.
3️⃣ Paint the Yellow French Tips
Using a bright yellow polish, carefully paint the tips of your nails in the classic French style.
4️⃣ Add Tiny Yellow Hearts
With a thin nail art brush or dotting tool, draw small yellow hearts near the tips or just below the smile line.
5️⃣ Finish with a Top Coat
Seal your manicure with a glossy top coat for shine and durability.
Pro tip: Practice the heart shapes on a piece of paper first for more precise nail art.
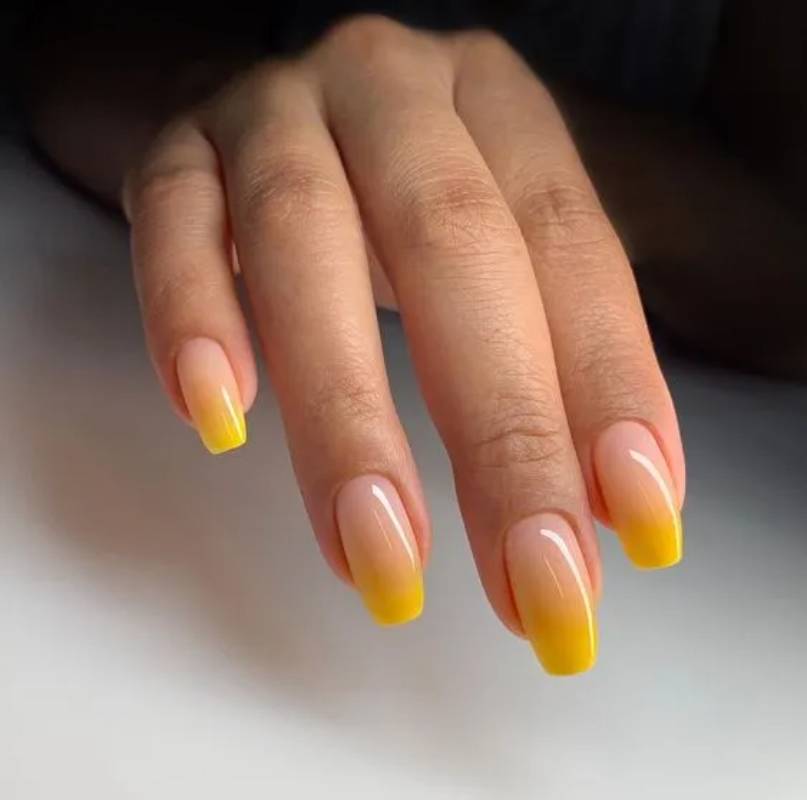
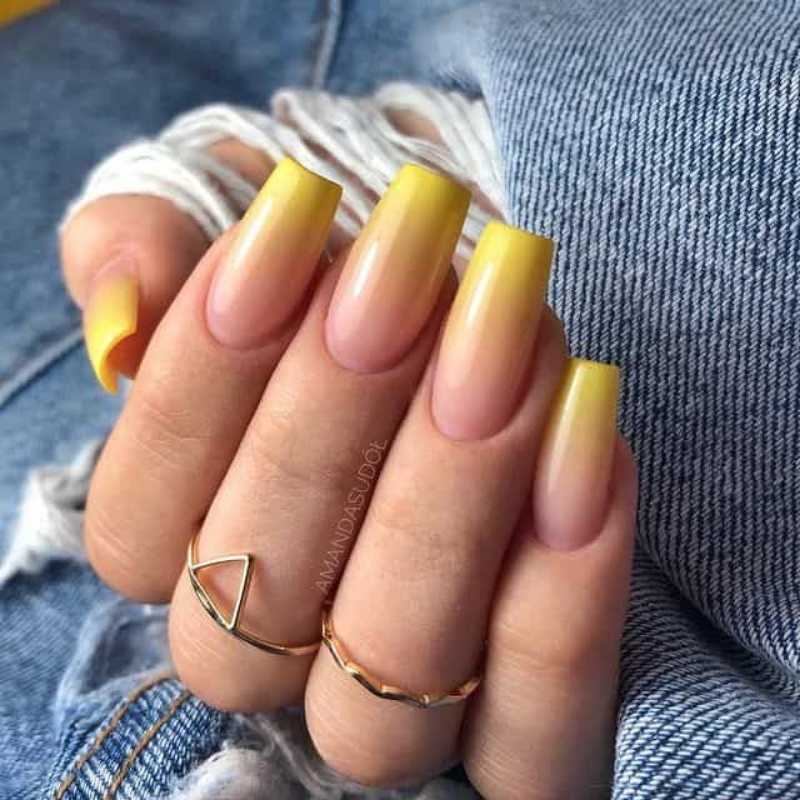
Yellow Ombre Manicure
If you’re bored of plain nails, try something new with a yellow twist. I like picking two accent nails and going for a soft ombre blend of milky white and yellow. It gives your hands a fresh, fun vibe. You can even add a bit of nail art based on your choice to personalize the look. In one of my favorite examples, the combination looked both cool and calm—perfect for any day out or summer brunch.
How to Achieve This Look
1️⃣ Prep Your Nails
File and shape your nails evenly. Clean and push back your cuticles for a neat base.
2️⃣ Apply a Base Coat
Start with a clear base coat to protect your nails and improve polish adhesion.
3️⃣ Create the Ombre Effect
Using a makeup sponge, dab milky white polish at the base and pastel yellow at the tips of your chosen accent nails. Gently blend where the colors meet for a smooth gradient. Repeat until you get the desired opacity.
4️⃣ Paint the Rest
Apply pastel yellow polish on the remaining nails for a cohesive look.
5️⃣ Add Optional Nail Art
If you want, add subtle designs like tiny dots or lines on the ombre nails to personalize your style.
6️⃣ Seal with Top Coat
Finish with a glossy top coat to smooth the gradient and add shine.
Pro tip: Use a light hand while blending with the sponge to keep the fade soft and seamless.
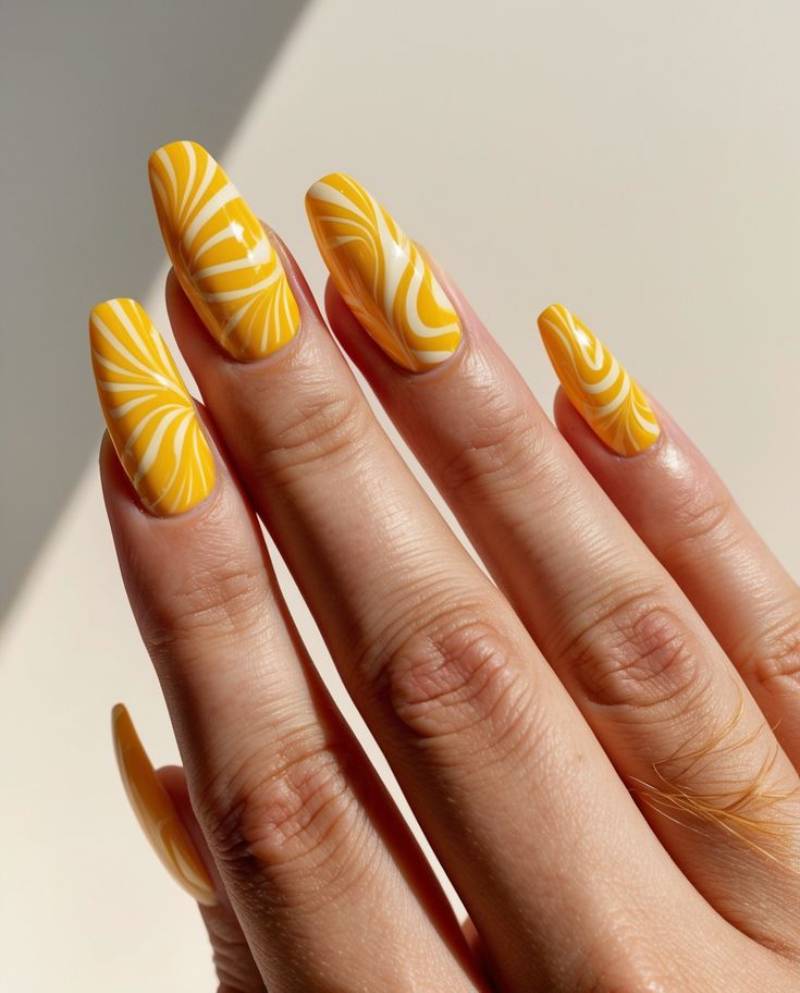
Neon Yellow Nails for Summer Vibes
For something brighter, I recently got a set of neon yellow nails with wiggly lines. Three white accent nails helped balance the boldness and made the whole manicure pop. There’s this sweet spot between simplicity and boldness that really makes this design stand out. If you love playful summer nails, this perfect mix delivers just the right balance.
How to Achieve This Look
1️⃣ Prep Your Nails
Shape your nails and gently buff the surface. Clean and push back cuticles for a smooth canvas.
2️⃣ Apply a Base Coat
Use a clear base coat to protect nails and help the polish last longer.
3️⃣ Paint Neon Yellow Base
Apply two thin coats of neon yellow polish on most nails. Let each coat dry completely.
4️⃣ Create White Accent Nails
Paint three nails with bright white polish for contrast. Allow to dry fully.
5️⃣ Add Wiggly Lines
Using a thin nail art brush or nail pen, draw playful wiggly lines on the neon yellow nails with white polish for a fresh look.
6️⃣ Seal with Top Coat
Finish with a glossy top coat to lock in your design and add shine.
Pro tip: Use quick-dry top coat to prevent smudging your delicate wiggly lines.
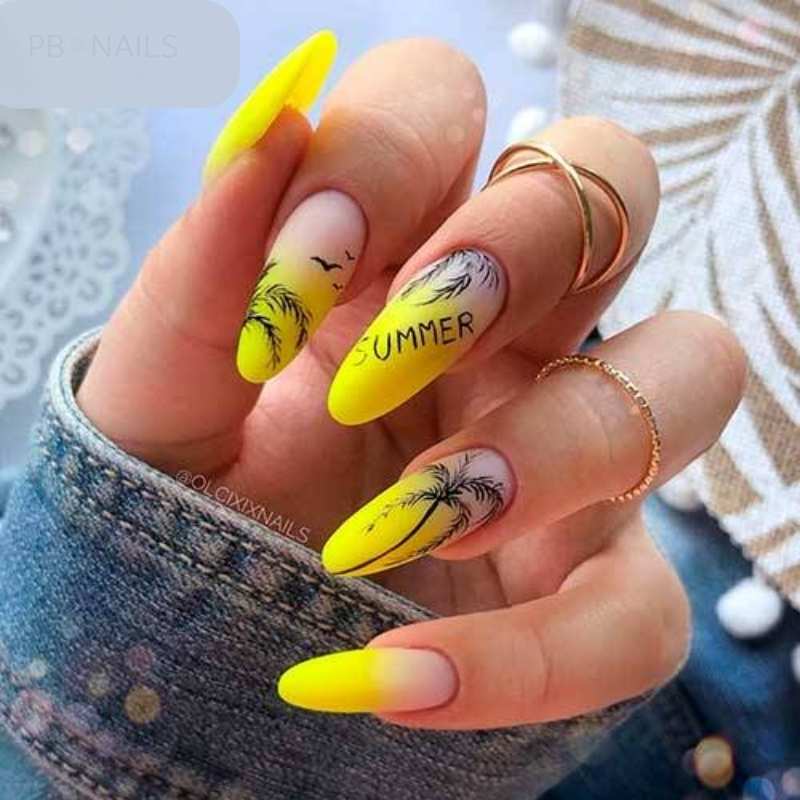
Fresh Lemonade Manicure
This yellow nail design reminds me of fresh lemonade on a hot summer day. It gives that bright, happy feeling as if you’re holding sunshine on your fingertips.
Simple yet refreshing, this manicure brings vacation vibes without leaving your house.
How to Achieve This Look
1️⃣ Prep Your Nails
Start by shaping your nails to your favorite length and gently buffing the surface. Clean and push back your cuticles for a neat base.
2️⃣ Apply Base Coat
Protect your nails with a clear base coat to help the polish last longer and stay smooth.
3️⃣ Paint with Bright Yellow
Apply two thin coats of a bright, sunny yellow polish. Let each coat dry fully to avoid streaks.
4️⃣ Add Lemon Slice Accent
Use a small detail brush or nail art pen to paint tiny lemon slices on one or two accent nails with white and light green details.
5️⃣ Seal with Glossy Top Coat
Finish with a shiny top coat to lock in your design and add a fresh, polished look.
Pro tip: Add a tiny touch of glitter on the lemon slices to mimic the sparkle of fresh lemonade and give your nails a playful summer glow.
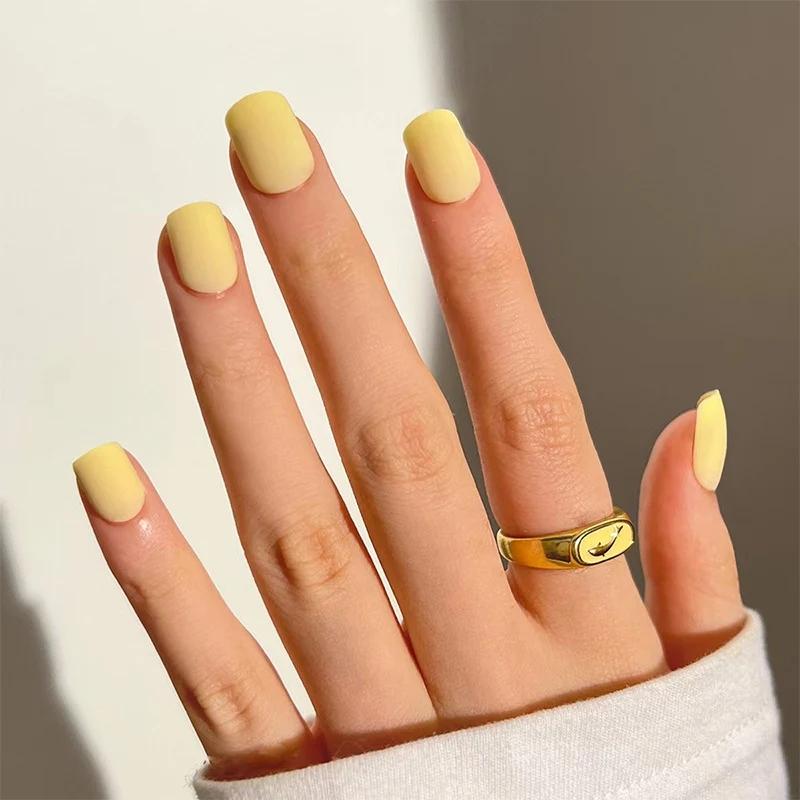
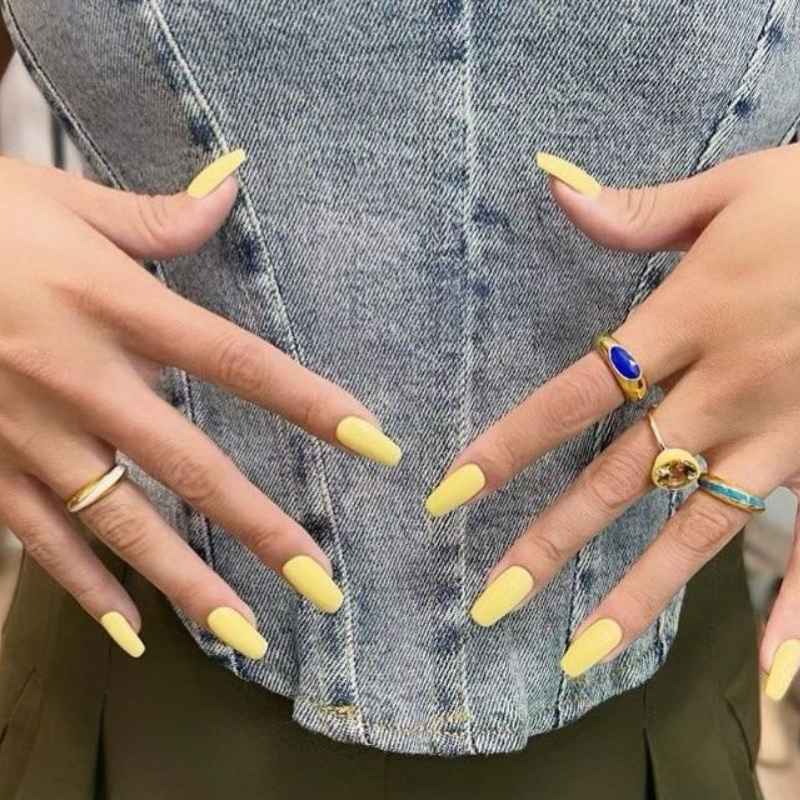
Simple Pastel Yellow Nails
The pastel yellow nails paired with a French design are both simple and stylish. I love the way the stiletto shape adds elegance while staying true to the trend.
Add a few subtle accessories for the cutest manicure that feels soft yet elevated.
How to Achieve This Look
1️⃣ Prep Your Nails
Shape your nails into a stiletto form and gently buff the surface. Clean your nails and push back cuticles for a smooth start.
2️⃣ Apply Base Coat
Use a clear base coat to protect your nails and help polish adhere better.
3️⃣ Paint with Pastel Yellow
Apply two even coats of pastel yellow polish. Let each coat dry fully for a smooth finish.
4️⃣ Create French Tips
Using white polish, carefully paint thin French tips on each nail. You can use nail guides for neat lines.
5️⃣ Add Subtle Accessories
Place tiny silver or gold studs near the cuticle or along the tip to add a delicate sparkle.
6️⃣ Finish with Top Coat
Seal your design with a glossy top coat to protect and shine.
Pro tip: Use a quick-dry top coat to speed up your manicure and keep your pastel yellow looking fresh longer.
Dried Yellow Flower Nail Art
This pastel yellow base with dried flower nail art feels like a breath of a spring day. It reminds me of walking through fields, seeing green grass, and spotting tiny dandelions.
Nature lovers will adore this subtle, earthy style that keeps your hands in bloom.
How to Achieve This Look
1️⃣ Prepare Your Nails
Shape and clean your nails. Apply a base coat to protect your nails and create a smooth surface.
2️⃣ Apply Pastel Yellow Polish
Paint two thin coats of pastel yellow polish. Let each coat dry completely for a flawless finish.
3️⃣ Add Dried Flower Decals or Pressed Flowers
Carefully place tiny dried flower decals or real pressed flower pieces onto your nails. Use tweezers for precision.
4️⃣ Seal with Clear Gel or Top Coat
Apply a clear gel or thick top coat to seal the flowers in place and give your nails a smooth, shiny surface.
5️⃣ Finish and Dry
Let your nails dry completely. For gel polish, cure under a UV lamp as directed.
Pro tip: Use a gentle hand when applying top coat over dried flowers to avoid smudging or shifting the delicate designs.

Simple Pastel Yellow Nails
If you’re into soft glam, the pastel yellow shade paired with a stiletto manicure is a match made in trend heaven. The French design here adds a little extra charm without overpowering the cutest details. Don’t forget to accessorize for that fully polished look—the simplicity here is what makes it elegant and modern, ideal for those who love subtle but stylish nails.
How to Achieve This Look
1️⃣ Prep Your Nails
Clean, file, and shape your nails into a stiletto form. Apply a base coat to protect your nails.
2️⃣ Apply Pastel Yellow Polish
Paint two smooth coats of pastel yellow polish. Let it dry fully between coats.
3️⃣ Create the French Tips
Use white polish and a thin brush to paint delicate French tips on each nail.
4️⃣ Add Accessories
Enhance your look with small nail decals or subtle glitter accents on one or two nails.
5️⃣ Finish with a Top Coat
Seal your design with a glossy top coat for shine and durability.
Pro tip: Use a peel-off base coat if you like to switch designs often without damaging your nails.
Dried Yellow Flower Nail Art
There’s nothing more refreshing than spring on your fingertips. With pastel yellow as a base, this nail art with dried flower accents sends you straight to a sunny field with green grass and dandelions swaying in the breeze. This design blends nature with beauty for a totally flower-forward look that feels like a perfect day outdoors—great for nature lovers who want their nails to tell a story.
How to Achieve This Look
1️⃣ Prep Your Nails
File and shape your nails, then buff gently. Push back your cuticles and apply a base coat to keep your nails healthy.
2️⃣ Apply Pastel Yellow Base
Use a soft pastel yellow polish and apply two thin coats. Let each coat dry completely.
3️⃣ Place Dried Flowers
Carefully place tiny dried flowers or floral decals on one or two nails using tweezers. Arrange them gently on the slightly tacky polish or use a clear builder gel.
4️⃣ Seal with Top Coat
Finish with a generous layer of clear top coat to lock in the flowers and add smooth shine.
Pro tip: To keep the flowers from lifting, press them flat with a silicone tool before sealing with top coat.

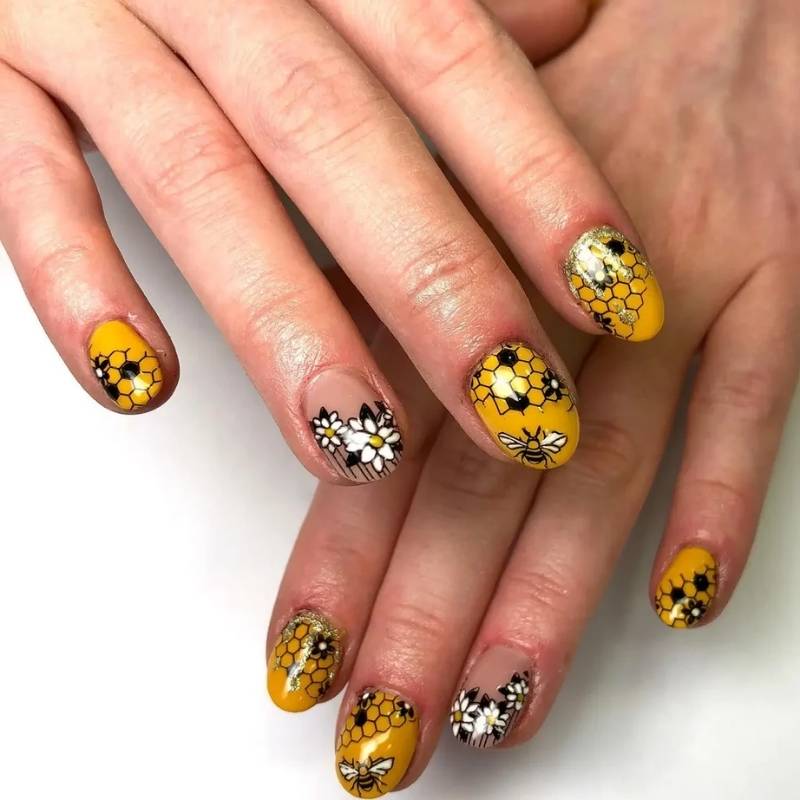
Nature-Inspired Honey Yellow Nails
For those who feel connected to nature, this honey yellow and hive nail art is a stunning choice. Whether in spring or summer days, this manicure reminds me of delicious honey, offering a warm, natural glow that’s both trendy and refreshing.
How to Achieve This Look
1️⃣ Apply a Honey Yellow Base
Choose a rich, warm yellow polish that mimics the color of real honey. Paint all nails evenly and let them dry.
2️⃣ Add Hive-Inspired Accents
Use a thin nail art brush or stamping tool to draw tiny honeycomb shapes on one or two accent nails with white or gold polish.
3️⃣ Optional Bee Art
For a playful touch, you can add a small bee design or use bee decals for a nature-themed finish.
4️⃣ Seal It In
Apply a clear top coat to give it a glossy, smooth look and protect the artwork.
Pro tip: Gold foil flakes or shimmer polish can add extra dimension, making the honey glow even sweeter.
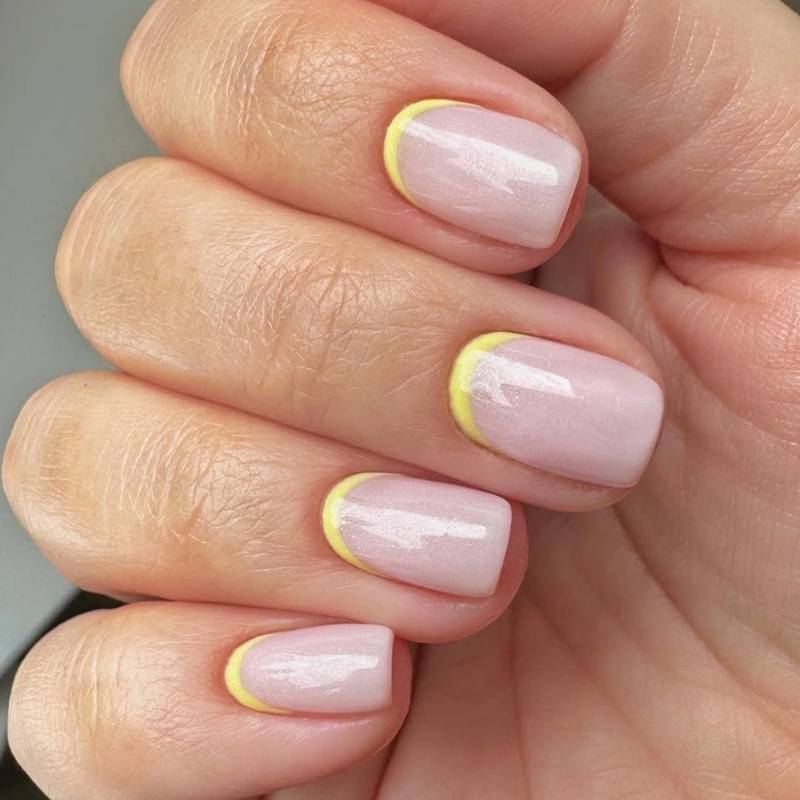
Reversed Yellow French Manicure
If you’re bored of the same old French design but still love the classic look, the reversed yellow French manicure is a clever trick to keep your style fresh without a total change. It’s a subtle twist that brightens your nails while keeping that timeless elegance you adore.
How to Achieve This Look
1️⃣ Prep Your Nails
Start with clean, shaped nails and a clear base coat to protect them.
2️⃣ Apply a Nude or Sheer Base
Use a soft pink or nude polish as your base to keep the look classy and clean.
3️⃣ Paint the Reversed Tips
Instead of painting the traditional tip, apply yellow polish at the base (cuticle line) of your nail in a half-moon shape. A nail art brush or French tip guide can help with precision.
4️⃣ Seal the Look
Once dry, apply a top coat to lock in shine and extend wear.
Pro tip: Add a tiny gold line between the yellow and base color for an extra chic detail that elevates the design.
Yellow nails are more than just a style—they bring happiness, warmth, and a splash of sunshine to every day. Whether you prefer the soft charm of pastel yellow nails, the bold fun of lemon nail art, or the unique twist of a reverse French manicure, there’s a yellow design waiting to brighten your look.
Don’t wait for summer to try these cheerful nail ideas—give your nails the glow they deserve and watch how it lifts your mood and confidence. Ready to shine? Pick your favorite yellow style and let your nails tell your sunny story today!Fle